MINDFUL LEADERSHIP

OTHREE DRYSUITS

Thoughts about the importance of body position and cave diving.

When we agree to lead a cave dive, we have — in effect — accepted a heightened responsibility. From one perspective — an important one — our job as lead diver is to keep our buddy(ies) safe, focused, aware and informed. In the simplest terms, we’ve agreed to get everyone to where we want to go, and — far more important — that on the way there, we’ll make the best effort possible to lay a breadcrumb trail to point the way back to where we started. And all this “work and responsibility” is so our journey back out of the cave can be completed without a hiccup or hesitation; and without any need for an in-situ debate. In other words, our exit will be clean, without stress, and fun.

Let me start off by saying it is a privilege to be the lead swimming into a cave. Even a dive along a familiar route has something to teach us, and leading any cave dive, even the most straightforward one, can be the greatest learning experience whether you are a newbie or a seasoned cave diver. Also, the lead diver is the one controlling the dive’s tempo and — to a great extent — its character. 

What an opportunity!

One simple secret to being successful in this role is communication. And since we can’t natter to our buddies as we swim, we have to use non-verbal ways to get a message across when we’re surrounded by water-filled rocks. Eyes and vision are the best options!

Every cave dive starts with a plan — well, at least it should do — and plans are created on the surface, perhaps with a map spread out on a table, and wetnotes in hand. This is when the route is decided, and this is when waypoints and navigation are discussed. (Other things too are decided, but right now, let’s focus on waypoints and navigation.)

So, let’s say that I’ve been designated to lead a team of three open-circuit divers. We have a particular section of the cave in our sights, and the purpose of our visit is to take an “I-love-me-wall” photograph (or perhaps one for a magazine) when we get there.

At some point during the planning process, I will have transferred the basics of our conversations to a page or two in an underwater notebook. That conversation may have been condensed into no more than a simplified stick drawing of the cave’s main line with mnemonic notes such as “T-Left, T-Left, T-Right, Second Jump Right.” All that’s important is that I’ve created it, shared it with my team, and everyone is agreed that it’s correct.

With our dive goal in mind, my team and I will have also worked out how many reels, spools, and navigational markers I need (and they need) for this dive, including how and where each will be deployed.

Great, all straightforward so far; now I just have to do it in the water, during the dive, making sure I get everything in the right place, and at the right time, with fluency and skill. For a relatively experienced and active cave diver, that in itself should be relatively easy, and should be fun; more of a challenge is that my teammates have to SEE me do it, agree with my placements, and understand the consequences of any navigational decisions I make and mark. I also need visual confirmation from them that it’s okay to continue. In short, we need to communicate with each other throughout our dive but most definitely when there are decisions to be made and confirmed.

Key to these needs is positioning myself in the cave so that I can:

  1. see the main line and the line in the tunnel we’re jumping into (or at least the tunnel itself
  2. See my buddy(ies)
  3. Back-reference where we have been
  4. Scope out where we are headed.

To accomplish all of this, the way I orient myself becomes a critical communications skill. Clearly, the practice of laying in the water, ahead of my companions, facing forwards with the mainline — or whatever I’m working on — immediately in front of me and shielded from everyone else’s gaze is unacceptable and it’s lazy. Unacceptable because doing so is potentially dangerous. Lazy because with a little effort, we can do it properly.

Take for example if I were too lazy to place a marker at a line T; or if I swam across a gap without my buddy noticing? Or if something similar happened with a set of markers indicating the mid-point between two ends-of-line? Or if I obscured another team’s line markers from my buddy, and on the way back, they confused her. (Remember, when we turn our dive to head home, she — my buddy — will be leading.)

These what-ifs may be unlikely, perhaps, but nevertheless possible.

And so, the easy fix is to be aware and present at all times, know exactly what has to be done “right here, right now,” and to make a point of positioning myself correctly at every main decision point and to be sure my buddy(ies) can see me (eye contact) and can see exactly what I’m doing. 

(By the way, if you have ever asked yourself why your cave instructor insisted you learn helicopter turns and back kick — possibly beating you with a wet-noodle until you got it right — this is why. Precise control of your body position and orientation in a cave is a required skill for anyone going deeper into a cave than the drip line.)

For the record, decision points include, but certainly are not limited to:

    • Running a primary reel to the main line and installing an attendance marker
    • Making a planned jump by installing markers and line
    • Approaching a line T and marking it with a cookie or REM
    • Passing a jump but not taking it
    • Passing fixed line arrows indicating distance to end-of line
    • Passing fixed directional markers indicating an end-of-line different to the intended exit and marking/cancelling them
    • Passing another team’s spool, jump reel, line marker(s) or anything that may be confusing especially in a lights-out/low-vis exit
    • Dropping or retrieving stage or deco bottles
    • Any point during the dive where you want confirmation which way is “home”

Correct body positioning is simply a function of fore planning and common sense. Take for example setting a jump. An acceptable procedure for RAID divers is:

  1. Thinking ahead I prepare my line markers and a spool
  2. As we approach the jump, I signal the jump is ahead and get confirmation from my team that they understand what’s ahead
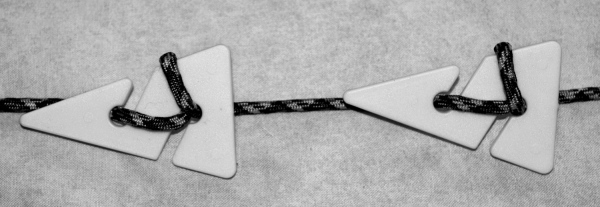
  3. At a convenient spot but within reach of the line and close to the marker or markers indicating the jump, I stop and change my orientation in the cave so that I can see the main line in both directions (and “okay” it if need be), I can see my buddy(ies), I can see the end of the jump line into which I’m going to tie my jump spool. (See diagram below.) 
Three divers and relative body positions

The team are going to jump to the left… The lead is correctly oriented to both see and be seen.

  1. I install my cookie indicating the direction of “out” and install a spool or jump reel
  2. I indicate the direction of “out” to my buddies with a hand-signal, and get confirmation
  3. I show them the direction I’m going to swim and when possible the bitter end of the jump line I am tying into
  4. I signal OK, wait for confirmation, and make the jump and install an attendance marker on my line close to my tied-off spool
  5. When the jump line is installed, I move away and orient myself to watch my buddies swim across and inspect the jump spool — confirming it is installed correctly and adding their personal attendance markers
  6. Everyone signals OK, I reorient to the direction of the jump line, and continue the dive.

Of course, different circumstances, and factors such as the size of the passage, the length of the jump, and the size of the team may require a slightly different approach, but what’s important — and a key pillar in safe cave diving — is that the lead diver takes the time and makes the effort to include his/her buddy(ies) in the decision-making process and pauses long enough to get confirmation that everything is understood and Okay at EVERY decision point. 

All this does take time. On a dive with complex navigation and five or six jumps, making the effort to be a good lead would add eight or ten minutes to the overall length of your dive. Who knows, perhaps more. However, taking the trouble to do things properly may mean the difference between everyone getting out as a team or not.

Yea, it’s worthwhile.


Steve Lewis is an avid diver, best-selling author, adventurer and motivational speaker. Among other eclectic pursuits, he is also a RAID Cave instructor-evaluator.

© Steve Lewis, 2019. 

Contact training@techdivertraining.org for more information or for permission to republish / share this essay.

HOW CAN I EXPLAIN THE ATTRACTION OF WET ROCKS?

OTHREE DRYSUITS

A LOVE LETTER OF SORTS…
Somewhere on the simple, spiral DNA roadmap that each of us has inside every cell in our body is a tiny snippet of code that connects us to the desires of our first human ancestors; and beyond. And somewhere in that snippet is an even smaller piece of ageless programming that yearns to belong to the sky. Secretly, and deeply in our cultural past, we envy the birds, and crave to soar above this beautiful planet and for a short while, escape the relentless pull of gravity.

This lust for flight is hardwired in each of us; it is innate, nobody is immune to it. In a few of us, the appeal, is so strong we are driven to do extraordinary things to satisfy it. I choose to cave dive; and rather than giving into that desire, that hunger for flight, by soaring above the Earth, she allows me to float inside her; deep in her underground rivers; her canyons; her dark spaces. She has shared with me her secrets, and I love her for allowing me to enter into those places, to see her wonders, touch her delicacy, become lost in her beauty.

The principles of diving are simple. Basic physics manifest in weightlessness. Water supports us. With practice, we can hover in the water column without effort. With practice, we can spin, turn, glide, soar, dive, and somersault with a carefully applied and skillful flick of our feet. The cumbersome equipment we require to be comfortable, to see, to navigate, and to breathe in water disappears and we experience a unique freedom. We really can become one with the water; one with the earth. This is a form of worship.

In clear water the overall sensation of this experience is of flight; we are flying. The ocean offers this, but caves are, for me at least, more compelling, and the water in many caves is a clear as Evian water. The sensation of flying is within easy grasp.

The features of a cave — its decorations, its furniture, its rooms, cathedrals, crawl spaces, and sculptured, fractal surfaces, float by. Art. Just art.

So caves are special, and cave diving is a privilege extended to few. It is a small club, and membership can be expensive. Earth is a jealous lover. When she accepts you and allows you inside her, she expects your total respect and monogamy; an odd resentfulness of other mistresses. I have buried too many friends whose lives have been snatched from them for no greater reason than for a brief instant, they forgot to tell her how much she meant to them, they became complacent, they forgot to be gentle with her, and forgot to submit to her vanity and ego; they did not comply to her rules. And she allowed them to perish.

Perhaps all cave-divers are running on borrowed time. I cannot say. I have given in to the Earth’s fatal attraction. I have stopped worrying about that; I have been lucky. She allows me to woe her and accepts my devotion. She has guided me, and watched me fly through places no other human has seen. I have hung motionless except for the beating of my heart, loud and persistent in my ears, and looked at scenery veiled in darkness since the beginning of time; a place that has never allowed any other human to look at it. The Earth and cave diving have given me this.

And yes, it is only wet rocks, but to me this scenery is as beautiful as any reef, any wreck — and god knows the temptation to be unfaithful is present in them — however, reefs and wrecks are simply platonic relationships; pleasant dates, a brief press of the lips at the end of our time together. Caves are the object of a deep, visceral, want; a lust; a true love.

And you, my little Barefoot Forest Imp, understand and forgive my infidelity; and for this gracefulness, I adore you too.

How do I get there from here… Step one on the road to Technical Diving

othree-banner-v2-b

Here’s a very simple piece of advice if you’re being pressured — by your mates, your instructor, or a little voice inside your head — to sign up for a dive class. BEFORE wasting time and money on another course and its accompanying piece of plastic (or eCard): “GET A PLAN.”

Base that plan on what you want out of diving, and how much of your free time — and disposable income you want to dedicate to your plan.

Also, it will help motivate you if you work towards your goal with a buddy who has similar aspirations. Kinda like having a running mate who you can trust to ignore the rain and the wind, and to meet you at o-dark hundred on winter mornings to jog 10 k.

And finally, be realistic with your schedule. You will be doing yourself a disservice piling training sessions one on top of the other. PACE yourself. There’s no prize for the one who “finishes” first.

(Well, two things about that: there is no finish, at least none I can see. After more than 20 years teaching technical diving, I’m still learning; Secondly, you will grow more and become a better diver by punctuating your dive trips (read “experience gathering expeditions”) with targeted training sessions rather than the other way round. There is certainly no set ratio; everyone is different, but think about starting out by saying for every thousand dollars/pounds/Euros/shiny beads I spend on travel, I’ll put 200 in my training fund piggy bank.)

Okay, so here are ten tips to help you get your plan created:

  1. Have a long-term goal in mind. “I wanna dive the Empress of Ireland, the Bianca C, and the MS Mikhail Lermontov; I want to swim the Grand Traverse; I see my future-self on a rebreather at 100 metres taking samples for scientific research; My daughter and I have a trip to Truk Lagoon planned and I wanna be ready, etc.” All perfectly valid goals. Write yours down on a piece of paper and stick it on the fridge door.
  2. Create a budget for time and money. Quality training cost money. For many classes with a professional instructor, you should be planning to spend $250 – $350 per person, per day on average. Most classes, complex classes like cave or decompression or basic CCR, can last five or six days. By all means research your choices; get booked with someone you’re happy with, but don’t skimp on money or time.
  3. BEWARE of any operation/individual guaranteeing you’ll get certified. Technical certifications are earned not bought, who knows how you’ll do? There are no guarantees you’ll pass; but a good instructor will make sure your experience will be money well-spent.
  4. Create a timeline… with waypoint so your progress can be followed. You’ll need help with this. Ask advice. Then get a second or third opinion. The answers will tell you a lot about the instructors/operations/dive shops you ask!
  5. Think laterally when searching for help with training (your pathway might take you away from your local dive shop and towards an independent professional, it may take you to the next town or out of the country. So, THINK GLOBAL… it’s make you grow.
  6. Ask: Am I ready to have most of what I know about diving, challenged and modified?
  7. Am I willing to travel?
  8. Do I do well with constructive criticism? Technical instructors are trained and conditioned to pick bad habits apart. The process can be unsettling for a student with “issues.”
  9. Are you aware that going deeper, staying longer, breathing different gases, swimming in overhead environments all carry more personal risk of injury, death or worse?
  10. And finally, you need to understand and appreciate that some forms of diving are addictive. They will take over your life. Are you ready for that?


Good luck and “Dive Safe!”

Stage-bottle logic

OTHREE THERMAL PROTECTION

There are different schools of thought about the “best” way to manage gas volume when cave diving with stage bottles.

The so-called traditional method is to treat the gas carried in stages, exactly as the primary gas supply: breathe one-third on the way in; one-third on the way out; and leave one-third for contingencies. If nothing hits the fan on a dive following this method, divers surface with stages, and primary cylinders each about one-third full.

Yet another option is “half + 15.” With this method, contingency gas for the stage is carried in the primary cylinders. This method requires a little more thought and arithmetic; but is considered by some to be the most conservative and best method when multi-staging. If everything goes smoothly when employing this method, divers surface with stages close to empty, but with all the contingency gas in their primary cylinders, which — with a single stage — translates into the primaries (twins or sidemount) being around half-full or more.

And finally there’s the seat-of-your-pants method which like half + 15, allows around half the volume of the stage bottle to be breathed, but critically, unlike half + 15, does NOT preserve any additional contingency gas in one’s primary cylinders. Provided nothing goes awry, divers using this “technique” surface with empty stages and primary cylinders with about one-third remaining. You don’t have to have a phD. in risk assessment to realize this is the most “liberal” way to dive stages; if anything dramatic happens, it can mean that divers do not surface at all.

But let’s leave discussion on the pros and cons of each method as the topic for a later blog post. Let’s focus instead on an error we should avoid when diving with stages in a cave regardless of which gas management rule we follow. That error is dropping a stage immediately its turn pressure has been reached.

It seems to be a more logical, more conservative, and therefore better practice to carry the stage and it’s extra gas a little further into the penetration.

Let’s look at a couple of disaster scenarios, and see why the habit of carry stage bottles a little deeper tends to be the better option.

Two divers (the ubiquitous Diver A and Diver B) have planned a stage cave dive. For the sake of simplicity, each is using the same size primary cylinders and each has the same sized aluminum stage bottle. Each has identical consumption, and fill pressures in all cylinders are identical. (An unlikely situation, but convenient for our purposes!)

Also, to forego any confusion over bar/litres or PSI/cubic feet, let’s consider the starting pressure in the primary bottles as 3P; and in the single stages as 3S. Our divers, A and B opt to dive following the Rule of Thirds in both primary and stage bottles.

OK, scenario one: Our divers begin their dive and, conventionally, breathe from their identical stages to start their dive. After a pressure drop of 1S, they drop their stages… each has 2S of gas remaining .

They swim on breathing primary gas. They each consume 1P of primary gas and signal “turn the dive.” At precisely this moment, Murphy joins their dive, and Diver A has a massive problem with his primary gas supply. He signals his buddy, and they share gas. Now Diver A and Diver B are breathing from Diver B’s 2P volume of gas.

If things go well — no entanglement, no slowing down because of restrictions, no elevated breathing rates, no taking a wrong turn in the confusion, and no arguments over navigation — they make it back to their stages with zero pressure in Diver B’s primary cylinders.

They grab their stages, and spend the rest of their exit thinking about how close a call they just had. They each surface with 1S pressure of gas in their stages, but zero in their primaries.

OK, scenario two is similar: But in this case Diver A and B when they have consumed 1S of the gas in their stages, switch to their primary gas, and opt to carry their stages a five or six minutes, or more, further into the cave before dropping them.

At the same point in the dive — just after the turn — Diver A suffers the same disaster, and has nothing to breathe. So, both exit breathing from Diver B’s 2P volume of gas; however, in this case, they reach their stages a few minutes earlier than in scenario one. There is gas in Diver B’s primary cylinders when they pick up their stages and continue their exit, during which they give thanks that they carried their stages further into the cave.

They surface with less than 1S of gas in each stage having perfectly justifiably used some of the reserve contingency gas in those stages to exit calmly. Diver B has some gas in her primaries; and, as in scenario one, Diver A’s cylinders are still empty.

Now we might argue the likelihood of the type of complete gas loss Diver A suffered in both scenarios one and two as remote… highly rare, probably impossible. But what cannot be disputed is that in scenario two, by carrying their stages for just a few extra minutes during their swim in, they had contingency gas placed in a better place than in scenario one.

We can debate how best to manage contingency gas volumes in stages (there may be benefits to each method), but in most cases it seems a better, more logical option to think before you drop; and wait.

Dive Safe!

Double Arrows… what do they mean exactly?

OTHREE DRYSUITS

Cave divers have a secret code… well, according to a non-cave-diving buddy we do. And perhaps she’s right; we do have a few odd hand-signals that are specific to cave diving.

What I did not mention to her when explaining the peculiarities of “ I’m Stuck,” “Changing Second Stages,” “Tangled in Line,” and “Okay buddy, I’ll help yer, but you’re gonna owe me…” was that some of the basic signs we take for granted in North America, are not universal in every cave-diving community.

Double arrows indicating proximity to a jump / side passage is a good example. (See the photo below.) Outside of North Florida, this may or may not signal what it does here: time to tie in a jump spool, fix attendance cookies to the gold line, and “Let’s go roaming!”

JUMPARROWS_BW

What’s perhaps more baffling is that even in the North American cave diving community, there’s a general misunderstanding about what exactly is meant by another set of double arrows.

The picture below shows two directional arrows pointing in opposite directions. Similar but with a very significant difference… well different certainly… but how!?

ENDLINE_bw

Until recently, I thought it generally accepted that this particular configuration indicated the mid-point between two “Ends of Line.” But during the past month, diving various caves but none separated from another by more than a two-hour drive, I heard it referred several times as indicating a “Safe exit in either direction” or “The halfway point between two exits.”

While it’s a fact that an end of line — a break in the main line — is usually where the overhead has a hole in it and daylight streams into the blackness of the cave proper, that is absolutely NOT the same thing as a safe exit; and the difference is more than a question of semantics, with the potential for a bad day ahead for assuming it is.

So, lets think about why this is.

A cave diving team, unless one of them’s clairvoyant, can only be sure of one safe exit: the one they came in by. Everything else is a mystery, and in truth, in a few cases there’s no absolute guarantee that when they get back to the hole they came in by, it’ll still be passable. Perhaps the only sure bet is large, open caverns like the entrance to Jackson Blue Springs in Jackson County, on Florida’s panhandle.

Caves, and especially sinkholes, have a dynamic nature. A sinkhole that a diver could climb in and out of yesterday, may have suffered a mini-landslide overnight making it impassible today. A tree providing shade last week, may have had its root system undercut by yesterday morning’s downpour, and is now sitting in the sinkhole like Aunt Zenia’s potted aspidistra: short of digging out, there is simply no exit now. A rock may have fallen from the ceiling a few feet from the sinkhole blocking access with an immovable chunk of limestone and 40-million-year-old fossils.

So, that’s why it’s a little risky to assume the mid-point arrows indicate anything other than equal distance between two ends of the main line, and nothing more… at least that’s the case in North Florida.

“Teaching” yourself Situational Awareness (SA)

OTHREE DRYSUITS

SA is not easy for an instructor to teach. Since some level of SA is innate for most of us, many instructors opt therefore not to include an SA module in their technical diving programs, preferring to simply “mark” a student’s SA as there or not there. Of the instructors who DO include SA in their classes, most do so with an understand that their role is to create a non-threatening, learning environment… she/he facilitates rather than teaches, because, with a little guidance, most students — with direction — do fine once they’ve been show the value of SA. It’s more efficient that way, but hereare some “techniques” I believe may help you (or your students if you teach) become more aware: more clairvoyant. 

Awareness — both in water and out of it — is a choice. We have to choose to build awareness of what’s happening around us: and how what’s happening now can influence what is going to happen next either positively, or what’s more important, negatively. So, when we dive — and especially when we dive deep or in tough conditions, or in an overhead — rather than being pushed from moment-to-moment with the flow as it were, and with no idea of what comes next, we can project “current events” into the immediate future. This  helps to protect us. With this skill, we can focus on things that matter — threats — and ignore the superficial and unimportant things that have no real importance — things that are simple distractions. Developing this skill takes time, but — with very few exceptions — we are all capable of its mastery. And without exception, developing and refining this skill will make every diver a better diver.

First we have to understand what a baseline is. A baseline is normal activity: noise; motion; actions; a series of things unfolding as they should in an anticipated order; everyday things that signal things are just fine and will stay that way — at least until something changes… and it’s that change we need to notice, understand, and be mindful of its implications.

Here’s a suggestion: begin in a quiet space… like a park or backyard. Be still and silent. Listen to what’s going on around you. If this were the 1970s and we were sitting around burning incense, and a block of Hash, I’d say: “Still your mind.” Since it’s not; and we’re not, let’s simply say, Focus on this baseline; it is the norm for that environment AT THAT TIME. Consider anything a threat that is not part of it; any odd noise, movement, circumstance… a dog suddenly barking, for example. Consider anything out of the norm, a potential threat… develop a healthy paranoia!

If possible, have someone introduce non-baseline “threats” — a footfall, a mobile phone alarm, a ball being kicked, a door opening, closing, being locked. Learn the appropriate reaction to each. Practice, practice, practice…

Try the same exercise in a shopping mall… more noise and a different baseline, but a baseline nevertheless.

Building awareness of the environmental baseline will help you to switch focus onto things that carry the potential to derail plans or possibly harm.

Now move your baseline awareness exercises to confined water

The secret of making any progress at all is to be relaxed and to be able to maintain your position in water column with quiet hands and feet. Your “consciousness” has to be directed away from yourself, so if you’re constantly fighting for buoyancy and trim, you will not have enough awareness left over to gauge and monitor the baseline!

Once you can focus on the baseline, have a buddy introduce “distractions” (displaying minor simulated problems with gear… letting an unclipped backup regulator hang loose, a fin strap not in position, a mask fogging up, rapid breathing, etc.) Practice these simulated “threats” during skills development dives. Document what is noticed and what is not. Simulate multiple oversights in gear and technique between you and your buddies… errant fin strokes, loss of buoyancy control, failure to respond to hand-signals. Make your debriefs learning exercises.

Enlightened self-interest tells us that a problem with our buddy’s gear, his or her piece of mind, lack of skill, is a potential  problem for us. That’s one of the most important values of good SA!

Most of all, apply what you learn on every “real” dive not just “practice” dives. Try to expand your SA every time you get into the water. I guarantee you’ll get more enjoyment — and less threat — out of your diving.

Save

How to get the most from a technical diving program/course

LongO'THREE

A common question is “What skills should I practice before my class with you?” The question is basically the same regardless of the course in question: intro-to-tech, full cave, it doesn’t seem to matter.

Oddly enough, the least helpful answer, is to send out the list of skills published in the instructor’s guide, and nothing else. Well, I guess it’d be less helpful not to respond at all, but a bare list of skills without any guidance, order of importance, value, or expectation of performance, doesn’t really tell much of a story; and certainly, is unlikely to help anyone prepare in a meaningful way. For example, what does adequate predive planning (taken from the standards for a major tech agency’s Cavern Course) mean in the real world?

If you’re signed up for a technical diving class this winter, next spring or whenever, and you’re wondering how best to prepare for it, the following tips may help.

First: if you haven’t already, speak with your instructor. Ask them about the class, get an agenda… what happens on day one, day two, etc. Ask for a breakdown of what they expect you to show them on each dive. Ask about their expectations regarding performance… what’s a pass, what’s a redo? Find out how much course time is practice time!

This last point is vitally important. A good class with lots of inwater time, will get you started on the road to building good habits. For example, the key to success in an entry-level cave or advanced wreck program is having enough time doing dryland drills to get the subtleties of a task – such as body position, where to point a light, how to hand off a regulator – refined enough to demonstrate well.

Secondly: study the equipment list, work out what’s gonna be a new experience for you, and practice how to use it. Reels – essential in so many tech programs, especially cavern, cave, wreck, and deco – are not all created equal, and even students who have first-class models, get screwed by their reels almost as soon as they get into the water. If you’re determined to buy BEFORE you start the class in order to get some practice, think simple and avoid gadgets. Here’s a model I use and recommend.

lightmonkey400

Also, most reels – including the one from Light Monkey shown above – come from the manufacturer loaded with too much line. It swells in water and with use, and falls off the edge of the spool. Take off line until there’s a half centimeter minimum of reel’s (or spool’s) body showing above the line. Here’s a picture of mine…

mylightmokey-200Notice, it is a similar reel (this is the 200 and the 400 is shown above), same manufacturer, but with line removed and a loop of equipment line added for the double-ended clip to make it hang a little more easily when stowed.

Also, learn where the new gear is going to be stored. Develop the muscle memory (the habit) of knowing how to get at it and then how to restow it. Every cave instructor has watched as one of their charges spends minutes searching for a line marker or struggling to stow a backup light.

Thirdly: relax. Arrive at your class rested and ready to learn.

And lastly: There is something called “instructor-induced narcosis.” It sometimes kicks in as soon as a student’s head disappears below the surface. Most instructors are expecting it to happen, and it usually has more of a negative effect on the student than the instructor. So, don’t sweat it! Take a deep breath, work out where things went wonky, try again.

Most of all, remember grow your skills, experience, comfort zone at your pace… and have fun!

Save

Save

Save

Save

A thought experiment concerning “team bailout” when diving CCR in a cave…

LongO'THREE

First off: Can anyone explain the rationale behind “Team Bailout?”

Hang on… that needs to be rephrased.

Let’s start with this: Is it just me or is the concept of “Team Bailout” for CCR Cave Diving just bat-shit crazy?

Yea, that’s way closer to what I was thinking…

Ok, for those of you who may not be familiar with the team bailout concept, it suggests that a buddy team diving CCRs in a cave environment – you know, wet rocks, hard limestone overhead, perhaps an hour or more from the surface – that they carry sufficient bailout gas “…to get one team member back to fresh air from the point of furthest penetration.”

In certain circumstances, this approach may sufficiently protect team members from harm, but those circumstances should not include the category of diving the vast majority of us engage in.  I believe, a better, more satisfactory practice is for EACH diver to carry MORE gas than is required to get themselves back to fresh air from the point of furthest penetration.

The arguments I’ve heard against using this more conservative tactic is: 1) carrying multiple bailout cylinders is a pain; 2) the likelihood of more than one CCR failure among a team is too slight to consider; 3) calculations for the volume of gas required in a high-stress situation adhere to a well-defined formula corrected for all variables, and therefore it is possible to calculate with a degree of accuracy sufficient to be safe.

Experience is a better guide to best practice behavior than deductive logic, and I have limited experience in this area. So, perhaps my paranoia is unjustified; but here’s a scenario we might all give some thought to before our next cave dive.

Here goes:
Three CCR divers were in the back of a low-flow cave. Each carried an aluminum 40 filled to capacity, which lumped together was enough gas to get any one of them out of the cave and back to dry land. Even at double their normal consumption rate, this was the case. Their dive was well within the parameters of team bailout therefore.

At the worst possible time, Diver A’s CCR went belly up. He could not revive it in any way, and has to bailout. The team began its swim out. A little sooner than expected, but still more than one-third of the way out, Diver A’s bailout cylinder was empty, and he asked Diver B for her cylinder. She suddenly realized that by giving it up, she will have no contingency gas herself. The surface was still a good swim away. Very reluctantly, she handed over her bottle. Momentarily distracted by her thoughts, she floated to the cave’s ceiling and took a minute to recover, which held the team’s progress to the surface still further. Stress levels in all three team members was now peaking. None of them was comfortable.

They were in fact, more small failure, one additional glitch away from a total melt-down. A surprisingly short while later, Diver A – who had been thinking for the past several minutes, what would happen if he got a bottle with a dodgy regulator or had a free-flow, and whose respiration rate had understandably elevated – once again was down to seeds and stems. This time in his second bailout. He turned to Diver C. Diver C had been thinking about this hand-off for a while. He was VERY uncomfortable donating his gas… however, he did so. Several minutes later, the team arrived in the cavern area. Diver A had barely sufficient gas to conduct a safety stop, but did so. Just as the team left the overhead, his regulator began to breath very, very hard.

On shore, while shucking their gear, the group was uncharacteristically silent, each with their own thoughts. What do you think the outcome of this incident was:

  1. This group did not cave dive together ever again
  2. This group rethought their bailout strategy
  3. This group  continued to dive team bailout

Save

Don’t even think about asking for an overfill in your aluminum cylinder…

LongO'THREE

I don’t trust the integrity of aluminum scuba cylinders… at least, not enough to:

  • overfill any aluminum cylinder (in fact I often under-fill aluminum stages and decompression bottles keeping below the manufacturer’s suggestions for working pressure);
  • keep them in service more than a year or two after their first hydrostatic test cycle (which is every five years where I live);
  • wander very far from a very conservative approach to the frequency of formal visual inspections, choosing instead to follow the manufacturer’s suggestions for cylinders in Heavy Service;
  • miss Eddy Current testing as part of the VIP procedure (EVEN WITH BRAND NEW CYLINDERS!);
  • be trusting of loners and rentals, especially those with the look of being in service since, and taking direct hits during, the Gulf War.

My reasons for being a “mother hen” are based on a professional ‘cover everybody’s arse’ strategy to risk management. And a certain knowledge that high-pressure vessels have an enormous potential to harm. I’ve witnessed the aftermath of two separate aluminum tank failures and have a very strong mental image of the chaos each caused. I read somewhere that the amount of energy stored in a “recreational scuba cylinder,” which one can take to mean an aluminum 80, is about the same as two WWII British military hand grenades. A sobering thought.

Of course, one should be equally cautious with steel cylinders, which have a similarly dangerous potential. However, aluminum cylinders more easily carry the scars of mild to moderate abuse in typical everyday service. Couple this with their inherently different reaction to repeated filling and emptying – aluminum’s fatigue limit – and the dramatic reduction of an aluminum cylinder’s endurance limit from several hundred thousand fills to perhaps hundreds when it is over-filled – and its potential for failure is increased.

Of course, an easy out would be to avoid using aluminum cylinders altogether, but the buoyancy characteristics of aluminum makes 80s and 40s excellent stages, bailout, and decompression bottles. Besides, avoiding their use would be a dramatic over-reaction.

Working within manufacturer’s limits and the handling guidelines they supply us, aluminum is safe for many, many more fills than any of us is likely to ask it to endure.

But we do need to be mindful of those limits and guidelines.

Luxfer, the manufacturer of a popular brand of aluminum scuba cylinders of all sizes including the ubiquitous aluminum 80 writes the following about safety and its products… all great advice!

“If the cylinder is used in heavy service then it should be inspected every four months.

“Heavy service” means any one or more of the following:

  • Cylinders being filled or “topped off” five or more times per week;
  • Rental cylinders in use during the ‘season’ and ‘off-season’ times;
  • Cylinders used wherever damage is more likely than in normal use or where the
  • care and/or maintenance is slightly below recommended care.

If the cylinder is known to have had any unusual treatment or condition, it should be immediately visually inspected, prior to its next use.

“Unusual treatment or condition” means if the cylinder:

  • Dropped, fell, was struck, was in an accident, or when the care and maintenance of the cylinder is obviously poor;
  • Was stored improperly, and shows signs of damage;
  • Has obvious corrosion since the last visual inspection;
  • Has a gouge, dent, scrape, cut, dig or, in any way, has been damaged since the last
  • visual inspection;
  • Was stored with water, material or matter inside the cylinder;
  • Shows signs of exposure to fire or high heat, including any one or more of the
  • following:
    • Charring or blistering of the paint or other protective coating;
    • Melting or charring of the metal;
    • Distortion of the cylinder and/or any cylinder accessory;
    • Melting of fuse plugs, valve handwheel, valve protector, and/or any other
  • valve component or cylinder accessory;
  • Has been partially or fully repainted or treated to hide damage and/or
  • fire damage;
  • Is known or suspected to be leaking; or,
  • Is known or suspected of having a crack.”


Dive Safe… be careful out there.

Save

Save

Save

Save

Save

Save

Save

A surprise lesson…

LongO'THREE

There are plenty of incentives for taking part in a scuba diving ‘expedition,’ and some of them at least, may not obvious at first sight.

The best, and a motivation with all the enticement of a chocolate-chip cookie in the eyes of the average six-year old, is to learn something new. Coming a very close second – with the pulling power of a chocolate- dipped coconut macaroon in my world – is having a tightly-held, but wrong-headed notion, kicked into the trash, and replacing it with an idea backed by science, logic, and responsibly collected data. Again, a learning experience.

Earlier this year, Jill Heinerth and I were asked to put together a small expedition to do some work in the Bell Island Iron Ore Mine, in Conception Bay, Newfoundland. We had both been there before, and we were both huge fans of what the place has to offer: essentially, the chance to experience truly unique dives in an environment that screams history and heritage.

There were tonnes of other reasons to sign on for this particular expedition, but diving in what is essentially an underwater museum, was pretty high on the list.

A total surprise – and an unexpected bonus – was having my opinion about heated vests and their potential role in diver safety – specifically decompression stress – turned around about 180 degrees.

The lesson went something like this.

Dr. Neal W. Pollock was part of the Bell Island project, gathering data for his research at Divers Alert Network. Neal is research director there – at DAN – and a senior research associate at the Center for Hyperbaric Medicine and Environmental Physiology at Duke University Medical Centre. And when not pushing an ultrasonic transducer against your rib cage, he’s a handy guy to have around when the chatter turns to many things related to technical diving.

I’d seen Neal’s presentation on Thermal Physiology and Protection at Rebreather Forum 3.0, in Florida a few years before. But, frankly did not really grasp his message. Then, sprawled on the floor of the Bell Island Museum and watching a whole stream of gas bubbles race around in my heart after a dive, helped me – and others on the expedition – listen a little harder to what he was telling us.

A link to his presentation at RB 3 is at the bottom of this page, and if you dive at all, you’d do well to watch it, but the Coles Notes version is this.

If, like me, you figure the safest way to dive is to be warm throughout, you may want to rethink your approach.

Dr. Pollock, suggests that there are three issues to think about when we consider thermal protection. Number one, at depth we must be able to function; secondly, we must take into account the effect of temperature on our decompression stress; and lastly we need to consider comfort.

Based on a “small but significant” study conducted by the Navy Experimental Diving Unit, Dr. Pollock explained: “Divers tend to put the emphasis on the wrong thing… comfort.” And comfort, according to the data, and Dr. Pollock, “should only be a distant third.”

The NEDU study found that the fewest instances of DCS occurred in divers who started cold, and finished warm. Probably the exact opposite of what happens on a significant number of technical dives. Worth noting is that for this study, subjects wore no thermal protection and worked in water at 36 degrees (warm), and 27 degrees (cold).

Significant also was that there were zero cases of DCS in 80 “cold start, warm end” dives, but in warm/cold dives, probably the situation for many long dives, seven out of 32 (22 percent) resulted in DCS. The dive profile incidentally was a seemingly benign 120 fsw with 30 minutes of bottom time and 91 minutes of deco!

When the dive profile was appreciably altered to be more aggressive – 120 fsw for 70 minutes of bottom time but with an unchanged 91 minutes of deco – the results had very similar implications: cold/warm dives resulted in 0.1 percent DCS.

Of interest to those of us who own and use heated drysuit under garments, warm/warm dives following the same profile, returned a 17 percent instance of DCS (four cases in 24 dives).

thermalimpactdcs

A slide from Dr. Neal Pollock’s presentation

For technical divers, there are many, many factors with a role to play in decompression stress, but consider this. With a heated vest, several things might happen. The vest is turned on and keeps you warm throughout your dive. The vest is turned on to start the dive, and then is turned off or runs out of power at the end of the dive. The vest is turned off to begin the dive and left off when you start to get chilled as bottom time passes, and only turned on during the latter stages of decompression (probably NOT the most common practice).

Based on the NEDU study, each has possible consequences, and not all of them positive. It would seem that the best option in terms of thermal status, is to start cold and end warm.

As Neal remarked, the NEDU study was across a very small population (73 divers), and one has to take that into consideration when assessing its value and relevance. However, my personal observation of what was happening in my heart after a 90-minute warm/warm dive – thanks to the transthoracic echocardiogram being orchestrated by Dr. Pollock about 20 minutes after I surfaced – is that I won’t do that again.


View Neal’s RB3 presentation here… and in addition to a much more complete interpretation of the NEDU study, he covers several other related and significant issues… watch it.

https://www.youtube.com/watch?v=yixnr07AiTI


Save

Save

Save

Save

Fixing a lack of skill with complex gear… Nah, try a swimming pool!

Nick Hollis in SMS75 Hollis SM harness

Nick Hollis of Hollis Gear showing some skills in swimming pool like conditions…

Few of us learned to dive without the help of a buoyancy device of some sort. Not to say that wearing a jacket-style BCD, sidemount harness, or backplate and wing automatically gave any of us pin-point control over our position in the water column: it certainly did not!

The vast majority of the divers — sport, technical, rebreather, open-circuit, whatever — earned that particular skill with patience, perhaps a little help from a buddy or mentor of some description, and a bunch of practice.

Swimming pools or ‘swimming pool-like conditions’ (warmish, reasonably calm, clear-ish, current-free shallow water), are awesome for gaining something approaching buoyancy control right from the first open-water class: and then fine-tuning that skill by return visits as often as practical. I will still take time, whenever I can, to simply “hang about” in the water. A visit to the pool is a great place to test new gear, adjust weighting, check that old favorites still work the way you want them to.

In fact, if you are an instructor looking for ways to increase student comfort, add to general diver safety, and build on the basic skills your students learn on your courses, you’d do well to offer a few extra hours of pool time regularly. I have a buddy whose open-water students leave her classes with demo-quality buoyancy control and near-perfect ‘cave trim.’ Her secret is additional pool time, which her students gladly pay a little extra for because she’s taken the trouble to explain the benefits of buoyancy control to them. They get it: they know it takes a bit of work: and they are not looking for a fast fix.

So, imagine my disappointment to see an ad for a piece of kit that is such a convoluted bunch of “Heath Robinson” engineering that at first I thought it a joke. The product, and it is real apparently, is pitched as: “An industry standard premium diving jacket, dive computer with connecting links to allow the computer and jacket to manage diving processes according to the selected settings just like an aircraft autopilot.”

What have we come to when the simplest of devices, and a little practice to master its use, has to be replaced by something with Catastrophic Failure (or something else with the initials C-F) written all over it.

Please, if you want to get your buoyancy squared away because it wasn’t taught to you as a beginner, take a cavern or intro-to-tech class from a good instructor. Contraptions that offer instant mastery through technology are like magic pills that promise to shed pounds of belly fat without diets or exercise. The word to describe this type of promise is bullshit.

Save

A rare honor for a dear friend

explorer-in-residence-jill-heinerth-1

Jill doing what she does…

Someone once told me that as a community, technical diving suffers from a lack of real role models. He said that’s is not that there is a particular lack of great projects going on, or important discoveries being made. “There’s a tonne of great news out there!” he said. “It’s just that the news and personalities behind it are quashed by infighting and jealousy…”

That’s a pretty damning, really bleak commentary, but during the many years that have passed between him saying it, and now, there have been times when I’ve been inclined to agree with him. However, today, the technical diving community got some great news, and perhaps we can all be a little pleased… and proud.

Jill Heinerth has been appointed EXPLORER-IN-RESIDENCE by The Royal Canadian Geographical Society. This is a first, and to quote from the RCGS website, the “Explorer-in-Residence Program [is intended] to foster greater awareness among Canadians of the expeditions and field research being carried out by the nation’s top explorers, scientists and conservationists.”

Now that is cool, I don’t care who you are… that is awesome.

Immensely pleased and proud to call Jill a friend, and to say that she and I have worked on a couple of projects together… and she helped to make them fun, safe, and productive.

Hope you will join me in wishing her all the best, and giving her what really is a well-deserved pat on the back… and perhaps a glass of nice red wine!!!

http://www.canadiangeographic.ca/blog/posting.asp?ID=2070

Want to ignore the rules? Then do this…

There really are no scuba police, and here in most of North America at least, government bodies give the diving community the closest thing to a free-rein. We can, in essence, do exactly as we please. We can dive without training, ignore warning signs, flaunt best practice, exceed both whatever certification we have and the experience earned on previous outings. We are free agents. Great stuff.

But the downside is awful. A couple of days ago, I read of another stupid death — highly preventable and caused by several breakdowns in the system… that tragic alignment of holes in the safety net that which is in place to help diving “accidents” NOT happen.

What’s frustrating about many of the deaths we read about online, in diving magazines, and in diving forums, is that the people involved had been warned. At some point, either in their training or general involvement with the diving community at large, they had been told what they had planned, was foolhardy or against best practice.

But they went ahead anyway.

Just as sad is that their behavior does have the potential to change the status quo. Their silliness may create a situation where some agency or quasi-government entity starts to pay attention to our activities… and arbitrarily start to shut things down.

I am reminded of something my mate, Wayland Rhys Morgen suggested for anyone who is about to — either figuratively or actually — hand their beer to someone and say: “Here, watch this…”

The next time you intend to deviate from best practice, take a piece of note paper and divide it into two columns. Write in block letters at the top of the left-hand column: “What people usually do.” On the right, also in block letters, write: “What I am going to do instead.” Then in the appropriate column write clear, concise language an explanation of each behavior associated with your planned dive. So, these ‘behaviors’ would cover things like analyzing and labeling gas cylinders, limiting depth and duration according to your training, recent experience, and the vagaries of the environment… stuff like that. Read it back to yourself — both columns — then sign and date it. Then give it for safekeeping to someone you trust: lover, spouse, son, daughter, best buddy, favorite cowgirl. It really does not matter much to whom, just hand it over. Tell them to give it to the people or agency that leads the inquiry should something bad happen to you on your adventure.

Mine Quest 2.0

Bell Island Mine 2.0

Winter in Newfoundland can be bleak and is most definitely cold, but this week, a group of volunteers and Bell Island Heritage Society staff ignored the weather and did a huge amount of setup work getting things ready for Mine Quest 2.0.

As well as building a platform/staging area for the exploration team to work from, during mid-February’s expedition, they carried several hundred kilos of materials more than 225 metres down a ten-degree incline from the surface to the water’s edge. Before the building commenced, using pickaxes and shovels to clear away loose rocks from the roof and walls of the mine shaft, then installed temporary lighting.

mineshaft

After the clean-up… the mine shaft we will be working from

Eventually, it’s hoped the mine on Bell Island will feature permanent infrastructure that will add dive adventure tourism at the historic site to the world-class wreck diving found just off the island’s coast. For the time-being, the hard work will help simplify, and aid the success of an effort to add the the two kilometers of passage explored and lined during the 2007 project I was lucky enough to be part of.

Over the next several weeks, and certainly during Expedition Week (February 13 – 20), I’ll try to keep you up-to-date on progress and exactly what’s planned.


In the meantime, hats off to Mark ( Magoo) McGowan, John ( Johnny O) Olivero, Nick Dawe, Kyle Morgan, Rick Stanley, Ron Reid, Teresita ( Teddy) McCarthy, Des McCarthy, and Tom Spracklin.

Thank you for your efforts folks.


For a comprehensive line-up of who will be working on the project, visit my friend and co-leader’s blog… Thanks Jill.

Bell Island Newfoundland


Building the odds in favor of a good outcome…

LongO'THREE

A simple tip from the closest thing you’ll find to an expert

I have one of the best jobs imaginable… I get to dive for a living. It has drawbacks just like any job… I spend a lot of time away from home and the people I love; sometimes I am compelled to jump into the water when all I really want to do is sit on my arse and veg out; and there are few constants in a very fluid and organic field of research about diving, which means lots of reading, lots of lectures, lots of changes in what we teach and what we reject.

However, there are also a bunch of positives… including the list of things on the drawback list: I travel, I dive a lot, I get to feed my brain new stuff all the time.

One of the best things though is the people I meet. The so-called technical diving community is packed with cool folks. These are the men and women with open minds, boundless curiosity, and a willingness to share what they’ve discovered. They are stellar human beings and it’s a gas to hang out with them, and learn from them.

One guy who always has something interesting to say is Dr. Neal Pollock. Neal is ex-pat Canadian scientist. He’s a research physiologist working in the States, and has a background in zoology, exercise physiology and environmental physiology. He is also a diver and part of his research relates to decompression stress.

He also has a very “English” sense of understated humor in his writing and presentation style which appeals to me. I particularly appreciate lines such as: “The approximation of decompression status predicted by current deterministic algorithms should not be confused with ‘truth.'” Honest, insightful, and funny.

Anyhow, his latest blog is a hugely interesting read. It’s entitled “Flexible Control of Decompression Stress” and you’ll find it here: https://www.shearwater.com/news/flexible-control-of-decompression-stress/

Take the time to visit and read. You’ll learn something.

Surviving the Rottweilers

LongO'THREESeven tips to help protect you when things go wonky underwater

You may have read somewhere that underwater emergencies are rare. I’m not so sure that rare is the best way to describe them.

While underwater incidents causing bodily harm or death may be infrequent, close encounters with potential disaster are frightenly common. Spend a week or so at a dive resort or on a live-aboard, and you’re guaranteed to hear stories that support this view. “I ran out of air,” “we got separated from the guide and had no idea where the boat was,” “We ended up way deeper than expected,” “My computer went into deco and I had no idea what to do,” “My regulator started to spew bubbles and I panicked… I did not know what to do,” “We skipped our safety stop,” “I felt odd and confused, but managed to hit the inflate button and shot to the surface,” “I signalled the divemaster but he misunderstood me and continued with the dive.”

‘Victims’ of these little brushes with catastrophe fall into three categories. Some give up diving altogether. They get the crap scared out of them and opt for golf, fishing, stamp-collecting. No foul.
Some learn from the experience and avoid the traps that painted them in a corner in the first place, and they become more informed and safer divers.

And some learn nothing. They carry with them the potential to make similar mistakes again and again… sometimes with ruinous consequences.

Here are seven strategies that may help divers enjoy their diving, and avoid becoming a statistic.

      1) Learn to say no! Too many new divers are fooled into believing that it’s OK to do trust-me dives with a dive guide or divemaster. They may have a good sense that diving once or twice a year does not prepare them for a 40 metre-plus dive (that’s 130 feet or more), in current, with rented gear, but a divemaster, instructor, sales-person talks them into doing it. This is dangerous bullshit. No agency condones this type of practice, but it is common in many dive resorts, and needs to be stamped out.


      2) Learn your limits and stick to them. There is nothing wrong with pushing yourself to learn and grow your diving experience and comfort zone, but be realistic about your starting point. Being an occasional diver means you start from zero at the beginning of every dive trip. Scuba skills are perishable. Even experienced cave instructors take the time to “brush up their skills” if they have been out of the water for a while.


      Even if you are lucky enough to dive every week, understand that your experience, training and gear limits the types of dives that you can safely undertake. Listen to your inner wimp.


      3) Learn self-reliance. Too many “rescues” end up in disaster or near disaster for all participants. Get training, learn what kit to wear to help deal with gas emergencies, PRACTICE. Most of all, STOP, THINK, ACT, REASSESS.


      4) Maintain your kit, and use a checklist when you assemble it and when you inspect it prior to EVERY dive. Equipment problems are the easiest underwater emergencies to avoid. Don’t fall into the trap of believing that something is good enough… if it “ain’t perfect” don’t dive with it.


      5) Plan your dive… Dive your plan. Understand the risks, make sure everyone is capable of doing the dive, and ensure everyone have the skill and kit to deal with contingencies should they arise.


      6) Be aware! The best way to deal with a diving emergency is to stop it before it gets out of hand. The vast majority of diving emergencies begin as small inconveniences that cascade rather like dominos falling over. Keep an eye on your buddy(ies), be aware of changes in the conditions, monitor yourself. The best blanket advice is to take things slowly.


        7) Have an escape strategy. When something goes pear-shaped, the top priority is to make sure everyone has something to breathe… next is to get yourself and your mates as far away from the spinning fans as possible. Cave divers talk about always having a continuous guideline to the surface. Sport divers can take a lesson from that: Always know the location of a safe, protected exit… in other words, someplace where you can surface and be found or find your way to your entry point.

Steve Lewis is an explorer and experienced cave diver, who has been teaching technical diving programs for more than 20 years. He writes and lectures on topics related to diver safety in North America, Europe and Asia.

Adventure Tourism “Under the Bell”

LongO'THREEDiving Bell Island Mine

In 2006, while visiting Canada’s newest and easternmost province to dive on four excellent WWII wrecks, I was asked if I had any interest in leading a small expedition to check out the flooded Bell Island Iron-ore Mine in order to help determine if it had the potential to become an adventure dive destination.

In January/February of the following year, that expedition laid around two kilometers of line, discovered countless artifacts and items of interest. We also lost a valued team member during the exploration. Despite Joe Steffen’s untimely death, our final report recommended the opening of portions of the mine to qualified divers.

Unfortunately, during the intervening years, Bell Island Iron-ore Mine has not been added to the list of North America’s ‘must-visit’ dive sites. The exceptional, matchless cultural and historic story it has to tell its visitors in face-to-face meetings, is left untold.

However, after three days of diving in the mine filming for a TV show this past week, I have to say: I hope that changes soon.

The mine is a fantastic heritage resource. It gives us vivid insight into an important part of Newfoundland’s history and the daily lives of Bell Island’s working people. It also connects the region to what remains perhaps the most iconic conflict of the 20th Century.

Uniquely, Bell Island Mine focuses several major tourist attractions: firstly, the current mine museum and underground displays, the four ore carriers resting on the ocean floor a few hundred metres from shore, and of course the surrounding scenery: truly all remarkable experiences. Secondly, the portion of the mine workings now underwater have a very special appeal. The mine is filled with artifacts – machinery, tools, even the graffiti left my miners – and it fills its visitors, who still number less than 20, with a sense of wonder.

As a viable tourism product, certainly the potential buyers of structured and regulated physical access to the flooded Bell Island Mine are limited. Diving in an overhead environment (cavern, cave and mine diving), represents only a small percentage of the total scuba-diving market. But it is an influential population. Clearly, divers trained and equipped to dive in the Bell Island Mine will never flock to the area by the truckload. However, what the flooded mine on Bell Island has to offer, should be made available to those who wish to visit. The quality of the cultural and historic experience are simply too great not to be shared.


What follows is the text of an original article I wrote several years ago for TDI’s eNewsletter. Actually, the brief for the article was “The Benefits of International Dive Travel” but I used it as an excuse to promote diving in Newfoundland, the value of diving the Bell Island Iron-ore Mine, and the wrecks of four merchant ships sunk while loading with iron ore during WWII.


OK, before drilling into a few of the real benefits and surprises waiting for us when we decide on International Dive Travel, and certainly one of the most interesting associations with “foreign lands” in my diving career, we need to walk through a very quick geography lesson, followed by an equally brief history lesson!

Newfoundland is a big island off the east coast of North America. In fact, it is the most easterly point in the whole of North America and Signal Hill outside of Newfoundland’s capital St. John’s is where Marconi set-up his apparatus to receive the first radio signal sent skipping across the Atlantic from Cornwall, England in 1901. Like most of that part of the world, Newfoundland is rich in Celtic culture thanks to the influence of its early Irish-Ulster-Scot settlers, and the locals still sound more Irish than American. The waters surrounding the island are chilly (think icebergs drifting down from nearby Greenland… even in June!), are filled with the most amazing marine life — including many species of whale – and are home to four of my favorite shipwrecks anywhere in the world. We’ll get to those in a few moments.

When the Second World War erupted in Europe, Newfoundland — which today is a Canadian province — was part of Great Britain. Hence, when that country’s Prime Minister declared war on Nazi Germany in 1939, Newfoundland was automatically part of the Allied headcount. Canada followed close behind them, but it was not until a very closely fought referendum ten years later in 1949, that Newfoundland joined the Canadian Federation to become one of its ten provinces.

So, what about those four favored shipwrecks?

Just outside of the city of St. John’s, in the middle of Conception Bay, sits a small blob of land called Bell Island. During the years leading to the beginning of WWII. Bell Island had a very productive mine that exported iron ore to steel mills in several countries, including Germany. At the outbreak of war, steel mills, a little to the south of Newfoundland in Nova Scotia, accounted for about a third of Canada’s steel production vital to the British war effort. With shipments from the Bell Island Mine to German factories cut off because of the war, it was inevitable at some point that the Germans would attempt to interrupt production and throw a “spanner in the works” for the flow of steel to Great Britain. And interrupt they did.

On the night of September 4th, 1942, a German U-Boat sneaked into the anchorage at Wabana, Bell Island where ships loaded ore to be carried away to various “customers”. The next morning and within sight of the guns of the Bell Island Battery, the U-Boat sank two ore carriers moored at the loading docks: SS Saganaga and SS Lord Strathcona. Twenty-nine men were killed in the attack, all of the victims were seamen aboard the Saganaga.

The Battle of the Atlantic had suddenly come to within a few hundred metres of North America’s shoreline.

The strategic importance of the mines on Bell Island did not diminish of course, and just a couple of months after the first attack, a second U-Boat crept into Wabana and found several ore carriers at anchor.

The U-boat captain fired a torpedo at the 3000-ton Anna T. It missed and exploded ashore ripping into part of the loading dock and disturbing the sleep of many inhabitants on the island. In the next several minutes, two more torpedoes were fired at SS Rose Castle. Rose Castle sank, taking twenty-eight of her crew with her, five of whom were native Newfoundlanders. The Free French vessel PLM 27 was the second target. She sank almost as soon as a torpedo hit, taking twelve men to the bottom of the bay with her.

In the space of less than 15 minutes, two ships, several thousand tons of ore and 40 men had been lost. The U-boat escaped even though there were three allied navy escort vessels in the area.

The four Bell Island wrecks sit today at reasonable depths (the PLM 27 the shallowest at around 23 metres / 75 feet, the Rose Castle the deepest at 43 metres / 145 feet), and within a radius of a few minutes boat ride of each other and only a stone’s throw from land.

When I was first invited to dive the Bell Island wrecks, I must admit that Newfoundland seemed as remote to me as the dark side of the moon. Newfoundland was, at least in my ignorance, nothing but folk singers, remote fishing communities, moose, and wild, wild countryside battered by strong winds and salt spray off the North Atlantic. Through a number of visits over the following few years, I discovered that it was all of this and so much more.

The wrecks were one of the first surprises. Four shipwrecks each more interesting and more crammed with history than the last. After the first handful of dives, I christened the area Truk Lagoon North. Perhaps using a little poetic license but the things that seemed common to both areas were history, the awe inspiring evidence of the destructive power of torpedoes, the sadness of the lives lost, and the contrasting beauty of the creatures that had made the wrecks their home. Like many divers, I have a fascination with WWII casualties and the story all wrecks have to tell those with time enough to listen. Like the Japanese fleet in Truk, The Bell Island wrecks are master story-tellers.

One of the best pieces of luck I had on my first visit to Newfoundland and Bell Island was meeting Rick Stanley. Rick is a proud local who owns and operates Ocean Quest Resort, which was home-base for our group during our visits. Rick is a strong advocate for all things relating to Tourism for Newfoundland, and almost single-handedly has promoted responsible diving on the wrecks, as well as campaigning to have them designated as a war grave and a protected site.

During all my visits to the island, he and his staff, seem to go out of their way to make our group welcome and introduce us to local hospitality… including the infamous Screeching-In Ceremony.

Screeching In is when visitors (people from away, is how the locals refer to tourists) are made honorary Newfoundlanders. Space prohibits a blow-by-blow account of a true Screech In ceremony but proceedings include strong rum, eating local delicacies such as cod-tongue, hard-tack (ship’s biscuit) and dried capelin (a small smelt), singing, dancing, and “kissing the cod” which really does involve getting close and personal with a large dead Atlantic Cod (gadus morhua). Having survived being “Screeched In” during several trips, I can honestly say, it is one of the most bizarre and funniest things I’ve done during the course of several dozen dive  trips.

Partway through my third trip to dive the Bell Island Wrecks, Rick Stanley asked me if I would be interested in putting together a group of divers “Capable of exploring the Bell Island Mine.” Of course I said yes.

The mines were abandoned when it was no longer economically viable to operate them; but the closure was oddly abrupt.

The mines on Bell Island opened for commercial mining in late 19th century and were once the world’s largest submarine iron ore mine with passages occupying an area under the seabed of Conception Bay roughly five kilometers by five kilometers or approximately nine square miles in size.

The mine that Rick was interested in having surveyed and accessed — and that was the project’s main aim — had been closed since Christmas 1949. The story goes that the workers downed tools for the holiday and were never allowed back into the workings.

Rick and the Bell Island Historical Society were curious to have a team of divers explore the mine system — or as much of it as practical in the 12 days available — and look for evidence of cave-in, collapse, artifacts and other things that might interest a different type of visitor than the ones currently coming to the mine museum sitting at the old entrance to Mine Shaft Two.

The questions they wanted answers to where simple: can it be dived? Is it interesting enough to attract divers? Are conditions supportable for regular visitors? There were some side issues that needed to be addressed, but the hope was to open up a unique form of adventure tourism for the island and its economy.

With a background in Tourism Marketing, I was certainly curious enough to take Rick up on his offer, and set about building a team that would be able to pull things off. After a simple exploratory dive in July of 2006, we set a target date for the following January/February, and started planning.

Our goal was to investigate as much of the inundated mine as practical within the short time available. We knew the water would be cold, and because of the surface support needed, we also knew that our efforts would have to be focused on a time when normal tourist activity would not interfere; and that meant winter which also would be cold.

I was lucky to find the perfect group of men and women who were not daunted by the challenges that the season, the logistics, and the challenging dive site would present to us.

Newfoundland in the heart of winter is an interesting study. Stuck as it is with both feet in the Northern Atlantic, and its face weather-beaten by winds coming off the glaciers of Greenland or Labrador, it is not for the faint-hearted. Several of the team where Brits whose experience with a real Canadian winter had been limited to movies and books. They got to experience a true winter storm on arrival, and several of us had plane delays getting into St John’s airport. My plane was almost on the runway but the pilot aborted and we headed back to Halifax International with our tail between our legs and our hearts in our mouths.

But eventually, all 16 of us were together in the lounge at Ocean Quest Resort, sorting gear, knotting line, and pumping gas.

During the following two weeks, the team surveyed the mine looking for any evidence of cave-in or collapse in the mine shaft and laid permanent guidelines from the surface along the main shaft to a depth of approximately 50 metres. The seam of iron ore slopped at an angle of approximately ten degrees and continued many thousands of metres under the overlay of ocean floor below Conception Bay. In addition to the main line, four ‘jump lines’ were laid in side passages. The initial plan was to extend these side passages (roughly horizontal) approximately 300 metres east and west of the main shaft. Overall a total of 2km of line was laid in the mine.

The search for artifacts left behind when the mine was abandoned turned up mine equipment, personal effects such as lunch boxes, and we discovered graffiti, drawn by the miners using the soot from their carbide lamps. The system was mapped sufficiently to enable the conclusion that the mine would make a challenging diving destination for cave divers to explore.

Every overhead environment presents divers with a number of challenges well beyond the scope of recreational diving. As well as the obvious threats to the team’s well-being — gas management, navigation, light, depth and the cold — the health of one of our team played a role. On Sunday, February 4, Joe Steffen, well-known in the diving communities in both the Great Lakes and North Florida, suffered a massive embolism and died. Joe perished in a few metres of water just a couple of minutes from the surface operations. Ironically “Iron Man” had an undiagnosed problem with his lungs which did not show up during a medical he’d had before joining the team from his home in Ohio, and attempts to revive him at the dive site and the medical facility adjacent to the mine were unsuccessful.

We lost a great buddy, and Joe — a career police office — left behind a wife a young son, and a daughter, as well as many, many friends.

In consultations with the various sponsors — which included TDI, Fourth Element, Whites, the NACD, and Ocean Quest — as well as local authorities, the exploration of the Bell Island Mine continued and its success was dedicated to Joe’s memory.

The following year (2008), Joe’s widow, Jennifer, visited Bell Island for a memorial service which included two of the team (Mike Fowler and Steve Lewis) placing a memorial plaque and an urn containing Joe’s ashes in the main shaft of Bell Island Mine No. 2.

Tourists continue to visit the Mine and divers enjoy the four wrecks that sit above its vast network of passages, but underwater operations at the mine await further work.

The team consisted of: Rick Stanley, Debbie Stanley, David Sawatsky (diver and map-maker), Phil Short (diver, deep explorer), Ralph Hoskins (diver and record keeper), Vlada Dekina (diver and expedition photographer), Dave Clemmens, David Powell, Mark McGowan (dive safety officer), Stephen Phillips (diver), Aaron Bruce (diver), Mike Fowler (diver), Joe Steffen (diver), Steve Moore, Susan Copp, Steve Lewis (diver and expedition leader).

Gradient Factors… a simplified primer

This short article is based on a series of presentations made in various locations during the late winter and spring of 2015, and is a shortened version of a more detailed treatment to be included in an upcoming book.

Let’s start off with a disclaimer and an outline of some assumptions made while working on this blog post.

First off, I did not start out intending to write a definitive piece on decompression theory or on the stellar work of Professor Albert Bühlmann. Also, this contains no detailed explanation of the internal workings of the maths behind a decompression algorithm and the challenges it meets while trying to model human physiology. Simply put, this was written to help the average punter better understand what gradient factors describe; and the potential impact of playing around with the GF settings on your personal dive computer (for example, a Shearwater Petrel).

Secondly, I’ve made several assumptions… not the least of which is that readers have a basic understanding what happens to an individual after spending more than a couple of minutes sub-surface breathing compressed gas. (That’s just another way of saying that I’m writing for certified and reasonably experienced divers who understand that diving can result in decompression stress of one flavor or another.)

OK, that settled, here we go.

All dives are decompression dives, ergo all divers are decompression divers. Our acknowledgement of this and the depth of that acknowledgement can greatly influence our behavior when we dive: most specifically, our ascent behavior. How deep we dive, what gases we breathe, and how long we spend at depth vary considerably from dive to dive; but all dives share one common threat for individual divers: the risk of getting bent.

Smart divers consider many factors when planning dives, many of which help to alleviate that risk. One is choosing to dive a “conservative profile.” I guess there are many interpretations of what that means… but for our purposes here, it means choosing a decompression algorithm that’s proven, and choosing a setting for that algorithm that will generate stress-tolerant dive tables.

Many PDC (personal dive computers) use a Bühlmann ZHL-8 or ZHL-16 algorithm to model decompression stress in divers and their decompression obligation on ascent. In a way this is odd because both deco models are not only dated (Herr Doktor Professor Bühlmann died of heart failure in early 1994), but are based on the faulty premise that we can prevent bubbles from forming in our bodies during our ascent if we follow the schedules the algorithm kicks out.

The data set on all recreational diving, but in particular staged decompression diving, has grown considerably since the Professor’s unfortunate and untimely death, and we now have considerable evidence that in fact bubbles do form even after the most benign sport dives conducted well inside the boundaries suggested by Bühlmann’s tables. Some newer decompression models make the assumption that bubbles do form in a diver’s body during ascent and make adjustments to the maths which are intended to control their growth and propagation. Many divers believe bubble models better predict what goes on in a diver’s body and are therefore, safer. VPM and RGBM are examples of “bubble models.” Versions of both are available for use in PDCs.

Yet Bühlmann tables remain popular. They are in fact perfectly functional, and are helping to keep tens of thousands of divers safe from the bends every week. The secret is that with very simple tweaking, a Bühlmann schedule can be made to follow a time-and-place curve very similar to those produced by bubble models slowing ascent and beginning staged stops deeper in the water column.

OK, a little very simple nuts and bolts discussion.

Traditional decompression algorithms – Bühlmann’s included – attempt to model what happens in a diver’s body using a number of different calculations each representing a different “theoretical tissue group:” and each filling up with and emptying inert-gas at different speeds. Important to note that these tissue groups are mathematical constructs and are not directly related to any actual body tissue such as blood, bone, muscle or brain. Those tissues – in fact all the tissues in a human body – are far too complex in their architecture, component makeup and construction to fit into any of the algorithm’s simplified tissue categories. The human body is a mass of variables that defy the constraints of pure maths. So, individual “tissue groups” don’t relate to a specific body part, but are a series of mathematical calculations which as a whole attempt to track inert gas uptake and elimination in vivo.

In Bühlmann’s ZHL-16 algorithm the fastest group has a four-minute halftime, the slowest (the 16th in this particular series) has a 635-minute halftime. Since we can regard a tissue group as saturated after six halftimes (standard science stuff), the fastest group will be “full” in 24 minutes, while the slowest takes 63 hours and 30 minutes to reach the same state! For the record, the halftimes or the 14 other groups in the ZHL-16 algorithm are: 8, 12.5, 18.5, 27, 38.3, 54.3, 77, 109, 146, 187, 239, 305, 390, and 498 minutes.)

Clearly, Now that we have some concept of the relationship between variable times and various group saturations, let’s look at M-values.

In the Bühlmann algorithm, each theoretical tissue group has a maximum internal pressure it can withstand. This pressure is exerted by dissolved inert gas and as long as the maximum is not exceeded, the gas stays in solution, and no bubbles form… well, in theory.

Like Robert Workman before him, Bühlmann termed this maximum internal pressure, its M-Value. Workman had coined the phrase while researching decompression for the U.S. Navy in the 1960s. His M-Value calculations were based on dives done at sea-level… perfectly predictable for Navy work. Bühlmann’s modifications took into account attitude and are slightly more conservative. Like a tissue group, an M-Value is mathematics and not physiology, and it is used to track how close a particular tissue group has become to super-saturation (critical bubbling). When a tissue group reaches 100 percent of its M-Value, the likelihood of decompression stress is statistically high.

And finally, gradient factors.

GFPicture1One can think of gradient factors (GF) as a way of adjusting the decompression algorithm to suit our needs, and GF can range between 0 and 100 percent. One hundred percent is the point where M-Value is on the verge of critical bubbling (1), and zero percent is the same as ambient pressure (M-Value of 0 where there is no force driving gas out of solution at all). Therefore, effective decompression can be found somewhere between those two points.

When one uses GFs to set the “conservatism” for one’s decompression, one uses two numbers: these represent the Low Gradient Factor and the High Gradient Factor.

In simply terms, the Low Gradient Factor (LGF) defines how deeply in the water column one takes one’s first decompression stop. The High Gradient Factor (HGF) defines how close to the 100 percent M-Value one surfaces with at the end of the dive.

GFPicture5Obviously we need to set up some gradient to begin the process of off-gassing (decompression). The slope of that gradient – how much pressure we allow – is a matter of personal faith, comfort and willingness to act as a guinea pig. This is the LGF and one option that seems to have been adopted by many divers – and incidentally recommended by Dr. Neal Pollock from DAN – is 30%.

This setting promotes off-gassing but stops one’s ascent deep in the water column but above the gas transition point (the theoretical spot on the water column at which more gas is eliminated than is taken up according to the algorithm).

Setting the HGF is a question of how close to the 100 percent M-Value limit we are willing to venture. Many divers recommend and use 80 percent. Again, Dr. Pollock’s suggestion is lower: 70 percent.

Therefore a 30/70 setting is considered by some, including me, to be an acceptable default GF setting.

However, before forming a rigid interpretation of GFs: just as different speed limits are applied to different road conditions, different GFs may be more appropriate for different dives. A 30/70 may work for trimix dives to 60 metres but may be unnecessary conservative for a short warm-water dive to 18-metres… and not sufficiently conservative for deeper dives.

The message then is to experiment with Variable Gradient Factors when planning your dives. Run what-if scenarios… Take notes… Alternatively, read what people are doing and what organizations such as DAN suggest

Most of all, be aware, nobody and no organization can predict precisely the outcome of any dive!

Factors in deep scuba diving

A recent tragic event – the death of Guy Garman attempting a 1,200 foot dive on open-circuit scuba – have refocused the spotlight of community interest on a number of issues specific to deep bounce dives. Or rather, it has engendered a bunch of questions from the diving community at large asking: what went wrong?

In his personal blog, Andy Davis has made a good attempt at answering some specifics relating to “Human Factors” and their possible role in Garman’s fatal last dive, but, and without wanting to comment on the specifics of Garman’s episode, here is a list some of the other potential pratfalls that await any future record attempts.

Oh, and let’s ignore the vagaries of decompression… actually coming back from depth, which is a huge challenge in itself… and look at only the first magnitude of challenges that a diver would face at extreme depth.

First, the issue with breathing helium below a couple hundred meters. One might say that high-pressure-neurological-syndrome (HPNS) is to diving deep on helium what nitrogen is to deep diving on air. But rather than the classic symptoms and signs of inert-gas narcosis (slowing of brain function and stupor), HPNS manifests itself in myoclonic jerks (brief, shock-like seizures of a muscle or a group of muscles), dizziness, nausea, and vomiting… and eventually, coma and death. In effect, HPNS seems to be caused by an elevation of brain function… in lay-person’s terms that paint a mind-picture most of us can appreciate, HPNS results in the diver’s nervous system short-circuiting.

The depth at which HPNS develops and the severity of its signs and symptoms is more closely related to the rate of compression rather than the depth or helium partial-pressure being breathed. So in essence, the faster one drops in the water column, the shallower symptoms occur and the more severe they are. I was taught the helium depth for potential HPNS on bounce dives is a low as 17 bar/ata. And that, depending on the proportions of the mix, and whether it’s heliox or trimix, can become a factor as “shallow” as 180 metres.

As recreational divers push depth limits more, HPNS definitely becomes a rising factor. Commercial, military and scientific divers have learned how to mitigate its risks. In many cases, they take several hours to descend, which lessens the effects of HPNS. Record-depth divers venture to potentially problematic depths and beyond in minutes. No amount of practice, special diets, exercise, yoga,  or magic chanting will reliably change basic human physiology. Thinking that you can ignore this fact is like venturing into outer-space dressed in a Star Wars Halloween costume from Walmart and expecting a good outcome.

Getting the right mix is also hugely problematic. Partial-pressure blending is an inexact science… actually, partial-pressure blending as practiced by most divers and dive shops is about as far from science as driving a moped is from MotoGP, but it is commonly done. I do it, you probably do it, my mates do it. With controlled and best-practice procedures, it is a workable fudge for most technical and sport dives. However, for deep dives, the standard methodology used by dive shops and the vast majority of technical instructors offers an unacceptable degree of slop. It is simply too inaccurate. Even the units of measurement we use are garbled, have nothing to do with real gas laws and behavior, and are miss-matched to our purpose. Therefore the margin for error falls far outside the bell-curve of tolerable risk management.

Essentially, when the fraction of oxygen in a breathing gas is as low as it must be for extremely deep diving, laboratory-grade calibration gases should be used to “zero-out” high-resolution oxygen analyzers. Even better is to have certified breathing gases supplied by a gas blending operation, and then verify its contents with a high-res analyzer. Using the standard gear that most technical divers and dive shops use is either suicidal or criminally negligent. The boundaries separating breathable, hypoxic and hyperoxic are simply too close in deep diving for anyone to wing it.

As if that were not reason enough to call in sick on dive day, there is the compounding problem of gas contamination: carbon monoxide, volatile organic compounds, oil vapor, et al. In sport and many technical diving applications, trace amounts of these categories of contaminants may not kill a diver. They may not effect a diver’s health at all. However, at depths where the ambient pressure approaches and exceeds 20 bars (190 metres or about 630 feet), even a gas containing a few parts per million, can be toxic. Several manufacturers have excellent equipment to detect these types of contaminants, but this equipment is cost-prohibitive for dive operations focused on recreational dives… even technical ones. Few if any have access to it.

Then there’s gas volume. Open-circuit scuba is the best technology for a host of jobs, but diving to extreme depth is not one of them. It simply requires too many tanks, and too many regulator switches. Too many opportunities for malfunctions, mix-ups, missed swops.

For example, let us consider a diver who consumes 14 litres of gas per minute on the surface (about half a cubic foot and a good average for this example). This diver would consume at least 450 litres (that’s about 16 cubic feet) per minute at a depth of 300 metres or around 950 feet… and that is if he or she were NOT stressed. They would also need to be adding gas to whatever buoyancy device they had concocted to support multiple tanks… a challenge in itself.

Couple this with the sobering fact that the pressure at this depth is around 31 bar/ata, so even regulators specifically set-up for deep diving, would be struggling to deliver gas at all since that gas would have more than 30 times its surface density at depth. Even a blend with lots of helium would require the diver to work hard just to breathe. And of course, a high work of breathing increases carbon dioxide buildup, which results in a cascade of unpleasantness… including an increase respiration rate and increased susceptibility to inert gas narcosis.

Thermal stress is another factor at even moderate depths both in fresh and salt water. More so in temperate water but in a tropical locations too, the difference in ambient temperature between the surface and target depth can be 20 – 30 degrees Celsius or more depending on current, season, time of year, etc. Combine this with the effects of pressure on neoprene, and it quickly becomes apparent that no standard wetsuit can provide adequate protection to keep a diver alert and functioning optimally below recreational (sport or technical diving) depths.

Well, I am sure these and other “long-shot” interferences such as compression arthralgia, immersion pulmonary edema, isobaric counter-diffusion were all considered by Guy Garman and his team of experts, but for the rest of us, they seem to suggest strongly that extreme deep diving on scuba is a crap shoot with the odds in favor of the house. Don’t try it at home kids.

To read Andy Davis blog, visit: http://scubatechphilippines.com/scuba_blog/guy-garman-world-depth-record-fatal-dive/

To read more about HPNS, visit Dr. David Sawatzky’s article for Diver Magazine: http://divermag.com/high-pressure-neurological-syndrome


Setting Limits for cave diving: How much bailout gas should a CCR cave diver carry… and where?

Closed-Circuit Rebreathers (CCRs) are complex. Fewer moving parts than a Formula One car, and less mind-boggling than a Heath Robinson machine, but as mysterious and confusing as both to some folks.

Here’s one thing that certainly doesn’t help. When open-circuit scuba goes pear-shaped, the situation usually announces itself with gusto. Events such as a high-pressure seat failure, an o-ring giving up the ghost, a hose failing, or a manifold or burst-disk leaking, make themselves known immediately. Divers spend a huge percentage of the time during any technical training program, rehearsing a variety of valve shutdowns, regulator switches, and one or more options intended to deal with this type of failure, preserve what gas they can, and get their backsides out and to the surface with the least fuss possible.

By contrast, a CCR is not only quieter than open-circuit in normal operation, a whole category of failures arrive unannounced and quietly too. Certainly CCRs are still prone to many of the issues that plague their bubble-making dive buddies. Ruptured hoses, extruded orings, faulty handwheels, and free-flowing first stages are all possible. But in addition, there’s a whole category of sly, furtive malfunctions unique to closed-circuit diving; and each of these has the potential to cause real harm.

The default and simplest solution is to “bailout to open-circuit.” In other words, stop using the rebreather and switch to breathing from open-circuit gear to get back to the surface as rapidly as circumstances allow.

Advanced training for CCR divers puts strong emphasis on keeping the diver in CCR mode for as long as safety allows, and only bailing out as the primary option for scenarios like catastrophic loop failures or full floods, widely divergent oxygen cell readings, carbon-dioxide breakthrough, mechanical damage to primary components, etc. Cave CCR students, for example, are expected to consider all the options available to them in the event of a system failure – real or simulated. A full-cave CCR course is an exercise in complex navigation, and disaster scenario management. However, for the sake of overall safety, CCR cavers are also encouraged to bailout to open circuit if they have doubt about what needs fixing and how best to do so.

A useful phrase worth remembering is: THERE’S NO SHAME IN BAILING OUT!

Of course, as with most pieces of advice about diving, particularly cave diving, and more specifically about diving a CCR in a cave, there is a limitation. There’s no shame in bailing out… provided you have more gas then you need to get back to dryland in one piece.

And this begs the question: How much bailout gas is enough?

Calculating the answer to this is simply a question of using average depth (expressed in bar or ata), and multiplying that number by how much time it will take to get back to open water. In addition, one is advised to factor in some contingency volume for heightened gas consumption due to stress, hypercapnia, and so on. One suggestion is to work with a basic SAC rate of 30 litres / one cubic foot per minute. So using this baseline for a cave with an average depth of 20 metres / about 65 feet / 3 bar or ata, the bailout consumption rate would be 3 X 30 litres or 3 X 1 cubic feet per minute.

This calculation suggests an 80 cubic-foot cylinder (11 L charged to 200-210 bar)  would last approximately 25 minutes. Penetrations therefore would be no deeper than a 25 minute swim to the exit… where one might normally stage a small cylinder of decompression gas: usually pure oxygen.

Some divers use a slightly more conservative baseline, some slightly more aggressive. Some calculate a slightly lower consumption rate after the first 10 minutes on bailout, on the understanding that a diver will begin to regain control of his or her breathing after that time.

Another approach is the “one-hour rule.” Following this guideline, divers each plan to surface with one hour of all consumables in reserve, which includes lights, oxygen and diluent gases, scrubber, and bailout.

Whichever guideline one opts to use, the strong recommendation is to backup any seat-of-the-pants calculations by conducting simulated bailouts from various points in caves one dives regularly. These actual real-world data – with an added factor for stress – can then be inserted in calculations to arrive at a more accurate estimate.

Once one has an idea of how much bailout gas is enough, the next decision is how to carry it. Options include, about one’s person, shared among team members, drop-staged at various points in the cave.

The NSS-CDS, one of the original cave diving training agencies, suggests a dive team carries 1.5 times the volume of gas required to get a single diver out of the cave. Therefore, in the example above and a three-person team, each member would carry a fully charged 40-cubic foot bottle.

The logic behind “team bailout” is that there is, for the diver with a gas emergency, a greater level of conservatism than the acceptable norm for open-circuit cave divers. It does however demand that team stays in contact, swap tanks during their exit, and that only one unit has a problem that requires bailout.

Except in exceptional circumstances – with seasoned team members and when the basic bailout scenarios are inappropriate or impractical – I choose to carry on my person, enough gas to swim out of the cave on my own. Depending on the unit I am diving, I find that carrying two, 80-cubic foot sidemount cylinders is easy, comfortable, streamlined, and allows for plenty of time to exit from the vast majority of tourist cave dives. On occasion, for “smaller” dives or shallower profiles, I’ll strap on smaller aluminum tanks for bailout. If a dive requires a bailout volume approaching my normal carried volume, or a greater safety margin, I’ll drop stage bailout gas and/or work out a kind of hybrid personal-carry-team-dropped-stage strategy.

More than any other factor, one should be aware of the elevated gas consumption that typically follows an incident that demanded coming “off the loop” (bailing out). One also has to consider, especially if open-circuit diving is no longer part of your regular dive menu, typical consumption rates for a CCR diver using OC gear are often higher than expected. Something to do with the sudden shock of breathing cold, dry air I suspect.

In any event, remember to always have something appropriate to breathe, and plenty of it. You will never regret carrying more gas than you need.

Do some CCR training standards need to be revisited?

Lucky enough to have the option, and sometimes I use open-circuit technology because it better suits the environment and situation, but I think of myself as a rebreather diver.

Also, I count myself as lucky to be a rebreather instructor. I enjoy teaching something a little more complex, technically challenging, and arguably a wee bit more cerebral than basic open-water classes. However, I have issues with a couple of things that standards require me to incorporate into CCR training.

Let’s start with recommendations for the flavor of diluent in TDI’s first level of mixed gas training. (FYI: this is the program with a depth limit of 60 metres… that’s 200 feet American.)

The course standards require the diver’s diluent cylinder to contain 16 percent oxygen or more. At first blush this seems sensible. After all, a gas containing 16 percent or more oxygen can be breathed on the surface without ill effect… but only in open-circuit mode… and only in the majority of circumstances, not all.

Someone unfamiliar with rebreather diving, therefore (a trial juror for example), could be easily convinced that even if the rebreather was unable to add supplemental oxygen to bring the partial pressure up to a healthier range – either because of a malfunctioning oxygen solenoid or depleted oxygen supply cylinder – the diver would be “OK” to surface and get out of the water. A 16 percent oxygen mix would be, then, a good choice to breathe in these circumstances.

However, it is not. Few CCR instructors promote this option. Most – me included – would promote coming off the loop and breathing bailout gas (decompression bailout gas for example), long before surfacing.

In essence, the fact that the diluent is breathable on the surface in very limited and sub-optimal circumstances has little bearing on risk management.

One might argue that such a gas is potentially dangerous. And the truth is that breathing a trimix diluent, any diluent even air, on a malfunctioning unit or with an empty oxygen supply cylinder on the surface or close to the surface on a rebreather is a poor choice. It would be a crap shoot anyplace shallower than say 21 metres (about 70 feet American). In my opinion, the risk of hypoxia – and other complications – is too great at that depth or shallower. Best option is to bailout to open-circuit deco mix. Easier. More likely to have a happy ending.

So, would I like to have standards suggest the oxygen content of the diluent bottle be increased? No, just the opposite.

The issue has nothing to do with what can be breathed on the surface. This is a red-herring in my opinion. With a functioning unit, the oxygen content of the gas within the diver’s breathing loop at the surface (the oxygen set-point) will be maintained at something like the equivalent of breathing EAN70. If the unit cannot do that, the diver is best advised to bailout to open-circuit gas… OFF-BOARD OPEN CIRCUIT NOT DILUENT.

So, the diluent on the surface issue is not an issue at all. What is an issue is what happens at depth.

The procedure of emptying the contents of a rebreather’s breathing loop and replacing it with diluent, is called, unsurprisingly, a diluent flush. It serves a couple of functions, each with a specific benefit.

Let’s look at number one function of a diluent flush. Doing so, replaces the gas being breathed with a known entity with a predictable oxygen partial pressure. That oxygen pressure is derived by multiplying the fraction of oxygen in the diluent by the ambient pressure expressed in bar or ata. So for air diluent at 30 metres the solution is approximately 0.20 X 4, which equals 0.8. And that’s what you’d be breathing after a complete flush on air, at 30 metres (100 feet). And, importantly, that is what you’d expect the readout on the unit’s PPO2 display to show you.

Reassuring when this happens. Even more so because you can then watch each oxygen sensor’s behavior as the unit starts to add oxygen to bring the loop gas up to its intended set-point (let’s say for example’s sake, an oxygen partial pressure of 1.3 bar). The speed at which the sensors respond and refresh a gradually rising PO2, and the uniformity of their display can indicate everything is functioning as it should… or that there are problems.

Now, let’s imagine we are diving at 60 metres using a diluent containing 16 percent oxygen. The ambient pressure at 60 metres is 7 bar/ata, therefore a quick diluent flush will return a partial pressure of approximately 7 X 0.16, which is 1.1 – 1.2 bar. If you were running a set-point of 1.3 bar or 1.2 bar (both are possible and common choices), a diluent flush would tell you bugger all. A diluent flush would not appreciably change the oxygen partial pressure.

In my opinion, diving to 60 metres on a diluent containing 16 percent oxygen is not the best option… actually, it’s a rather poor option, and one I am reluctant to recommend. I believe doing so takes away a valuable, vital real-time test of oxygen cell function.

Here’s my point. While 16 percent oxygen may support life when breathed open-circuit on the surface, the likelihood of a CCR diver opting to do so, is remote… perhaps a very last resort… if that. Whereas executing a diluent-flush at depth to check on oxygen cell behavior is something one might do several times during a dive.

I’m all for managing risk, and having your backside covered should the Rottweilers hit the fan, but I don’t believe TDI’s suggestion of the “correct” diluent for 60-metres dives does so… it is simply too oxygen rich. Why not suggest a 10/50 diluent on all CCR dives to 80 metres and above? It’s easy to mix and is the default diluent gas sold to divers in many, many of the dive shops I use.

At 60 metres (7 atmospheres, 200 feet), a partial diluent flush with a 10/50 returns readings of around 0.7 bar, which gives one the widest scope possible for watching oxygen cell behavior.

Continue reading

The “weighting test:” are technical divers absolved for some reason I don’t know about?

When you first learned to dive, I’d bet dollars to doughnuts that your instructor explained a simple trick to help you check how much lead you should carry. It went something like this:

  • The diver enters water (at least 3-4 metres deep) with gear in place and a regulator in her mouth, with her cylinder almost empty (SPG reading perhaps 50 bar/500 psi)
  • She inhales and holds a full breath then vents all the air from her buoyancy device.
  • She hangs motionless… Quiet hands and feet
  • If correctly weighted, after 30 seconds or so, she will settle in the water and float at eye level, half her mask window below the water, half above
  • She exhales and slowly sinks

What is not commonly taught is that this test can be completed with a full tank also. The only difference being that the diver should add enough ballast after the test to compensate for the weight of gas that she will use during the dive… the aptly named buoyancy shift… otherwise she will be too “floaty” to hold a safety stop at the end of her dive.

Your first instructor may also have explained exactly why carrying too much lead is a recipe for a miserable dive. Achieving good trim, buoyancy control, presenting a streamlined angle of attack to the water, and in-water comfort can be difficult for new divers but more so when he or she is over-weighted. Hence the value of doing a weighting test: it is definitely time and effort well spent.

Of course, an alarming percentage of divers all but ignore the lessons taught by the test and dive with “a little extra lead just to be safe.” God only knows what that’s supposed to mean, but it happens too often.

Now just in case you consider yourself a technical diver and are reading this thinking: “Bloody sport divers… always getting it wrong;” I believe that the worst offenders in the over-weighting challenge are technical divers. That’s right buddy, you and me.

The Balanced System Misunderstanding
The term “balanced system” actually describes three important aspects of gear selection and configuration. The first is the outcome of the balancing act between buoyancy and gravity, and whether the diver and the gear she takes into the water floats or sinks when it’s all put together. (Simplified to does it float or does it sink.) Secondly, the weight of ballast that could be ditched should the Rottweilers hit the fan and the diver has to swim for the surface without a primary buoyancy aid. (For a sport diver this ditchable weight is usually his/her weight belt; and for a technical diver, it might be stage bottles etc.). Thirdly, where the ballast should be located or carried since this will affect the diver’s trim and issues with the angle of attack as he or she moves through the water.

For a technical diver, understanding and addressing all three is necessary — just as it is with his or her sport-diver buddy — but the nuances of all three issues are more complex to calculate and more finicky to arrange for anyone engaged in tech diving profiles.

You may have read before in various onLine postings and perhaps textbooks that “a balanced system is one that a diver should be able to swim to the surface even with a failed [primary buoyancy cell].”

The ability to get themselves and as much of their life-support system back to the surface is certainly something technical divers should strive to achieve, but without any actually thought, calculations or in-water testing, it really cannot be assumed. Many do.

For example, the buoyancy characteristics of most sets of traditional North Florida Cave Rigs (steel backplate-mounted and manifolded doubles) means most would have a hard time to qualify as balanced at the beginning of a dive when fully-charged with gas.

For many technical divers, their backmounted doubles (and the gas they contain) constitute the vast bulk of the ballast they carry. So in effect, they often carry very, very little ditchable weight… if any. If they are over-weighted, they have nothing to ditch. In an emergency, swimming a set of steel doubles up to a safety stop and holding position in the water column for even a few minutes would be close to impossible and certainly stressful for these people.

Luckily, primary buoyancy cell failures are rare, but even so, divers who opt for steel doubles need to be aware of the potential challenges their kit presents them with… you can’t take off one tank and swim the other one to the surface when wearing twin cylinders!

Sidemount users have things slightly easier because they can unclip one primary bottle, dump it, and surface while breathing from the second. But their systems present challenges too. Rebreather divers also have a special balanced rig paradox to sort out if they happen to have a “dramatic moment” at depth.

Weight Changes During Your Dive
As a diver, especially a technical diver or one who aspires to become one, and contrary to the assumptions made by the Ideal Gas Law, we need to understand that gas has mass. For non-scientific applications this means gas weighs something and as it is consumed during a dive, the drop in gas weight is what contributes to buoyancy shift.

I don’t usually speak American Standard Units, but you might and if you do, you should take note. A cubic foot of air weighs approximately 0.0807 pounds. Perhaps more useful is that 13 cubic feet of air equals about one pound. Therefore, a diver carrying a couple of 130 cubic-foot steel cylinders, who has consumed just half of a full air fill during her dive, will be approximately 10 pounds lighter than when she started!

For the rest of the world, one thousand litres of air – assuming standard content, pressure, and a temperature of 0 degrees – will weigh around 1.29 kilos… slightly less at higher temperatures. So, a diver starting her dive wearing two 10-litre cylinders charged to 230 bar is carrying a little less than six kilos of gas with her!

Another thing that may affect weighting is the type of thermal protection being worn. For instance wetsuits compress and the lift they provide will decrease as depth increases. Drysuits and what’s inside them providing insulation, also compress at depth and provide less lift.

So… Let’s Determine How Much Ballast
The first step of the weighting test for a technical diver is similar to the one used by sport divers.

Work in a spot where there is sufficient depth to submerge but not a wall dropping to trimix depths. The six-meter / 20 –foot platform at your local quarry should be perfect. This is your test zone.

With minimal gas in your cylinders (a little less than one-third of their working, rated volume), no gas in your buoyancy cell, just enough gas in your suit to be comfortable (assuming you are wearing a drysuit), check to make sure you are able to maintain eye-level surface float with your lungs full. Exhale, and you should begin to sink slowly. This is the balance between buoyancy and gravity that you should aim for.

If you cannot sink, your rig is under-weighted. If you cannot float without adding gas to your buoyancy cell or suit, it is over-weighted.

Step two is a little more complicated.

Below where you completed step one, perhaps on that platform at six metres / 20 feet, have a collection of small lead weights that equal the weight of the gas that is “missing” from the cylinders you wore in step one. Use a handful of small weights… one kilo or less each. Have enough to make up the weight of a full fill and perhaps a little more. Use the 1000 litres weighs one and a quarter kilos, 13 cubic feet is one pound guideline.

Now descend to the platform, check your gas volume… now’s not the time to run out of something to breathe. Pick up all the weights, put them in a pouch, in a pocket, in a mesh bag, whichever works for you, and kick for the surface. Remember, no gas in the buoyancy cell. You CAN put a little in your suit, but don’t overdo it. The test is to calculate a balanced rig not to cheat.

This additional weight simulates your in-water weight at the beginning of a dive. If you can make it back to the surface, great. If not, relax, sink back to the platform and take out one small weight at a time until you CAN make it to the surface. Take note of by how much you were over-weighted when you initially tried to make it to the surface. Note how much lead you dropped before you were able to swim up.

You might say that whatever weight that is, represents how many litres or cubic feet you would have to breathe or dump to get back to the surface should something bad happen at depth. Not a terrific situation.

Frankly, being over-weighted by ANY amount has the potential to be life-ending. It’s certainly not smart. You may need to adjust your kit configuration. Use an aluminum rather than a steel backplate, get smaller cylindersor ones with different buoyancy characteristics.

Cut out as much excess non-ditchable ballast as you can. If you need lead to achieve balance in step one of the weighting test, make sure it can be ditched. I see a lot of divers adding V-Weights between their backplates and tanks… you do the math.

Stages and Decompression Bottles
When you carry out steps one and two of the weighting test outlined above, don’t wear stages or other bottles. These are ditchable and can be dumped in an emergency when a dive is first starting and your rig is at its heaviest. However, DO consider that aluminum stages and deco bottles (the type preferred by the majority of technical divers), have strange buoyancy characteristics and may float when empty or near empty. Factor this into any considerations for holding a safety stop.

In other words, should you have a problem with your buoyancy cell and are too heavy, hand off any negative bottles to your buddy. If they are empty, too positive, and you believe they may prevent you holding a stop at the end of your dive, you can dump them because they will probably float to the surface.

Rebreathers and Bailout Bottles
Rebreathers divers use very little gas during a diveusually just a couple of hundred litres, perhaps 10 cubic feet… therefore, their gear’s buoyancy shift is minimal. However, they carry bailout bottles. These may stay untapped for months. Only issue might be that on the one dive where they have to be used, the diver will ascend with less weight than “usual,” since they’ve been breathing open-circuit since they came off the loop. Because of this, the suggestion is to do a weighting check simulating a safety stop with one or two spend bailout bottles strapped to you.

Conclusion
Making the effort to get your weighting will increase your comfort and you will be in a much better position to handle emergencies, like wing failures and other problems. Cutting excess weight will make it easier for you to control your buoyancy, and you will not be wasting as much gas continually filling and dumping your buoyancy cell during the dive.

You may also derive some benefit from buying a digital fish scale. You can use it to measure the in-water weight of various accessories such as stage bottles, cameras, lights, reels and the like. Simply zero out the scale, lower the accessory into the water, hook the digital scale to it and it will display its weight. Cool too if you want to calculate an object’s volume!!

Remember also that you need recalculate your weighting when you change something in your configuration like tanks, primary lights, regs or drysuit underwear.

Have fun and dive properly weighted.

Flying after diving… what are the guidelines?

Here’s a somewhat common scenario… perhaps one you have experienced yourself; or thought about at least.

Anyhow, here it is. You and your buddy are on a dive vacation someplace that requires airline travel… bummer, right!? Pack light. Hope the TSA doesn’t break anything on your way out. Hope customs at the destination doesn’t fuss over anything on the way in.

However, all those issues aside, every other piece of the planning puzzle is falling into place just fine except for one small issue. The flight home is scheduled wheels-up at O-Dark-Hundred in the morning, and there is an opportunity to dive something really, really cool the previous afternoon… late in the afternoon. The question is: Can you do that dive without getting bent like a pretzel on the flight home less than 12 hours later?

The whole issue of Pre-flight Surface Interval (PFSI) is a contentious one. The old-school guidelines were wait 24 hours after diving before jumping on a commercial flight. But that recommendation has been revisited in more recent studies and the PFSI shortened; with suggestions that various other factors such as breathing nitrox, the length of safety stops, gas breathed during safety stops, and the duration and depth of dive, can all influence by just how much the PFSI can be shortened.

A quick straw-poll of my dive buddies tells me that the definitive answer is a moving target. There is little agreement.

What we can take as read is that flying after diving has a strong potential to apply extra decompression stress on a diver and increases their risks of decompression sickness. There seems to be a direct relationship between the risk dropping and the amount of time spent out of the water increases allowing excess inert gas to be eliminated normally and harmlessly through the lungs. Some trials have estimated the PFSI necessary for a low DCS risk (read acceptable number of incidents of DCS) after relatively long single or repetitive no-decompression dive profiles sits between 11 and 16 hours.

The PFSI for dives requiring staged decompression stops, was around 22 hours. At first blush then, a 24-hour break after diving would seem in most sport-diving cases to be very conservative. But then again, what worked in a dry chamber on a couple of hundred test subjects, may not apply to the average dive tourist coming home from a week in paradise where the diving was punctuated with rum, grilled fish and late-night romps on the beach. Equally, it also may not apply to an informed technical diver who pads her/his decompression stops with extra time, and breathes pure oxygen for long periods during that PFSI!

Well worth the download and reading time is: The Influence of bottom time on preflight surface intervals before flying after diving, published by Undersea Hyperb Med. And authored by Vann RD, Pollock NW, Freiberger JJ, Natoli MJ, DeNoble PJ, Pieper CF. (2007). It is available from the ultimate diver’s research tool: http://archive.rubicon-foundation.org/xmlui/handle/123456789/7343.

The study’s conclusion suggests “that bottom time, repetitive diving, and a decompression stop may significantly influence the pre-flight surface intervals required for low DCS risk. Moreover, it highlighted the need for additional human trials to resolve the effects of exercise and immersion on DCS risk during flying after diving. Such information might assist in the calibration of dry, resting trials for the effects of immersion and exercise which would be useful as dry, resting trials are less expensive and faster to conduct because more subjects can be exposed per chamber dive. This might be of aid for improving the accuracy of existing flying after diving guidelines.”

Significant in that conclusion is the call for additional human trials to resolve the effects of exercise and immersion on DCS risk when flying after diving.

I volunteer.

However, I would be far from an average test subject since something seems to put me outside the bell-curve for DCS risk. For example, my experience with PFSI is far from what’s generally acceptable and my practices at times have been foolhardy. Furthermore, I fall outside the age category that most studies could ethically accept in any trial… but all that aside, I would love to be a guinea pig.


Normalization of Deviance

Many divers, probably most divers, accept that diving can be truly dangerous. Of course, from time-to-time you’ll probably bump into someone who tells you and, most importantly, themselves that the risks associated with diving apply only to other people and not to them, but the majority of us are supremely aware that the Rottweilers can hit the fan on any dive, at any time, and for any number of different reasons. So it seems odd that there is so little mention in diving books and student manuals of the one “behavioral fault” common to the majority of dive fatalities.

Every year, the Diver’s Alert Network releases its report on diving incidents, injuries and fatalities. This is, in my opinion, the most valuable piece of data collection and analysis done by any organization within the dive community. It makes for compelling, but somewhat depressing reading. For example, in its 2010 report, it shares with us that there were 144 scuba-related deaths reported world-wide.

If we were to summarize the factors that contribute to dive fatalities, at least those in DAN’s report, we’d find four categories.

  1. Poor health (divers being really out of shape, on meds, ignoring common sense and diving with existing ailments or injuries).
  2. Procedural errors (things like not analyzing breathing gas, diving a rebreather with dodgy oxygen cells, running out of gas, etc.).
  3. Issues with the environment (getting into trouble because of changing conditions, like currents, visibility and the like).
  4. Problems with equipment (particularly serious in the world of rebreathers, but also including situations where a piece of kit goes pear-shaped and the diver freaks out and panics).

However, it seems to me that there is a fifth to add to that list, and its influence seeps into and significantly colors each of the other four. The Normalization of Deviance describes a dangerous facet of human nature. It goes something like this: We do something that does not follow the accepted (and acceptable) rules or guidelines – for example, we skip certain steps in a “standard” procedure because it saves time. The trouble stems from the unfortunate fact that we get away with taking the shortcut. Then, believing it’s safe to make the same safety shortcut next time around, we do the same thing… we ignore safe practice, established safe practice. In the absence of things going totally pear-shaped, our deviation from normal practice and safe procedure becomes a new acceptable norm.

The term Normalization of Deviance is from Diane Vaughan’s book on the Space Shuttle disaster, In that book, The Challenger Launch Decision, Vaughan, a professor in Columbia University’s Department of Sociology, points out that the component failure that contributed to the loss of the Space Shuttle, and the deaths of seven crew members on January 28, 1986, was predicted before the launch. The risks were known and documented!

She explains that normalization of deviance within NASA and Morton-Thiokol (the company that manufactured the solid rocket boosters (SRBs) used to propel the shuttle into space), allowed a recognized design flaw to be ignored. She writes: “As [NASA and Morton-Thiokol] recurrently observed the problem with no consequence they got to the point that flying with the flaw was normal and acceptable” In essence, flight plans made no allowances for a known issue with the SRBs.

This deviation from best practice resulted in what Vaughan termed a: Predictable Surprise. Eventually, luck ran out, the component failed and the shuttle disintegrated 73 seconds after launch killing five astronauts, two payload specialists, and grounding NASA’s shuttle program for almost three years.

Normalization of deviance – and the predictable surprises that follow – are part of that catch-all phenomenon too often observed during the accident analysis that follows failure of any high-stakes, high-risk endeavor. We call that phenomenon: Human Error.

Certainly normalization of deviance shows its ugly face in diving. Often. A classic example is the double deaths of Darrin Spivey, 35, and Dillon Sanchez, 15 on Christmas Day 2013. Spivey, certified only as an open-water diver, took Sanchez, his son, who held no recognized dive training or certification at any level, to try out new equipment, Sanchez had received as a Christmas present. For that tryout dive, they visited the Eagles Nest cave system, which is situated within the boundaries of Chassahowitzka Wildlife Management Area, Florida.

Spivey and possibly Sanchez were aware that they had no business attempting such a highly technical cave dive without specific training in cave, decompression, and trimix. The Eagles Nest, also called Lost Sink, is known justifiably as a very advanced, highly technical dive. There is even a huge sign at the water’s edge proclaiming such.

And it’s no secret that such an advanced deep dive demands respect, and training, experience and planning. Especially since the top of the debris cone directly below the system’s rather tight vertical entrance is deeper than the maximum sport diving limit. Anyone wandering in there by accident, would very soon realize the magnitude of their mistake and get the hell out of dodge… well, most would.

But Spivey and Sanchez had broken the rules before and gotten away with it. The pair had, according to records and the later testimony of family and friends, dived several North Florida caves including the Nest, and walked away Scot free. Their luck held.

Like NASA and Morton-Thiokol, Spivey and Sanchez had normalized their deviant behavior, and until Christmas Day 2013, everything was fine. Their predicable surprise was that both father and son drowned.

We all take shortcuts… Certainly I have, and I am sure you have too. If we have done so with dive safety, we’ve been lucky and have gotten away with it… up until this point at any rate.

Because of the regularity of dive fatalities and the metaphorical wake-up whack on the side of the head that these accidents can deliver, stopping the normalization deviance should be a breeze for divers. It should be simple for us to stop taking safety shortcuts. But I don’t think the dive community as a whole is particularly vigilant on that score.

Dr. Petar Denoble, DAN’s research director, writes: “While each accident may be different and some of them occur in an instant, most accidents can be represented as a chain of multiple events that lead to deadly outcome. Removing any link from that chain may change the outcome.”

I’ll put myself out on a limb here and say that if the dive community, especially dive leaders such as training agencies, instructors and other dive pros, could put greater emphasis on the pratfalls and consequences associated with the normalization of deviance, it might help to lessen the unfortunate tendency of some divers to depart from established best practices… We would in essence, be removing a link that shows itself in many chains of error. And we might see diving fatalities shrink: perhaps not to nothing, but at least shrink a little.

We will never change human nature, and never eliminate human error; but we can help to create a culture of responsibility based on a realistic review of what kills divers.

GETTING SIDEMOUNT TANKS TO BEHAVE THEMSELVES AND SIT WHERE THEY SHOULD

By Steve Lewis

One of the least mysterious things about sidemount diving is how to rig a set of steel primary cylinders so they hang at divers sides as they are supposed to, rather than hanging pendulum-like below them. However, some still struggle to get it anywhere close to right. Perhaps this article will help.

There may be several variations on the basic theme but I’ve found the simple way to rig steel cylinders to hang this way is to break the process of rigging them into a series of simple steps. Now, before explaining things in detail, there are a few assumptions that apply to this method.

Firstly, the primary cylinders are fitted with left and right DIN type valves. Secondly, whatever SM harness you use, it is fitted with loop bungees. Some folks refer to these as “old school” bungees, some call them “Armadillo” bungees because the original Armadillo SM harness used them as standard, and some call them loop bungees. These tips may not work with ring bungees or straight bungees: frankly I have no idea since I use loop bungees exclusively. The third assumption is that you want the orientation of your cylinders to look something like the illustration below.

sidemountTanks1a

In it, the diver is able to hold good horizontal trim with her/his cylinders parallel with an imaginary line drawn through their body’s center.

The fourth and final assumption is that the bottom of the cylinders (the part nearest the diver’s bum) are going to be clipped to hardware on the back of the SM harness or somewhere close to the diver’s hip.

A fifth point, not really an assumption, is that as long as tanks with opposing valves are used (i.e. left and right-hand valves) whether the first stages are worn pointing in towards the diver or pointing out to the environment is immaterial.

A simple way to approach tank rigging
Start with the notion that there are several things which will affect a tank’s orientation… and therefore the diver’s also. I find it easiest to get all of these things (let’s call them variables), approximately squared away on dryland and then resolve them one at a time working in shallow water with an observant buddy or one with a GoPro and time to spare.

sidemountTanksnewThe first thing to get sorted is the rigging on both tanks. The clip/boltsnap on the neck of the tank is simply tied onto a small loop of equipment line (3 mm braided poly works fine). The loop needs to be long enough to allow it to fit over the valve and handwheel. This clip is a backup for the loop bungee, so its setup and configuration is probably the simplest thing about rigging sidemount.

It is the placement of the stern (rear) anchor point in relation to the position of the valve… well, the handwheel on the valve, that is a little more complex. I guess we could start anywhere, but I seem to have the best luck, and the shortest gear-tweaking sessions, starting at this point.

First of all, it helps if we understand what challenge we are trying to “fix” with each variable… or what each affects at least.

When we dive sidemount, we want our primary cylinders at our sides, with the handwheels pointing away from our body, and pointing very slightly down towards the sea bed, lake bottom, cave floor, etc.

We want the handwheels oriented this way to make it possible for loop bungees to wrap around the handwheel and stay in place. We can do this by manipulating the location of where the cord with a bolt snap on it is connected to the body of the primary cylinder, in such a way that the natural resting position of the handwheel “knob” is out and down.

Start off by looking at the cylinder from directly above. Think of the handwheel pointing to 12 o’clock on an imaginary (and analog) clock face. Six o’clock is opposite and at 180 degrees away from it, and we want to mark this line. So, take a straight-edge and a marker and draw a line about 20 cm or eight inches long from the bottom of the tank along this six o’clock meridian along the side of each cylinder.

The illustration on the left should make this clearer. It shows a dotted line running along the cylinder at 180-degrees from and opposite to the handwheel. The CAM band is show in red, and the tail (a piece of nylon equipment chord) and the boltsnap or butterfly clip is shown as a solid black line and a small black and red oval at the end of it.

For the vast majority of divers, fixing the stern anchor point at six o’clock (or slightly to the left or right, let’s say five-thirty to seven-thirty) will greatly help orient the bottle and handwheel correctly.

In fact, the best option is to start off with the anchor point at six o’clock for both the left and right-hand cylinders. Fix them in this way, and let’s move on.

Now, note well a couple of provisos. The distance of the CAM band from the bottom of the cylinder is another variable and something we will discuss in a few paragraphs. At this point and as a first step, all we need to do is to find the optimal spot on the clock face to fix the spot where the stern anchor is attached to the cylinder.

For the time-being, we can put the CAM bands three or four fingers width from the bottom shoulder of our cylinder.

OK with that done, we are ready to work on the rest of our tank rigging.

The illustration below shows three more primary variables.

sidemountTanksVARIABLEPoint A is the length of the loop bungee which wraps around the cylinder’s handwheel keeping the top of the tank attached to and aligned with the diver’s shoulder. Making it longer or shorter allows a diver to adjust the position of the valve and cylinder’s top with the diver’s chest and armpit.

If the loop bungee is too long, the result will be a bottle hanging low in the front and higher in the back. If the bungee is too short, the diver will be unable to reach the tank handwheel, and there is a good chance the valve will dig into his or her armpit. This is both uncomfortable, and potentially hazardous since he or she will the unlikely to have the mobility to doff or don the cylinder without help.

Most manufacturers of loop bungees use 6-7mm (1/4-inch) thick shock cord. This thickness is strong enough not to stretch much in water. Bearing this in mind, adjust the length of your loop bungee so that with your arms by your side, and without any tension in it, the end of the loop just pokes out past your bicep. This will need to be fine-tuned for some individuals but this is an OK starting point.

Point B is the length of the tail attaching the cylinder’s bottom to the stern anchor point. (Either a Dring or “door handle” on the diver’s harness, or on the diver’s waistband.) We have already oriented the anchor point to align the handwheels, what’s controlled by making this the cylinder to hang parallel to our lateral line. If the tail is too long and the cylinder will be oriented tail down. Too short and it will be difficult to handle and the tank will sit with its bum pointing up instead of straight back.

The length of this tail WILL need to be adjusted! Do not cut it too short when you first attach it to your CAM band.

Point C is the location of the CAM band or clamp attaching the stern anchor to the cylinder. This is one of the factors influencing the diver’s trim! Moving the CAM band closer to the top of the cylinder will shift weight towards the diver’s bum, while moving it closer to the bottom will shift weight towards the diver’s shoulders/head. So moving the CAM band helps to trim the diver who is either head or bum down… you move the CAM band towards whichever end of the diver is sinking.

I find it much better and quicker to make small adjustments to one variable at a time, and to get it “right” before moving on. Your mileage may vary, but this method works for me.

A few centimeter-adjustment (an inch or so) can radically alter the trim of a tank or the diver. When you move something, make a note of what your did. I also mark the ‘six o’clock line’ on my primary cylinders with hash marks every centimeter or so from the bottom of the tank up about 10 centimeters. This makes fine-tuning my trim easier when I wear thicker or thinner drysuit undies.

There are more subtle issues with getting your sidemount self squared away (hose routing for example), but this should help you improve the way you look and feel in the water.

The value of a buddy with a camera so that you can see exactly what you and your gear looks like in the water, cannot be over-stated… make that happen.


Good luck.

sidemountTanks4asidemountTanks2asidemountTanks5asidemountTanks7bsidemountTanks6a

Donating the long-hose in SM…

One of the most commonly asked questions when divers with experience diving the classic North Florida Cave Diving setup (backplate, wing, long hose, etc.), and who are switching to technical sidemount, centers on donating the long hose in an Out of Air (OoA) scenario.

And, here’s the answer I give them.

First let’s look at a common sidemount setup — at least here in North America — which is a configuration with the long hose on the right-side bottle, and a shorter hose to the diver’s left. This configuration almost certainly owes its popularity and its genesis to North American cave divers who converted from wearing doubles to sidemount. These folks almost certainly brought the longhose with them, since the traditional SM rig had NO long hose at all!

OK, so we are considering then, a SM diver with one long hose… on his or her right, very similar to their backmounted cousin.

Now, any discussion of an OoA situation by definition is one about risk management, so first steps are to consider when (if) the requirement to share gas with a buddy becomes necessary. In other words, how likely is it… how often does this happen?

I may have been lucky but after more than a thousand cave dives and several thousand open water decompression dives, I have never been in a situation where gas sharing was required. Certainly never in a panic situation.

Before you start a letter-writing campaign, let’s be clear, I am NOT suggesting it (an OoA situation) does not happen, just that it is a rare occurrence: especially among technically trained and experienced divers. One might argue that it is so unlikely in this community that planning for it should be approached with a different mindset to the one that is taught, but let’s leave that debate for a later date. Instead let’s say that it seems far more likely in a technically trained and practiced team that a team member would realize an “OOA” situation is being APPROACHED rather than suddenly discovering that it has ARRIVED.

In these situations, handing off a regulator would be controlled and simple to manage, almost regardless of which regulator was being breathed from.

Real-world experience tells us that the VAST majority (one might say almost ALL), panicked divers grabbing at working regulators are novices who have been poorly trained, do not follow safe gas management rules, and have poor skills.

However, let’s err on the side of convention and ultra-conservatism and say that OoA scenarios are common enough to require special kit considerations. And let’s look at times during a dive when a team of well-trained, and similarly configured sidemount divers are most likely to experience a mildly emphatic need to donate a regulator. This may help to inform us how best to train/prepare for this type of event.

A list of the most likely times to share gas would certainly begin during the very first stages of a dive. This is the most likely time for a regulator to malfunction, or, if pre-dive tests have been cursory, for things like a leaking second-stage mushroom valve to make its presence known or an incorrectly opened valve to stop delivering gas at depth.

Second on the list would be around the point of “maximum penetration” either approaching the turn-around or immediately following. (For the sake of simplicity, let’s apply the maximum penetration label to an open-water or soft-overhead environment where TIME is often the controlling factor influencing when a dive team turns.)

A third situation is during the final stages of a dive… essentially when a diver switches to his/her decompression gas or during the later stages of a decompression obligation.

It would be beneficial or prudent perhaps, for a diver to PLAN to be breathing from his/her long hose during these periods when the likelihood of needing to donate a regulator is at its highest. It’s not a coincidence that when one follows the method commonly taught to sidemount cave divers (described in an article I wrote for X-Ray Dive magazine last year), this is exactly the case!

Very briefly, the suggested method begins with the diver breathing from the right-hand bottle for one-sixth of the available volume, then switching to the left-hand bottle until one-third of the starting volume has been consumed. At this point, they switch back to their RH bottle and breath IT until a further one-third of its starting volume has been used. Note well that the dive will have been turned about halfway through this second spell breathing from the RH tank. When the RH tank pressure gauge indicates the switch point has been reached (one half of the starting volume gone… one sixth plus one third is one half), the diver switches to their LH cylinder and exits on it.

An added advantage to this method is that there is ALWAYS at LEAST half the starting volume of gas in the RH bottle… the one with the long hose.

Of course, there are a couple of refinements to this method that one can employ.

Firstly, use a long hose on both left and right cylinders. Secondly, attach boltsnaps to regs on the long hose with breakaway fastenings.

Most of all, while there are many alternatives to the methods outlined above, it is worth reminding oneself that putting a lot of effort (and circular debate) about gas-sharing should begin with a full and frank analysis on HOW MANY TIMES GAS SHARING INCIDENTS OCCUR in well-trained, properly equipped teams. The response to this may shock you.

You may also be interested to investigate what actually happens in a panicked OOA situation and how well WHICHEVER technique you have been trained to employ will serve you in that particularly challenging situation.


Hope this helps.

But I can’t be bent, my computer says I did everything right

By Steve Lewis
With thanks to Neal W. Pollock, Ph.D., Research Director, Divers Alert Network

If you are a certified diver, chances are you know a few things at least about decompression stress since part of your initial training (and a lot of what followed in more complex programs hopefully), explained the vagaries of breathing compressed gas underwater.

The issue with diving – at least for this discussion – is that as a diver descends in the water column, he or she has no option but to breathe compressed gas; and the inert gas contained in whatever is being breathed is stored in the diver’s body. This is sometimes called inert gas uptake. At the end of a dive, on the way back to the surface, the process is reversed and is called inert gas elimination or more simply decompression. These two processes are part of every dive… even seemingly benign sport dives to shallow depths for short periods of time. Every dive really is a decompression dive.

Managing inert gas uptake and decompression within safe limits when diving is second only to making sure one has something other than water to breathe. If we “get it wrong” and remain at depth too long, ascend too rapidly, breathe the wrong gas, or simply have a bad-luck day, we run a higher than usual risk of suffering decompression sickness (DCS). Getting bent, the colloquial term for DCS, is a collection of disorders caused by a portion of the inert gas stored in a diver’s body bubbling out of solution too rapidly. The consequences of being bent run the gamut from nausea, fatigue, mild joint pain and dizziness all the way through paralysis and death.

The uptake/elimination cycle is a complex one. For example, it’s believed the speed of inert gas uptake is different (faster) than the speed of inert gas elimination.

Not only are uptake and elimination NOT lineal mirror-images of each other, but several variables are thought to play important roles in the uptake/elimination processes as well. I used the term: “… are thought to play important roles” because the variables – the bio-physical processes at play within a diver’s body – are complex and not completely understood. In a word, the factors governing decompression safety are effectively capricious. We might say with some authority that because of its complexity and variability, DCS is the bête noire of divers and diving. It certainly scares the bejesus out of me.

In the vast majority of recreational dives, the inert gas in question is nitrogen, but when a second inert gas is introduced into the breathing mix – helium for example – a whole new array of complications is unleashed. Diving with two breathing gases – oxygen and nitrogen – presents us decompression challenges: diving with three magnifies the challenge considerably.

An ally in the fight for information about and a better understanding of gas uptake and elimination is the dive computer.

Personal dive computers (PDCs) have evolved astonishingly rapidly in the past 20 years. The current generation does a very good job of tracking the mathematical prediction of inert gas uptake and elimination even when the person wearing the device is diving deep, for long periods of time, and breathing multiple flavors of gas. However, a PDC offers no iron-clad safe-guard that its user will not suffer a DCS episode.

Accepting the ever-present risk of DCS and understanding the erratic character of this risk, is a pre-requisite of becoming a responsible and informed diver, regardless of whether your dives take you to 10 metres or 100 metres; or last for 20 minutes or 200.

A personal dive computer – like any computer big or small – is very good at crunching numbers. It excels at calculating gas uptake based on depth, time and breathing mix; and, with the help of a decompression algorithm, showing users how fast or slow to ascend, where to stop in the water column, and for how long. However, this is all theoretical. Decompression theory is just that; and a decompression algorithm is simply a mathematical model that postulates what happens within a diver’s body when he or she is diving. That’s right, deco theory is woven throughout with guesswork: some of it informed, some not so much so.

The shortcoming of any decompression algorithm and therefore of any dive computer is that the relevance of its calculations to you and me are limited because it cannot adequately account for the numerous biophysical variables particular to us as individual divers. You and I may be similar perhaps, but certainly we are not the same. We can wear the same brand and model of PDC and dive very similar profiles breathing the same flavor of nitrox (or trimix), but the two of us will most certainly on-gas and off-gas at different speeds and with different levels of efficiency. And those differences will vary from day-to-day, dive-to-dive. One of us might get bent while the other is free of any signs or symptoms.

Adding yet another complication is that there are simply dozens of dive computers on the market and several substantially different decompression algorithms at their core… some models of PDC are capable of running more than one algorithm. This makes it close to impossible to give useful suggestions detailing the pros of each and how to work around the cons. Nevertheless, there are a few recommendations that apply to PDC use generally.

Number one, read the user’s manual. Have the computer beside you as you do so and play with it. Get to know what your new tool is capable of and how to activate any bells and whistles it may be fitted with. Learn what button does what and how to access the type of information that is going to help you stay safe on your dive. Absolutely have as an end goal for your “getting to know you” session, understanding what algorithm your computer uses, how to adjust conservatism factors, and the potential effects of more or less conservatism on you and your health.

Number two, use it according to the guidelines in the user manual and whatever common-sense you have been gifted with. In attempts to reset their PDC because of a recent transgression (usually something that came close to getting the user bent), I have witnessed divers pulling out batteries, hanging computers in the water “to decompress,” and even leaving their PDC on the boat for a dive to “cool off.” None of this is a good idea. Seriously.

Number three, all late generation dive computers deliver warnings when their users misbehave. These take the form of audible alarms (bells and buzzers) or visual warnings (flashing colors, symbols or messages). Some combine both. However yours is designed to deliver its warnings, take note of those warnings and modify your behavior accordingly. I once shared a decompression station and an annoyingly long stop with someone whose PDC chirped ceaselessly at him (and anyone else within earshot). He had NOT read the user’s manual and therefore was unable to switch it to any of the three decompression gases being used on the dive. His computer wanted him to return to about 30 metres and stay there for a long, long time.

Number four, understand that a PDC, even one with a four figure price tag, it not a panacea. At most, and following the best possible scenario, all a dive computer can supply its user with is an approximate guide to their decompression status; and a rough guess at their proximity to decompression stress.

Paraphrasing Neal Pollock, a computer, even when used correctly, provides no more than superficial protection from DCS: just the very first-level of information. We need to dig a little deeper into what affects decompression, and understand a little more about our PDC than when to change its battery if we want to mitigate the risks of decompression sickness.

Dr. Pollock, Research Director at Divers Alert Network and a researcher at the Center for Hyperbaric Medicine and Environmental Physiology at Duke University Medical Center, tells us there are more than two dozen factors influencing decompression safety. These include the obvious, such as time and depth, as well as the less obvious and less easily defined and quantified such as epigenetics, atmospheric pressure, and pre-dive exercise.

Essentially, Pollock’s research underscores the difficulty of producing a “magic silver bullet” capable of protecting us completely from DCS. He also suggests that often divers who suffer DCS look for some way to shift blame. They tell us their incident was “unearned.” “Hey, I did everything right… exactly the same as many times before.” They moan because their computer did not warn them. In fact, one often hears a diver express confusion because their dive computer did not get bent and they did.

He says if we fail to recognize errors in our behavior, our pre-dive preparations, or the influence of our personal makeup and fitness to dive, “and we refuse to take personal responsibility,” the learning process breaks down.

Pollock explains that many of us focus on only a small part of the overall picture regarding decompression safety. He uses the example of hydration. Divers routinely blame poor hydration for causing their DCS, but few have a realistic handle on what constitutes good hydration, and fewer yet on the many other factors that contribute to deco stress.

“Proper hydration may play a role in decompression safety, but throwing back a half-litre of water immediately before diving does nothing except make you pee,” he explains. “The “hydration” goes right through without any appreciable effect.”

So where does this leave you and me?

If your diving exposures are mild, you are certified to use and indeed use the appropriate nitrox for your dives, you behave responsibly and cautiously, and follow the best practices suggested by organizations such as DAN, chances are good you will never experience DCS.

If your diving is a touch more radical, and you routinely conduct staged decompression dives, the advice is to dive especially conservatively. Research and understand all the many factors that may have an impact on your safety, and plan accordingly.

Most of all, take responsibility for your actions and don’t make a challenge out of who can get out of the water fastest. Better to enjoy a slightly delayed post-dive beverage with your mates than spend hours in the chamber wondering why it is you’re bent but your computer isn’t.

I wanna make a case for unsweetened tea

If I first tell you that I’m an expat Brit, it will probably come as no surprise if I also share with you that I enjoy a cup of tea. A few shots of strong espresso in a bowl of hot milk is my morning drink, but tea is on the menu for most of the rest of the day. Perhaps less easy to fit into the ethnic stereotyping is the way I prefer my tea made. That preference is not hot with milk and sugar, but black with lemon, cold and unsweetened. And if we want to assume another level of stereotyping, you might ask yourself how I developed a taste for a drink that is a favorite in the Southern States but difficult to find most any place else, especially where I live in rural Canada.

By the way, the answer to the question above would be scuba diving. I like to drink unsweet tea anytime I can lay hands on it, but in particular I like to drink it when I am diving. Now I should also explain that I drink a lot of water when diving or otherwise. On a normal day, my water intake is around two to two and a half litres. When I am diving, I throw down at least that much. However, I also like to drink tea… probably a litre or more of it given the chance. My guess is that I “caught” the habit hanging out in North Florida’s Cave Country.

Now just in case you are reading this and saying quietly to yourself: “Guy’s an idiot. Tea is a serious diuretic and divers should steer away from it,” give me a couple more minutes.

And by the way, if you ARE thinking that, you’re not alone. I was recently on a dive boat (an excellent live-aboard working out of the Florida Keys). Always open for suggestions and customer feedback, one of the owners asked what I would change about their operations. I suggested their soda gun have a button for unsweetened tea added. She looked at me with a smile and explained that tea being “the most powerful diuretic known” I would not be seeing it on the menu for her divers anytime soon.

I resisted the temptation to argue. For example, I resisted the temptation to point out the boat’s soda offerings included: cola, and root beer; both of which have serious dietary side-effects from ingredients not to be found in tea. I also chose to not point out that there was a huge canteen of coffee on the galley counter below decks… surely if tea is diuretic, that must be too. Right? And thankfully, and most of all, I resisted the temptation to cry: “Bullshit.” Because bullshit it is.

Here are some facts about tea.

Tea is, at worst, mildly diuretic; with the emphasis on mildly. While you may poo-poo the veracity and question the bias of any study I care to cite here, data – and not some bullshit hearsay from a dubiously researched diving manual – indicates that everyday consumption of tea (hot or otherwise) does not produce a negative diuretic effect unless the amount of tea consumed at one sitting contains more than 300mg of caffeine. Since the average cuppa contains around 50mg, you’d have to drink about 1.5 litres of tea in one sitting to ingest this level of caffeine. That, my friends, would take some serious guzzling.

It may be worth noting that the British Dietetic Association has suggested tea can be used to supplement normal water consumption! Nothing there about tea being counter-indicated for good hydration… the opposite in fact. The BDA report went on to state that “the style of tea and coffee and the amounts we drink in the UK are unlikely to have a negative effect [on hydration]”. I think we are safe to apply the same logic anywhere else in the world.

A clinical study published by the British Tea Advisory Panel (admittedly a potentially biased source) stated that a cup of tea can be just as good as a glass of water at keeping your body hydrated. It explained that four to eight cups of tea consumed throughout the day, is thirst quenching “without any diuretic side-effects.” Now, I am willing to squint a little at one or two of those assumptions without adding some provisos but it’s interesting nevertheless.

In addition, the Harvard School of Public Health rates tea as one of the healthiest beverages. Tea contains essential nutrients that are being studied for their value in possibly preventing heart disease and diabetes. For instance, brewed tea is rich in free-radical fighting antioxidants.

Unsweetened ice tea is also naturally low in calories. A 16-ounce glass of unsweetened ice tea (that’s a little less than half a litre) will deliver about three calories. The same volume of cola contains about 180 calories all of which come from sugar.

Now you are free to drink whatever you want. And if I am on your boat, I will follow your rules and allow you to live by whatever odd dietary foibles you may have. But, please get something straight, unsweetened iced tea is NOT a serious diuretic and in fact may encourage divers who have an issue drinking a healthy dose of water to actually better hydrate.

Thanks for your time!

Anyone for a cuppa?

GETTING DRESSED

One of my students (in a sidemount clinic) suggested this might be helpful if more widely circulated. I see many sidemount divers — newbies and “experienced” — working ad-hoc when it comes to kitting up. If that works for you, great. I seem to have better luck, and seem to get the job done faster, following a set procedure. Here is the one I use.

Sidemount rigging… the easy way to get all that gear on without forgetting anything!

This is essentially an “assembly checklist” for diving two primary bottles configured correctly with opposing handwheels and rigged for sidemount diving.

  1. If gas in both cylinders has not been analysed, do so and mark MOD of mix on duct tape applied to neck of primary cylinder making sure it conforms to dive plan and is OK to surface breathe.
  2. If gas has already been analysed and MOD marked, check it conforms to dive plan and is OK to surface breathe.
    1. MOD for both cylinders should be the same give or take one metre or less
  3. Connect regulator with long hose to right-hand cylinder.
  4. Inspect hoses, crimps, exterior of first and second stages, and house the long hose in tank bands.
  5. Pressurize (turn handwheel on), confirm starting pressure / volume is correct according to dive plan.
  6. Turn handwheel off. Watch SPG for any fall in pressure.
  7. Repeat procedure for connecting left-hand regulator (necklace) to left-hand cylinder noting that starting pressure in both cylinders should be approximately equal.
  8. Position cylinders in the most convenient spot for you to stand, sit, kneel or squat between them.
  9. Don SM harness and tighten shoulder straps, chest and crotch straps.
  10. Get between cylinders and get ready to put them on.

BEGIN WITH LEFT-HAND CYLINDER

  1. Clip nose bolt snap to top D-ring
  2. Clip anchor bolt or butterfly snap to butt plate rail
  3. Put loop bungee over handwheel
  4. Connect LP inflator to wing and test
  5. Route regulator hose up left side and around neck passing necklace bungee over head
  6. Inspect mouthpiece for holes, cable tie in place and tight, and no foreign objects
  7. Begin to wet-breathe regulator
  8. Watch for SPG pressure drop and turn handwheel until valve is fully open


MOVE TO RIGHT HAND CYLINDER

  1. Clip nose bolt snap to top D-ring
  2. Clip anchor bolt or butterfly snap to butt plate rail
  3. Connect LP inflator to drysuit routing hose under harness and over chest strap… test
  4. Put loop bungee over handwheel
  5. Pull sufficient length of long hose from retainers (two “clicks”), and route regulator hose across chest, and around neck
  6. Inspect mouthpiece for holes, cable tie in place and tight, and no foreign objects
  7. Begin to wet-breathe regulator
  8. Watch for SPG pressure drop and turn handwheel until valve is fully open
  9. Clip regulator off to bottom D-ring on right shoulder.


Finish pre-dive checks and go diving.

SMS75 from Hollis…

Thoughts about the latest sidemount harness from the folks who brought us the SMS100 and SMS50


Last November I had an opportunity to dive the prototype of a new sidemount harness being developed by Hollis. Already a SMS100 and SMS50 user, I was interested to see what the company’s “mid-range” design could do that the 100 and 50 could not.

That November introduction involved diving the Hollis rig at Jackson Blue Spring in Florida. I enjoyed diving it and immediately phoned my contacts at Hollis. I explained the 75 was almost exactly what I wanted from a sidemount harness. I wanted one to dive in a variety of conditions to test if my original assessment was correct. I had to wait a while. Quite a while and when my first shipment of SMS75s arrived from Hollis a couple of weeks ago, I was extremely happy to finally have units in-hand.

Not only did I had pre-orders from students who were signed up for sidemount courses, I was even more excited to get my personal unit in the water for proper testing outside a cave environment to see how it fared in colder water and lumpier surface conditions.

FIRST IMPRESSIONS
I’ve never been disappointed with kit from Hollis. My experience with the company’s wings, fins, instruments, DSMBs, reels and so on has been really positive. It may cost a little more to design and produce gear that’s going to last ages, but I hate having things break because of cheap components and crappy quality assurance controls. I cannot say price is never an issue, but I am willing to fork out a bit more cash in the hope of avoiding the sort of disappointment that inevitably follows using shoddy kit of any sort.

With that said, right out of the box, the SMS75 is impressive. As with the SMS100 and its tiny travel cousin the SMS50, the 75 looks like professional-grade gear, and in a side-by-side comparison with other units in my personal dive locker, the Hollis stands out. If you know power tools, I think a fair comparison is comparing a heavy-duty DeWalt or Milwaukee cordless drill with a $29.99 special from a no-name manufacturer only doing business on eBay. Anyhow, built from rugged 1000D Cordura, the SMS75 looks tough enough to take a beating, and the finishing is excellent… no hanging threads, gaping or marginal seams or dodgy sewing.

As well as the build quality, the SMS75 has several design features that result from outside-the-box thinking. These deliver benefits that are easy to appreciate and that make rigging simply and comfortable with the least possible fuss.

THE HARNESS
The traditional habit of taking the shoulder harness and anchoring it behind a diver’s hip is a throwback to the design restraints of the North Florida Cave Diver’s backplate and wing setup. When faced with the challenge of taming a set of double steel back-mounted cylinders, legend has it that Greg Flannigan and Bill Main solved the issue with a continuous length of two-inch webbing and a purloined Florida Department of Transportation road sign. Fixing the over-the-shoulder harness was easily done by threading it through the backplate and almost every backplate manufacturer almost thirty years later, uses the same method. Most sidemount manufactures – including Hollis with their SMS100 and 50 – follow suit. Trouble is that this routing for a harness while reasonably stable, is not the most comfortable nor does it make things easy when trying to doff and don kit.

With input from a couple of Hollis Ambassadors, Nick Hollis, himself a sidemount diver, Edd Sorenson and other hard-core cave divers, the shoulder harness on the SMS75 is different. It attaches to the waistband away from the diver’s lower back and close to his or her side or front effectively creating in combo with the unit’s crotch strap, a stable three-point anchor system.

Not having two-inch webbing biting into your armpits may take some divers a few tries to get used to but for me at least, it felt immediately more comfortable. Once adjusted it also felt more stable, but there is a temptation to over tighten the shoulder straps which pulls the waistband out of anything approaching alignment. The trick is to get it snug and then let gravity and the crotch strap do its work.

THE BUOYANCY CELL
Another obvious innovation is the trapezoidal-shaped buoyancy cell on the SMS75. Unlike a traditional wing, it puts most lift around the diver’s hips and none at all on the shoulders. The traditional wing used in tandem with an aluminum or steel backplate spreads buoyant lift more or less equally between the shoulders and hips. For the typical sidemount diver who wishes to attain a horizontal trim, a traditional wing, or an integrated buoyancy cell delivering any appreciable lift at the shoulders will create a challenge: this type of cell tends to float the diver in a heads-up orientation.

The benefit is that right from the first couple of seconds in the water, a diver using the SMS75 trims out at or close to horizontal. While some other sidemount systems often require modifications or trim-weights on the diver’s shoulders, I’ve found that small changes in the tank cam bands is all the adjustment necessary to get a diver “squared away.”

BUNGEES
I’ve long been a fan of the more traditional loop bungee (AKA Armadillo or Old School bungee) over the straight bungee or ring bungee. I find it keeps the neck of the primary cylinders under control and helps to set up their orientation where it’s supposed to be (at the diver’s side) and at an angle that is correct (parallel to the diver’s lateral line). The SMS75 ships with loop bungees, and this once again saves time getting the system set up ready for diving.

LOCATION OF CONTROLS
One last innovation. The SMS75 features ‘reversed inflator/dump:’ the OPV/Dump is located on the top of the unit behind the diver’s head while the inflator is protected and tucked away on the diver’s left hip with the working end of the hose and its inflation valve located on the left breast and held in place by small-diameter shock chord.

For those used to finding the draw string for the dump close to their hip – or a little lower – it will take a few dives to unlearn the old muscle memory and relearn a new one… but in my opinion, the ubiquitous plastic elbow fitting is the weak spot of almost all buoyancy devices. Having it tucked away and out of the way is worth a few minutes learning a “new trick.”

DIVING THE SMS75
In two words: It’s magic.

There are several good sidemount harnesses on the market. They each have pros and cons, and frankly I have no issues diving many of them because they work and are fun to dive. However, I teach sidemount and one of the toughest “asks” of any instructor is getting the student and his or her harness to fit together like a hand and glove. You can get there with almost any unit from a reputable manufacturer, but it takes some work. In the most extreme cases, that work involves scissors, a grommet punch, and lots of cable-ties or an industrial sewing machine. In the easiest, there is always some modifications to be done.

The SMS75 is an exception. This past weekend, I worked with three divers wearing SMS75s and had them all just about done inside of an hour of surface and in-water time.

WHAT I WOULD CHANGE
Hey, I am a sidemount diver, so of course there are two things I would change, even on the SMS75. I’d like the double ring clip attached to the center of the butt plate to have slightly larger clip-off points, and I’d also like a second set of door handles either side of the butt plate… but neither is going to stop me from diving it.

CONCLUSIONS
The marketing message from Hollis tells us:

“The SMS75 is an evolution from years of sidemount development, which started with the SMS100. A product that has been copied, modified and a benchmark for technical sidemount for years. Even more popular has been the lightweight SMS50 line. These two have taken sidemount mainstream and the building blocks this new harness. While it will cater more to hard-core cave divers, SMS75 was created to handle all environments.”

All good stuff, understandable, and not full of bullshit. Most of the OC diving I do these days is in overhead environments – caves or wrecks – and the choice to dive this style of kit configuration, after more than 18 years diving traditional backmounted doubles, was based on both lifestyle AND mission specific criteria. Sidemount is not a panacea. Nothing is. It is simply an extremely flexible and useful tool that works for many different types of diving.

I think it’s fair to say that with the SMS100 and the SMS50, Hollis helped to convert many divers to “going sidemount.” Hollis was a relative late-comer to sidemount diving, but they listened to community feedback and in just a few years, have become one of the manufactures who are front and center in the sidemount market. With the SMS75, its divability out of the box, the ease with which it can be configured, and the range of diving that I feel it’s suited for, Hollis definitely has a winner.

Important to note that the SMS75 is not revolutionary. It is not going to turn a bad diver into Superman or Wonder Woman and it does not have a special switch that will suddenly fix an OOA problem. However, it is a fine piece of kit. Well designed, balanced, well-made, easy to use, and reasonably priced.

And while it’s unlikely to bring peace to the Middle East, it certainly has the ability to bring sidemount diving within the grasp of a lot more recreational and technical divers. And if you haven’t tried it, give it a shot… you might like it.


A FEW DETAILS
As an aside, the SMS75 is rated for 40 pounds of lift (enough to float about 18 kilos). The smaller SMS50 is rated at 23 and the SMS100 is credited with a touch more than 50 pounds lift. The SMS75 is available in three sizes: SM/MD, LG/XL and XXL and the system weighs seven pounds. It also ships with two cam bands, SS bolt snaps and enough equipment line to rig two primary cylinders. Suggested retail is $695US.


So many lessons to learn…

Why can’t we buy gear at North American Dive Shows?

I just returned from a trip that included visits to dive shows in Paris and Dusseldorf. It was a working trip and a bloody hard slog at times. Several days after getting back to North America, I am still waiting for my checked baggage, with my truck keys and shaving kit packed inside, to arrive. But despite all, the trip was worth the effort; if for nothing else for the lessons it taught me about the dive industry… or at least the portion of it that deals with running dive shows.

Perhaps the biggest and most obvious difference between European shows and those in North America is that punters in Europe can buy stuff. At Salon de la Plongee and BOOT Show, people were buying drysuits, rebreathers, regulators, BCDs, wings and backplates… and vacations! Imagine that. Both the Paris and Dusseldorf shows (and a couple of English shows I’ve attended in the past) seemed to be busier too. Is attendance density related to the ability for consumer to purchase kit? I suspect this is the case.

Someone once explained that you cannot buy dive gear at shows in North America because of liability issues. You can place an order at a stand and have it shipped to you later, but you can’t buy it on the spot and stuff it in your backpack. Anyone else think this is silly? It makes zero sense to me and the liability argument must surely pre-date internet purchases. After all, I can buy a rebreather off eBay no questions asked… surely there’s a greater weight of liability buying something that way than face-to-face with a manufacturer at a dive show.

Could be entirely unrelated but another difference in Europe is the age and general appearance of the punters walking the show… the demographics actually. The average attendee is younger. It is not just that there seem to be a lot more 30-somethings in the audience, but many have their children with them… diving seemed to be more of a family event in France and Germany. There were even dive-related events and displays specifically targeted at future bubble blowers.

I have seen campaigns over here that make a big thing out of diving bringing out the kid in all of us, but we ban kids from coming into the largest dive show on the continent!

There’s a lot wrong with the way North Americans package and market diving. Letting punters bring their kids and allowing them to buy at shows is not going to fix much, perhaps, but good lord, it might help surely.

Not sure if anyone from DEMA is listening to any of this, but if you are, take note. Two free marketing tips: Include Consumers and Future Consumers in your tired worn out show.

The final word from my new book…

This has been a poor year for diver deaths. I have just wrapped up a book called Staying Alive and it’s about risk management for divers… I started it because of a couple of regrettable incidents and as I finished it three months later, more deaths. The book is scheduled for launch next month from Amazon and CreateSpace. Here are my closing remarks.
_____________________________________________________

IN CLOSING
Perception of risk changes over time. The more successful we are at beating the odds, the less risky we take our behavior to be; and of course, the opposite may be true. Too often, luck reinforces bad decisions and dilutes fear, and fear is surely part of the apparatus, our personal filter, for risk management. We each must understand that because someone surfaces from a dive with a smile on their face, it does not mean they follow a good risk management process or that their behavior is not risky. It is impossible to measure a negative. Vigilance is required.

I am sitting in my office wrapping up this project. There is snow on the ground outside and I will soon have to pack and get ready to fly to Europe and go to yet another interesting and very big dive show. Perhaps I should feel happy, but I do not: I am sad.

Yesterday evening I got news that a father and son (a boy of 15 who had earned no level of scuba certification at all) had both drowned in the Eagles Nest Cave, an advanced-level North Florida system considered a challenge to certified and experienced trimix cave divers. They were, according to family, testing out new gear the kid had been given for Christmas. What on earth were they thinking: what was the father thinking as he died? Last week, two more technical divers perished. One in the Red Sea and one in the caves of Mexico. I knew them both. One much better than the other but both were nice guys; both were experienced, and unlike the father/son combination who died in a spot where neither belonged, both of last week’s victims were what one would call careful divers.

Fatal dive accidents frequently have multiple and complex, often interconnected, root causes. While each accident has unique qualities about it – in part because of the individuals involved – most accidents can be characterized as a chain of small events that lead to disaster.
This chain of events very often starts with a minor challenge – a failure in communications, a broken strap – and one event meshes with a deficiency or mistake elsewhere and triggers something even more serious, and this in turn results in escalating calamities until the house of cards has fallen down completely. To stay on top of things, technical divers need to become pretty slick at recognizing problems early, preventing a chain reaction, and thereby avoiding a one-way ride to calamity. Often something as simple as calling a dive early, before anyone gets close to the edge, can change the outcome radically and turn a potentially nasty epiphany into a positive learning experience.

Gareth Lock, who was kind enough to write the foreword for this book, is a Royal Air Force officer with a background in risk analysis and management. In his writings and presentations, he shares with us a refreshingly analytical view of dive accidents.

He and I arrive at a similar destination via quite different analytical pathways. Based on his background in the military, he uses what he calls the HFACS Dive model (pronounced H – FACS-D). His analysis and methods are based on the Human Factors Analysis and Classification System framework developed by Dr. Douglas Wiegmann and Dr. Scott Shappell of the United States Navy to identify why accidents happen and how to reduce their impact and frequency. Gareth suggests that for a dive accident to occur, several contributing factors have to align. These factors may include organizational influence, unsafe supervision, a pre-condition for unsafe acts, and unsafe acts themselves.

I believe the factors, the triggers, that lead to deaths like the recent ones in a Florida cave, the Red Sea, and Mexico are more personal, more within our grasp. The eight triggers identified back in the 1990s: Attitude, Knowledge, Training, Gas Supply, Gas Toxicity, Exposure, Equipment and Operations, provide divers with a laundry list of potential dangers.

Gareth points out with some clarity, that people ‘get away’ with diving ‘successfully’ when there are errors at every level in his HFACS model: they simply did not align that day. “And that,” he tells us. “Reinforces bad decisions and creates diver complacency.”

One has to agree with him regardless of how or why you feel divers are dying so frequently. It seems that ignoring just one of the eight risk triggers may be enough to begin a series of events that end in death: it may take two or three, and a lucky diver may get away with ignoring four or five without an incident. Life is not fair that way.

Finally, Gareth reminds us: “It is easy to blame a person, when the system is actually at fault.”
I believe too that we are sometimes too quick to blame the individual and often do not trace the mistakes made back to their “systemic” roots, but sometimes all the fault does rest with one person. The system did its best and the best is all we can expect of anything outside of a nanny state. In some instances, the buck comes to a full stop up against the victim’s attitude, their ignorance, their lack of training, their history of flaunting the rules, their willingness to gamble with the odds.

Every day you and I, indeed the whole diving community, are faced with a dilemma: error of omission or error of commission. In cases where we know someone is pushing their luck, do we mind our own business, remain quiet and watch as they hurt themselves or their dive buddies; or do we speak out? If we are part of a system that Gareth and others say needs fixing, do we have the tools to carry out the repairs? Do we even know what to fix and where to start? Can we make a difference?

There’s a kid throwing starfish back into the sea as the tide recedes. A guy walks up and asks him what he’s up to. “Saving lives,” he explains. “The tide is going out and these starfish will die on the beach, so I’m throwing them back in.” The man laughs and tells the kid that the beach is miles long and that there are hundreds, probably thousands of stranded starfish. He tells the kid he can’t save them all. The kid stops what he’s doing, looks at the guy, looks up at the sky, and back out at the ocean. He bends down, picks up another starfish and throws it as far out to sea as he can. “Saved that one!”

My hope is that through all this effort, I may just get one person to think twice before starting a dive with a faulty oxygen cell, or breathing a gas that hasn’t been analyzed, or dismissing a buddy’s suggestion that today is not a good day to go diving or taking an unqualified diver to a trimix depth cave to test new gear. Help me save a starfish.

New Sidemount Options

I rarely write reviews of kit; however, I had an opportunity to dive two new sidemount harnesses last week. One a prototype of the HOG/EDGE SM system; the other the new SMS75 harness from Hollis. I wanted to share first impressions since my experience with the out-of-the-box usability of most SM rigs is one flavored with frustration and compromise. Both of these new offerings show some promise in my opinion, and both suited me and my style of diving well.

For the record, I was diving in Jackson Blue (a North Florida cave) wearing an O’Three 1-100 drysuit and using a borrowed set of Worthington low-pressure 17 litre / 108 cft cylinders, and carrying an aluminum 40 cft cylinder for decompression gas. On the off-chance that you are not familiar with these steel cylinders, each has a surface empty weight of a little more than 20 kilos.

First, the Hollis SMS75. I’ve been waiting for a chance to see and dive this rig since being told about its development earlier this year. As with all the Hollis gear that I’ve used over the years, the SMS75 is well-built and looks like it can take abuse, which for a sidemount rig is essential. The basic design at first glance looks similar to the SMS50 but there are several key differences. To begin with, more buoyancy with the emphasis on getting the diver’s hips and arse up without resorting to sticking trim weights on the shoulders. The rated lift provided is stated as 45 pounds (about 200 Newtons or 20 kilos). I have not tested that rating but I was near bladder capacity wearing the tank package described above in fresh water.

Next is the harness. The shoulder harness is connected to the waist band webbing via two adjustable retaining buckles rather than disappearing under the armpits and attaching somewhere uncomfortable close to the diver’s back. This design is more stable and delivers better control and is essentially a rethink of the “classic” steel or aluminum BP harness routing that I find cuts into my armpits. While most SM designers have adopted a follow the leader approach, it’s refreshing to see that both Hollis and HOG have given this aspect of their rigs some thought.

Another difference between the SMS50 and the 75 is that the SMS75 comes with “old school” bungees (also known as armadillo style bungees). This style of bungee (when properly adjusted) has the advantage of keeping the top of a diver’s primary bottles where they belong and not sliding around shifting balance points as the diver reorients him or herself to navigate restrictions.

The final chance is that the inflation hose is flexible rubber with an oval cross-section and not the hard, inflexible circular trash used on many rigs… including other Hollis rigs.

Other hardware seemed adequate and perfectly serviceable… without any need to resort to scissors and duct-tape.

One potential drawback of the Hollis system is that I’ve been told it’s available in only one size. It fitted me perfectly, but I’m more or less “stock” size (180 cm tall).

The prototype HOG rig has been back and forward between the workshop, drafting table and test group for more than a year, and is finally due for its official launch around Christmas 2013. Because of this, it’s not really practical to offer anything close to a blow-by-blow of the system I dived, except to touch on some design features that I believe will make it to the final product.

Harness innovations are similar to the Hollis SMS75 which is due in great part to the fact that Edd Sorenson consulted for both companies — and in fact dives regularly with BOSS HOG, Chris Richardson. The lift that HOG is aiming for is a few pounds/kilos/tens of Newtons more than the Hollis, and the unit I used delivered about 55 pounds of lift, again focused on the lower back and hips. The shoulder dump was pouched on the demo/prototype so I was obliged to rotate and use the LP inflator unit to dump gas. This made for a couple of less than stellar moments during a couple of days use, but obviously should not be a concern on the “real thing.”

Again, similar to the SMS75, the HOG unit had the smaller, higher profile Tech “door handles” on a wider than normal butt plate. This positions the anchor points for the primary cylinders close to the top of a diver’s hip bone rather than a few centimeters lower down and closer to the spine. This is a good option for most of us but I can see it presenting a mildly annoying cylinder trim challenge to those who dive aluminum cylinders.

The HOG unit has adjustable crimping bungees to control the distribution of lift… a little… and also has a smooth replaceable cover over the whole of the buoyancy cell. Jury still out on this. It’s “required” because of the bladderless construction of the HOG wing, and did not get in my way. I simply reserve judgement until I see the final product.

Both the HOG and Hollis were fitted with a Y-style crotch strap rather than the single 2-inch webbing “be careful of the family jewels” option that most every other SM unit uses. I love this type of harness and find it way more comfy and the better option for being pulled by a scooter. Not sure if this will be the default with full production units. If it’s an option, I will ask for it.

Overall, BOTH these units seem VERY well-designed and functional. The SMS is useable out of the box if the unit I used is any indication. The HOG has a couple of “minor edits” before full production for an end-of-year delivery… but Chris tells me they will be done.

My final take is that I will be replacing my existing SM units (ones loaned to students in workshops and clinics) with both the HOG and SMS75, and I while I will keep my SMS50 for a light travel unit, my personal SM rigs will be replaced with a HOG and an SMS75 before I get back in a cave (or wreck) in open-circuit gear.

HOLLIS sms75 iNSIDEHOLLIS sms75 outSIDE

USING ADDITIONAL REDUNDANCY: the maligned and misunderstood pony bottle

This is a short extract from a book on risk management that we hope to have finished next month.


I would guess that most dive instructors, especially those who teach technical programs, get regular requests from divers to explain how to “use” a pony bottle, how to configure it so it’s not in the way, and which size pony bottle is “right” for them.
These are great questions because any diver who intends to dive deeper than 30 metres /100 feet should carry a redundant source of gas. A dive buddy is supposed to represent the first line of backup, and a well-trained and well-practiced buddy is a great resource in the event of some major gas emergency. However, the best strategy is that whenever practical strive to have a backup for your backup. In this regard, redundant air via a redundant delivery system offers a huge cushion.
The question of size is perhaps the first question to answer because how to rig and use a pony bottle depends to a large extent on its size.
When we consider using a pony bottle as a bailout or as a backup in the event of a massive gas failure with our “primary system” (the normal tank and regulator), we factor in a full minute at maximum depth to get things sorted and to gather our wits before starting the ascent. With this in mind, let’s revisit the table for SAC adjusted for depth. Since we are still talking about recreational sport diving, the limit for maximum depth is around 40 metres or 132 feet. The ambient pressure at this depth is five bar or ata and therefore the average per minute consumption will be 70 litres or 2.5 cubic feet.

Let’s also apply a realistic dive factor. Since a pony bottle is only deployed in times of stress, we need to use a DF for that first minute that reflects high-stress. The norm for this application is a DF of 2.5, which translates into 175 litres or 6.25 cubic feet for that critical first minute!
(If at this point you are beginning to question the veracity of ads extoling the virtues of those tiny emergency cylinders of “spare” compressed air, please read on.)
After the first minute, we calculate a normal ascent rate (9 metres or 30 feet per minute) up to a safety stop. That journey – about 35 metres/ 117 feet – will take about four minutes. Once again, to help simplify the calculations, we use the ambient pressure at the midpoint between maximum depth and the safety stop, which in this case will be 3.22 bar or ata. We also drop the DF to 2.0. So we have ascent time X SAC X ambient pressure X DF, which equals 360 litres or about 13 cubic feet of gas.
Now for the safety stop. Even when a dive is within the no decompression limits, there is a strong suggestion from most experts that a five-minute stop is indicated after a dive to maximum depth. So the consumption for a five-minute stop at 4.5 metres or 15 feet with a mild DF of 1.2 adds up to a total of 122 litres or 4.35 cubic feet. Finally we have to factor in a little gas for the last part of the ascent to the surface. Therefore, the best estimate is that a controlled ascent following an emergency at depth will require at least 680 litres or close to 25 cubic feet of breathable gas!
It’s the considered opinion of most divers who have experienced a real gas emergency at depth in real-world dive conditions that these numbers are neither exaggerated nor inflated. When something bad happens at great depth, there is no such thing as a plan that is too conservative or too careful. The risks of drowning, embolism, decompression sickness and various other ailments that can result from stark panic and ballistic ascents are very real and totally unforgiving. The alternative to a controlled normal ascent are simply not worth considering.
Clearly then, the “right” pony is one that holds at least 680 litres or 25 cubic feet. Because of its general usefulness, buoyancy characteristics, ease of deployment, and attractive cost compared to smaller tanks, many divers invest in an aluminum 40 (nominal capacity 40 cubic feet / 1200 litres) as the best “emergency” pony bottle.
Two final words on the topic of pony bottles before we move on to gas volume management for more advanced diving. The gas carried in a pony bottle is contingency gas. It should never be factored into the gas volume requirements for a dive. It is there for emergency use only. If the dive plan calls for more gas than can be carried in a regular primary scuba cylinder – an aluminum 80 for example – then the total kit configuration for the dive needs to be reconsidered and calls for an additional primary cylinder or a high-volume primary cylinder such as a steel 15 litre / 120 cubic-foot tank.
A bailout/pony bottle is useless if it does not deliver breathable gas faultlessly. The valve, regulator and SPG must be tested before every dive. Do not take for granted that it is filled and in working order. Analyze and label its contents, check the pressure and wet-breathe the regulator at the start of each dive.
Let’s leave this topic with one last thought. As we were editing this chapter, I read about yet another incident where a diver “ran out of air.” This time a pair of brothers and a friend were hunting crayfish in about 30 metres / 100 feet of water off the coast of New Zealand. Calm conditions at a site familiar to all three divers. Describing the victim, his brother said: He was a competent diver with several years’ experience.

I would suggest an edit… a small change but something that I hope will speak volumes to you. He was USUALLY a competent diver, but not this time. Even several years’ experience cannot compensate for serious oversight.
Plan your dive, dive your plan.

Self-Assessment: an antidote to complacency?

Cleaning out old files and finding a copy of my original dive-plan template – something my buddies and I used for several years when we first started to do deep mix dives – I remember why we scrapped it and drew up a new one: It’s missing an important element.

If memory serves, the error was pointed out by Bret Gilliam. At that time – around 1996/97 – Bret was president of Technical Diving International (TDI) and he was gathering information for student manuals and asking members to contribute things like teaching notes, learning goals, and so on. Among the various bits and pieces I contributed was a spreadsheet template of the dive plan my buddies and I were using, and that I was also teaching students to use.

“It’s good but you’re missing something…” he told me after looking it over for a few minutes. “Something critical.”

I checked it a couple more times and to my eyes the plan looked pretty comprehensive and exhaustive. I told him I could not see what was wrong with it.

“There’s nothing in it about conducting any level of self-assessment before you jump into the water,” he said. “Don’t you think that’s worthy of a line or two?”

There is a well-established maxim that tells anyone who’s listening that complacency kills experienced divers. Checklists and Dive Plans are intended as a good first-line of defence against that sort of complacency. They are intended to counter human nature and swing attention back to things that it’s easy for divers, even very experienced ones, to take for granted and overlook. For instance, I’ve seen divers forget or simply not bother to conduct a positive/negative check after refilling a diluent bottle on their rebreather. A checklist can serve to remind someone with this level of complacency not to be a Muppet.  But, as Gilliam pointed out to me, the most complete, comprehensive and meticulous dive plan cannot prevent things going horribly wrong if the folks executing it aren’t as present-and-correct and as ready as their equipment to do the dive.

Self-assessment is now included in the pre-dive checks for all TDI and PSAI courses, but like the requirement to analyze and mark EVERY bottle of gas, or pre-breathe EVERY regulator – or any of the other listed items on a checklist or dive plan – it is entirely self-policed, and quickly becomes worthless if any one member of a dive team shortcuts that “policing operation.”

The process is simple enough. You ask yourself a couple of easy-to-answer questions and you answer them honestly. Better yet, when the dive leader has completed her self-assessment, she should check with everyone on the team to make sure they all “passed” the self-assessment check.

When we dive – even on those dives that seem like a simple bimble around in shallow water – we must ask ourselves if our plans account for any and all hazards. For the purposes of providing a realistic answer, a hazard in the case of diving is any agent or situation posing a credible level of threat to our life, health and property, those of any team member, or the environment in which we intend to dive.

When we make a self-assessment, that assessed risk includes things that are not visible or readily apparent to our buddies. One is our personal level of comfort.

To check this is the case and that our planned dive is within our comfort-zone, ask: Considering ALL the risks associated with the dive as planned, do I find them acceptable? Does the plan cope with things, events, which have some significant probability of occurrence during that dive? Rottweilers hit the fan and precisely when and how depends on circumstances that may not be predicable. Does the plan make allowance for this and am I comfortable if it does not?

Recreational divers, even those engaged in kick-ass technical dives, are under no contract and are not protected by legislation. Each of us is responsible for our safety and well-being, and – to some extent through enlightened self-interest and the tenets of friendship – with that of our buddies. Honest answers to these questions will help keep us safe and should be asked before every dive; no matter how simple and inconsequential the dive seems.

In addition, there are several other questions we might ask ourselves as part of the “self-assessment” process that should be carried out long before we pull on a drysuit. They concern personal health. We need to ask if we are comfortable with: our personal heart health; are we free from angina, epilepsy, diabetes, asthma, dehydration, and fatigue? Is our cardio and physical fitness up to the stress of the dive as planned? Do we have adequate strength to do the dive as planned? Have we learned and practiced the critical safety skills required on this dive as planned? Are we diving drunk, with a hangover or stoned? Are we physically and mentally ready to do the dive as planned and if something hits a fan while we are down there, are we ready to deal with it appropriately?

It may seem a little odd, but self-assessment should also ask: Do we believe in our buddy’s abilities and do we feel they have the skills and experience required to do the dive as planned? Are we being over-confident expecting ourselves and each member of the team to do the dive as planned? Does that hold up if we become separated? Do I feel the same should it become necessary to rescue a buddy on this dive… can I rescue them and can they rescue me?

Self-assessment does not always return a positive answer. But self-assessment is a positive habit to fall into and it needs to become part of the pre-dive preparations for EVERY dive… especially any dive that requires the use of decompression gases to manage a decompression obligation, or that takes place in a hard overhead environment.

It’s not always deep and scary…

The same probably happens to you too. I’ll be at a dive show or some dive-related event and people will ask me about memorable dives. I think what they expect to hear are the “Boy’s Own Paper” adventure stories about a bunch of us stacked up like cordwood in a very small cave entrance to decompress; or drifting in the Gulf Stream at 60 metres being tailed by sharks and waiting for a shipwreck to appear out of the gloom. And normally, that’s what they get. However, some memorable dives are simply not framed in anything like such an exotic setting. Some dives are memorable simply because they pack an unexpected surprise… or they excite someone else… or both.

This past weekend I had the opportunity to make a dive in Lake Rosseau at the site of the long-defunct Royal Muskoka Hotel. Lake Rosseau is one of the three big lakes in Muskoka about 18 kilometers long and eight wide. The southern end of the lake is about 200 kilometers north of Toronto and for more than 150 years, along with the rest of Muskoka, has been a vacation spot and cottage country for folks from the city… and much further afield.

The Royal Muskoka Hotel was opened at the turn of the 20th century and was billed as the grandest summer resort in all of Muskoka, with room for 350 guests. Among its amenities: electric lighting, hot and cold running water, a post office, telegraph office, bar, billiard room, bakeshop, newsstand, barber shop and beauty salon. On the grounds (a little more than 50 hectares) was a golf-course, bowling greens, tennis courts, riding stables, and walking trails. It was a get-away for the rich and famous. But 50 years after it opened, in the spring of 1952, it burned to the ground, and its remains were summarily pushed into the lake.

I’d contacted a buddy who runs the marina at the modern-day equivalent of the Royal Muskoka (a J.W. Marriott resort) on the lake. I needed to complete one last skills-dive for a student doing a course with me, and a quick dip in the lake seemed like an easy way to accomplish it. He suggested going to the shore just off the site of the Royal Muskoka. There is a wall there that drops off to 45 metres and it’s close to the J.W.’s dock. Perfect. As a newly-certified diver himself, he was excited by the prospect of what my student and I might find.

I was less excited. Having dived in the local lakes on and off for more than 20 years, I knew that the visibility in most of them – especially the big three – could be hugely affected by tannic water with a similar level of transparency to a cup of strong Earl Gray tea.

Reverse of plate showing the effects of 60 years submerged

Well, I was wrong. Sure the water was the color of tea, but more like weak Darjeeling and perfectly acceptable so that, at depth, my student and I could see quite well… probably six metres or so. Certainly well enough to pick out lots of things that could have been relics from the Royal Muskoka, including a perfectly intact dessert plate: perhaps one of many laying at various points on the almost vertical wall.

My student completed her skills – timed staged decompression stops using breath cycles or drop in tank pressure and a knotted line on a DSMB rather than a depth gauge/bottom-timer: and surfacing with an unconscious diver from depth – and we celebrated her success by presenting our find — the perfectly intact plate — to our boat captain. He was ecstatic, and now wants to dive the area himself. I hope to make that happen sometime soon.

Face of plate found in Lake Rosseau

A memorable dive… because? Well, it’s cool to dive a spot that offers the chance of seeing and touching something historic, but more importantly, memorable because a new diver came away completely gob-smacked and excited about “local” diving without even getting his feet wet: although that’s not really true since the rain was coming down horizontally on the way back to the dock!


The Rules Apply to All of Us

If you are a technical diver — a cave diver, a trimix diver, a rebreather diver, something of that sort – you have read someplace that complacency kills experienced divers. Fact is, you may have read it several times and heard it said repeatedly because that phrase is contained in most if not all technical diving textbooks. It is so commonly bandied about that for some of us, it may have become a little trite… a cliché… something to become complacent about.

Time to smarten up.

Recently, there was yet another senseless death, which might serve to illustrate the point. This one happened at Ginnie Springs in north Florida.

A young guy named Carlos Fonseca had an oxygen toxicity episode a couple of hundred metres inside the cave and died. He was breathing from a stage bottle clearly marked oxygen and later analysed to be just about pure O2. According to statements from the folks diving with him, Carlos thought he was breathing air.

Before the dive started, he was questioned about the bottle, challenged about analysing it, but insisted that he had filled it with air, even though it was labeled for dedicated oxygen service. Now he is dead.

This incident is sad and terribly tragic… a family without a dad/husband/son/brother et al… But unfortunately it is not surprising that a certified cave and trimix diver died doing a simple, run of the mill dive that was WELL within the scope of his training and experience. As slight as his experience may have been, and as rapidly as he had progressed from open-water diver to cave diver, the dive was a simple one for which he had adequate training.

Diving is an activity that requires some restraint because it is so easy to push beyond one’s capabilities… as Steve Berman once said — and I paraphrase — any twerp can get to the back of a cave. But not everyone can manage the journey back out.

I did not know Carlos… never even met him… but I do know the fella who taught him to cave dive and a couple of buddies had dived with him during the past couple of years. He had progressed from open-water punter to trimix and cave in a couple of years. He had the money, time and desire to do so.

The over-arching assessment from the people I know who knew Carlos was that he was very confident… perhaps to the point of arrogance… but so what. He was certainly enthusiastic. He had completed 100 cave dives in a couple of years, and when you live a 16-20 hour drive from the caves, 100 dives is enthusiasm in bold letters. But, in truth, he really had not been diving long, and he certainly did not have vast experience regardless of his many postings on onLine forums and Facebook, and even though he had ticked off several “big” dives in his logbook. However, I do not believe any of that had anything to do with him being dead right now.

Experience whispers strange things in our ear. I have lost many, many friends to diving, and have seen many people who I did not know personally… like Carlos Fonseca… die in the water. Part of the work I choose to do involves picking through the debris folks like Carlos leave behind. The task is to identify what went wrong and make sure others understand the circumstances surrounding the incident, the events that triggered an incorrect reaction perhaps, so that nobody makes the same bloody error. Sometimes this is difficult, but not in this case. There is no doubt about what happened; no question what triggered the victim’s death or whose actions contributed to that death. Of course, the resulting analysis may be difficult for some to accept.

A buddy of mine is a lawyer who specializes in cases where some poor bastard has died, and he tells me his staff have a kind of open pool going to see how long it is before a friend or relative says, writes or posts on the internet something along the lines: “He was the best diver in the world… I simply do not understand how a thing like this could happen…”

Someone always says that, even when the diver is a total novice… just like that kid who died in California a couple of years back trying to do an air dive to 80 metres. He was a divemaster… maybe, I forget. Anyhow, he had ZERO training to do that sort of dive but the boy’s father insisted his son was a “professional” and would not accept evidence to the contrary… or that his son had probably been lulled into complacency and hubris by his slightly more experienced and certainly older dive buddies.

In the case of Carlos, we know what went wrong and we have evidence that the victim ignored warnings from his fellow divers. He certainly ignored best practice. He is not the first diver to make such a rookie mistake, and the fact that a few years ago he knew nothing at all about diving is truly irrelevant. He DID know what SHOULD have been done. He had sat through training and certainly had correctly answered exam questions on gas management. HE CHOSE TO IGNORE WHAT HE KNEW. This is not because of lack of experience or because he progressed rapidly. He simply ignored what he knew to be the right thing to do… that’s a function of character, poor judgement, pressure or stress: take your pick.

In the final assessment, Carlos Fonseca believed the rules did not apply to him. He certainly knew that the established practice is to ANALYSE and LABEL every cylinder that goes into the water.

Is there something to learn from this incident? Of course there is. It’s the title of this piece. But there is also something else I would like to remind you of just in case someone reading this has ANY doubt. YOUR BUDDY IS CARRYING YOUR CONTINGENCY GAS… IF YOU DO NOT KNOW WHAT IT IS (first-hand, having checked for yourself) THEN YOU SHOULD. YOU may need to breathe it at some point. There can be NO credible argument against this, in my opinion.

The Best Rescue Divers Don’t Have to Rescue

It may sound strange but it’s generally accepted that the best, most successful rescue divers don’t have to actually rescue anyone because they are able to recognize signs of impending panic and are savvy enough to intervene before true panic happens.

Of course, the question most aspiring rescue divers ask at this point goes something like: “Is that a learned skill, and if so, is it difficult to learn?”

The short answer is: yes it is, and no it isn’t!

When we imagine a rescue diver in action, what flashes before our eyes – initially at least – is an image of a neoprene-clad hero(ine) pulling an unconscious diver from the raging surf… Think GQ cover meets Surfer Magazine and you’re halfway there. Then after a few nanoseconds, the real image kicks in and it’s not so pretty; not as organized; and certainly not as heroic. The truth is that a full-blown rescue, as welcome as it may be in a disastrous situation, is simply something we should strive to avoid at all costs. In essence, a good rescue is one that may consists of a quiet word before the dive and either a change in the dive plan or a retreat to the nearest café for a coffee, a Danish pastry and a chat about tomorrow’s dive rather than today’s.

One of the pre-dive skills required in every technical diving program is something labelled stress assessment. This step in the pre-dive ritual is a vital “rescue” technique, and it applies to both self-assessment as well as buddy or team assessment.

Given that you and your buddy or buddies are certified, equipped and have the experience to enjoy your planned dive without undue risk, the day-by-day stock questions you should ask yourself are: Am I up for this dive? Do I feel good about the dive conditions today? Do I feel ready to do this dive? Am I comfortable with the things that need to be done to make sure this dive is fun? And finally, how does my buddy (or buddies) feel about the dive?

This step alone – coupled with honest answers and a real understanding that there is no shame in calling a dive at any time… even before you pull on your gear – goes a long way toward making you a “successful” rescue diver.

Speaking with divers following an aborted dive — a dive where things went absolutely pear-shaped — a sobering but not surprising statistic is the large percentage of them who say: “I just knew something was going to go wrong,” or “I had a funny feeling about the dive before we suited up.”

If a rescue diver has one simple but truly important task to do at the dock, on the beach, at the dive site before the actual in-water part of the dive starts, it’s to conduct a quick survey of every diver – including herself – to check if everyone really is happy with the dive plan and feels no pressure to do the dive.

During the dive itself, even without the use of diver to diver voice communications, there are ways to keep checking that everyone is happy. What are they? Let’s review the opening statement that was used to kick this article off… “Recognize signs of impending panic, and are savvy enough to intervene before it happens.”

This form of clairvoyance – being able to tell when something is about to fall off the rails and do something about it BEFORE it happens – is not telepathy or some other psychic power, but a perfectly attainable skill called Situational Awareness, and a good rescue diver needs it.

In the most general terms, situational awareness is perhaps the most under-rated, unsung components of safe and successful diving operations.

In advanced diving discussions, we have adopted the term Situational Awareness (SA) as a sort of catch-all phrase to describe what we mean when we say: “keenly aware”; and probably for good reasons. SA has been a core concept in high-stress operating environments, such as the military and aviation, for many years.

In these milieu, SA skills support the ability of individuals to handle complex and rapidly changing situations in which informed decisions – directly relating to personal and team well-being – need to be made under tight time constraints. In these high-stress settings, lack of SA is one of the primary factors in accidents attributed to Human Error.

For the purposes of rescue divers, SA is best described as being aware of what is happening around you and your team, and understanding how the flow of events, and the actions of team members will impact your dive’s goals and objectives; both now and in the near future.

It also encompasses the skill of selecting which bits of information are relevant and which are not and can be discarded.

Put briefly, SA is the chess-player’s skill but applied in an environment where checkmate can result in real physical harm, and not just a wooden game-piece being knocked sideways.

One key sign of a buddy’s comfort level while underwater is his or her respiration rate (at least on open circuit gear). A nice relaxed breathing rhythm generally means a nice relaxed diver. Faster breath cycles may be a sign of tension, carbon dioxide build-up, overwork, and are often the first outward sign that forewarns of events that can domino into bedlam if left unattended.

I have a good idea of my normal breathing rate during a moderate dive – it’s around eight per minute and therefore somewhere south of the adult resting average of 12 to 16 breaths per minute. I self-monitor during a dive, but I also pay attention to the bubble “signatures” of the divers around me, trying to pay particular attention to changes in the frequency of each diver’s exhalation. It’s certainly not a definitive marker of approaching problems, but a rapid increase in breathing is something a good rescue diver might want to pay attention to.

If your buddy starts to work hard and breath more heavily than usual, get their attention, slow them down, give them some reassurance — such as an OK sign and a squeeze on the arm — will show them that you are watching out for them. Something as simple as getting a diver to pause and wait for a few beats before carrying on can easily avert an unpleasant episode further along.

If you dive with the same crew on a pretty regular basis, you also learn other more subtle signs and body language that will indicate that they are less than comfortable.

As a rescue diver, it is always in YOUR best interest to pay attention to these little markers during a dive. Sure you may be capable of executing a perfect tired diver tow and safe ascent with a semi-conscious buddy, but why take the chance when that whole scenario can be avoided by stepping in a few minutes early?

A slightly different version of this article was first published in Technical Diving International’s eNewsletter in June 2013.

What it takes to lead a technical diving team: A suggested plan for staying real and managing risk

One of the most interesting dynamics of technical diving… both during its planning and execution… revolves around the issue of leadership. It’s not simply a question of who leads and who follows but a much more complex balancing act between responsibilities, experience, team composition and dive goals. And since technical diving is recognized as a high-risk, team-oriented activity, coming up with the correct answers can mean the difference between a great dive and a bad experience.

I guess the most important first step is to understand what we mean by leadership and the factors that inform that definition.

We should start by pointing out that one of the fundamental guidelines recommended is: “The weakest diver leads the dive.”

Now weakest in this context is not an assessment of physical strength or mental fortitude – although these may be factors in some cases. More usually a diver may be “weak” because he or she has less experience with the particular sort of dive being planned and how best to achieve the dive’s specific goals; or they may start the dive with another more subtle disadvantage. On some ocean dives, weakest may be the diver most prone to seasickness and who has taken meds to help deal with that particular stress. It may also be the diver who among his or her peers on the particular day in question wakes up the least rested or most stressed… as in “I’ll lead the dive today because I had a restless night.”

Whatever the actual reason for “weakness” the logic behind this guideline is that it helps eliminate “trust me dives.” In cases where the least experienced diver is the leader, it also offers the best opportunity for that diver to expand his or her comfort zone. Let’s take the example of a cave dive with a three-person team. For this example, let’s say that two of the team have explored the cave on several occasions but for one, this is her first time in. All three may be experienced cave divers, but one is certainly at a slight disadvantage. By having her LEAD the dive, two things are assured. Firstly, she will not be lead into a situation which she finds uncomfortable. Her level of comfort on the dive will most likely be increased since it will go at her pace, and with two companions to “guide” her when the time comes to make a decision – for example “is this the right side-passage to take…” – her comfort zone may be expanded but not breached.

The result will most likely be a much more enjoyable dive for everyone involved since stress levels can be better managed.

This example of leadership during the actual execution of a cave dive may not relate directly to the type of diving you do, but the logic is transferable to all varieties of technical or complex advanced diving whether in a hard overhead environment or not.

It also introduces us to part of the complexity that surrounds the whole question of Leadership in Technical diving, and its definition relative to the importance of coaching and mentorship in the process.

Let’s recap and redefine a little. The weakest diver leads during the EXECUTION of a dive, but this diver would most likely take a backseat role during the actual PLANNING of that same dive.

If we go back to our example, let’s travel by time-machine to a day or two before the execution of the dive to the time our three dive buddies sat down together to plan the dive. We know that all three are experienced cave dives and during their initial assessment of the dive’s parameters they agreed that each had the appropriate training, familiarity with the required equipment, and general experience in the type of environment. What was apparent was that one needed a detailed briefing on the specifics on the dive since she had never been to the site before. This is where the dynamics that influence leadership in technical diving comes into play.

In old-school terms, leadership might be interpreted as the behavior of a tartar or martinet. A person who demands strict adherence to his or her rules and any deviation from those rules will result in some sort of punitive reaction: verbal or otherwise. I am reasonably sure that many of you have first-hand experience of this form of bullying and “management” by intimidation. There is no place for this style of leadership in technical diving… or anywhere else actually. It may have worked to send hapless souls over the trenches during WWI but is about as useful in diving as ashtrays on a motorcycle. There is simply no room for this attitude anywhere close to technical divers planning their dive.

The leader during this stage needs to be empathetic, supportive and their role is more akin to a coach or mentor: someone who encourages others to contribute ideas and suggestions. A real leader shares knowledge, has real information, suggests better alternatives when asked, and gets satisfaction from helping others grow. Essentially, a good leader produces good leaders.
In the example of the planning for the cave dive, the leader might respond to questions about distances and times with something like: “what do you feel comfortable doing?” rather than pushing his or her agenda. In fact, an important part of the mentoring process is to promote the goals of others even when it makes their own subordinate.

For most of our dives, up-front considerations of leadership are a little over-the-top. The vast majority of dives – even technical ones – follow a pattern that is established within the team and roles and responsibilities are simple, understood and virtually unspoken. Often on this type of dive, leadership amounts to little more than: “Hey Jill, how about you run the reel today?” But when game-day brings those special dives… the apex dives for your team… give special consideration to the dynamics of team leadership. Oh, and remember that changing circumstances at depth, may alter who is “weakest” and may require change of “leadership!” But of course, that’s something best learned under the mentorship and coaching of an experienced technical instructor!

A slightly different version of this article appeared in TDI’s eNewsletter in May 2013

FREE C-CARDS…

Texting back and forth with a diver who’s signed up for some training sessions with me (he’s taking a Helitrox Deco class this spring), I was explaining which elements of his program are covered by my fees. And of course in that list of items, there was no mention of the c-cards that graduates get if they pass the course (with TDI this program comprises Advanced Nitrox and Helitrox Decompression Procedures, so two c-cards).

“How much for the cards?” He asked.

“Nothing,” I wrote. “The cards are free… you earn ’em. You can’t buy them!”

He texted back that he liked that idea. “Different to some other scuba classes I’ve taken,” he said.

This got me thinking about why, when I started to teach technical programs, I adopted the policy of “Giving Free C-Cards” to successful course graduates.

Students rarely fail the programs I offer. However, it’s not unusual for a student to have some challenges and have to do a few extra dives or work on their own for a while to grasp a concept that initially is hard to grasp… but an out-and-out fail is unusual.

Sometimes though, it happens. A student has a complete disregard for their teammates, they run out of gas repeatedly, they are simply not ready for “this type” of diving or do not have the required controls over body and mind in the water to be a technical diving. Usually, they accept my advice. Once or twice I’ve run into problems.

The one that made me very glad that I had adopted and advertized the policy that, “Your Card(s) are FREE!” took it really bad and reported me to the training department of the agency underwriting the course (which happened to be TDI).

In addition to the professional complaint, she had threatened a suit through small claims court under the assumption that her course fees included payment for c-cards. She was demanding at least that portion of the money she had paid, back. Her position was that she had paid for the course and expected to get her cards at the end of it.

Odd, don’t you think?

Anyhow, if you teach (tech or sport programs), here’s a suggestion if you do not so so already. Make it clear to your students that C-Cards are FREE, and that students earn them rather than buy them.

So, you travel with a rebreather do you?

I find myself traveling with a CCR more often than not these days, and most of the time, at least part of my journey entails airports and airport security. Surprisingly, I have few horror tales to share with you; in fact, just the opposite. I have found that with a little preparation and politeness — and leaving a few extra minutes between arriving at the terminal and my departure — things usually go very smoothly.

Let’s talk about the preparation part of the equation for a moment. Several years ago, Jill Heinerth mentioned to me that she put a note in with any rebreather kit she was carrying specifically explaining what the heck it was to security staff. I borrowed her idea.

The wording and the logos on the “letterhead” of the printed document I carry has changed a little over the years, but regardless, it always seems to work wonders. Here, for the record, is what my ‘official CCR travel document’ says.

NOTICE TO BORDER / AIRPORT SECURITY PERSONNEL

This apparatus is a Closed-Circuit Rebreather (CCR) diver life-support system and may be safely transported as cargo, checked, or carry-on baggage. The components of this CCR system consist of a scrubber head (containing a series of gas sensors and display handset powered by an encased standard user-replaceable battery); scrubber body (containing top and bottom screens, end-caps and a feed or deflection pipe); breathing loop (containing breathing hoses, Open_circuit Bailout valve (BOV), and counter-lungs); and two scuba regulator first stages each fitted with an array of low and high-pressure hoses. Additional open-circuit scuba equipment may also be carried with this CCR life-support system.

NONE of these components offers a threat to the security and safety of inspection personnel, other passengers, carrier vessels, buildings or other property, and all components conform to NOAA (National Oceanographic and Atmospheric Administration) and WRSTC (World Recreational Scuba Training Council) recreational scuba equipment guidelines for transportation by commercial carriers.

The individual transporting this equipment should be able to show proof of certification in its use and will be willing to explain its function to any security personnel upon request.

PLEASE NOTE: Any pressure vessels (scuba cylinders) accompanying this CCR life-support system MUST be dismantled and have valves REMOVED in such a way that visual inspection of the vessel’s interior is facilitated (as per TSA/FAA ruling). Failure to conform to this stipulation voids this document.

You may find that printing this out and putting it in your baggage with your rebreather helpful.

How much of a conservative are you?

When it comes to storage and use of the ‘kitty litter’ used in rebreathers to scrub carbon dioxide from the breathing gas, I had until very recently thought of myself as ultra conservative. Turns out this was not necessarily the case.

I was careful with the storage part and careful when packing or loading the scrubber canister of any unit I dived with, but it turns out I misunderstood the actual working life of the absorbent once it was partially used.

Now I should make it clear that the only absorbent I have much experience with is Sofnolime® 797. This is a product made by Molecular Products in the UK and – in my circles at least – is the gold standard for use in closed-circuit rebreather diving. For the record, I use what’s called the non-indicating variety, which means it does not change color when suffused with Carbon Dioxide.

Sofnalime® itself looks a little like a white version of the material used in a cat box (hence its street name), and is actually a triangular cross-sectioned extruded pellet made in part from calcium hydroxide with a little sodium hydroxide mixed in, and is between 1.0 mm and 2.5 mm in size. It is alkaline (a pH between 12-14), slightly water soluble, and non-corrosive – but the dust will irritate the eyes and perhaps the skin, and inhaling it is a definite no-no.

In simplest terms possible, the chemical reaction that takes place inside a rebreather’s scrubber removes carbon dioxide and produces heat and water, and turns the soda lime into chalk (calcium carbonate). Also, for the record, in addition to proper storage and handling of unused scrubber material, used soda lime should be disposed of responsibly. Whenever possible, I take it home and then spread spent scrubber material on the garden where horticultural lime might be indicated, and put the rest in our horseshoe pit.
Ok, now with that clear, let’s focus on my misunderstanding.

Rebreather manufacturers tend to rate the working life of the scrubber material in their units based on the size of the scrubber canister. Literally on the amount of kitty litter their machine holds. In a perfect world, we might ask for a slightly more scientific method to gauge this, but referring to an X-hour scrubber is the norm. Certainly, this is what I was taught… but it is not what I teach; and here’s why.

After speaking with one of the chemists at Molecular, I learned that the method commonly used to indicate the effective life of scrubber material (i.e. Sofnalime®) is incorrect. While a freshly charged scrubber may have X or Y or N hours of potential effectiveness ahead of it, that number of hours is an estimate based on continuous use.

Let’s say for example that a rebreather manufacturer designates its scrubber duration as four hours. This means up to four hours on one dive and NOT two two-hour dives back-to-back on the same scrubber. This, according to Molecular’s chemist, would be “pushing it.” There are several other considerations that should be taken into account when estimating how much ‘life’ is left in one’s scrubber but on straight, no frills, moderate depth dives (such as shallow cave dives in North Florida which would normally be to depths less than 30 metres/100 feet) after one two-hour dive on a ‘four-hour scrubber’ perhaps only an hour and a half is left, and NOT two more hours. After a couple of one-hour dives, a third dive to 45 minutes or so, will all but exhaust the remaining Sofalime® so that in actual use, the effective life – and safest interpretation – of a four-hour scrubber would be less than three hours.

Now, it should be said that estimates of scrubber duration from manufacturers tend to be conservative and are usually based on the worst type of conditions; however, I found it interesting that the guy who oversees the manufacture and testing of the active component in the little chemistry set I lug around on my back to go diving, is more conservative yet.

And I for one will follow his example from here on in.

A word or two about underwear…

What is it about the European’s and drysuits? During the past ten years or so, I’ve owned and worn six drysuits representing five different brands. Their design and materials used are different and they’ve helped keep me warm and dry for working dives and personal dives in a lot of different locations. Well, most of them have kept me warm and dry. The only suit made in the US, was a terrible investment spending more time going backwards and forwards to the manufacturer in California for “repairs” than in the water. So let’s forget that one. The other five suits are from four manufacturers based in Germany, Poland and the UK. All five suits (two from the same company) performed and continue to perform well and remain “onLine” in the Dive Locker at home ready to do service.

Now six suits over ten years is going some! Most active divers might need two suits over a ten-year span, but in my defense… well, I don’t have a defense. Truth is that I have more suits than I need. Another truth is that for the majority of my dives over the past year, I have worn suits from one single UK-based manufacturer because they are both outstanding performers. A slight conflict of interest here. A company that I do consulting work for recently signed a deal to distribute this brand of suit in Canada and the USA. However, they did so based on the feedback of several consultants they use (including me) who had been diving the suits for a year or so. Bottom line is that we liked the suits, and our advice to our client to represent the line was based on the product’s performance rather than profit margins.

Anyhow, as you know, a drysuit is only half of the system designed to keep a diver protected from the elements. The other half are the thermal undies worn under the suit. For the record, I have more of these than I have drysuits — two-piece, one-piece, light-weight, fluffy, heavy-weight, fancy and plain. A drysuit is important. Fit, comfort, dryness and its profile in the water are critical issues, but all (in the case of shell suits) or a portion (with neoprene suits) of the actual thermal protection a diver needs to stay alert, warm and comfortable in the water comes from whatever it is the diver wears under his/her suit.

Because of this perhaps, I am even more critical and more detail oriented about the thermals I wear than the drysuit that goes over the top of them. Most of the thermals I have bought or been given over the years no longer go near the water. They are too bulky, too restrictive to allow free movement, and are a drag to dry after a day on a boat or at a cave site. These I wear to walk the dog and shovel snow in the winter. I have quite the selection, and Brad — the ex-seeing-eye German Shepard who enjoys walks in the snow and helping me move the stuff from around our house — knows that when I pull a set on during the day, it’s time to go out and play. He does not dive.

What I look for in drysuit undies is really pretty simple. I find changing conditions, and water temperature at various dive sites ranging from more than 20 degrees (C) to less than 0C (winter sea water) lend themselves to a layered approach. A good base layer will work on its own for warmer temperatures and a good extreme top layer extends the comfort zone through MOST colder water. For really cold temps, a heated vest is the best solution.

I do a lot of diving in the Great Lakes and the conditions there present an additional challenge. Summer air temperatures can be in the 30s and water temperatures at depth are a pretty constant 4 degrees C (the temperature of water at its densest). This too calls for a layered approach with the layer closest to the diver’s body capable of providing good thermal protection while wicking away the inevitable perspiration that results from putting on warm garments in summer weather.

So, I am on a constant lookout for thermals that suit those varied needs. It also helps if they pack small, dry rapidly, and are made well enough to last more than a few dives before seams let go or become unravelled.

A month or so ago, I was in the UK doing a factory inspection of the O’Three facility in Dorset. The company’s drysuits are spectacular. The owners of the company have been pushing their undergarments to me for a while, and during my trip to see them in the UK, I was convinced to give their Point Below Base (PBB) system a trial at the first opportunity.

That opportunity was earlier this month, cave diving in Marianna in Florida’s pan handle. Conditions were perfect for this type of trial… Water temperatures ranging from 17 to 20 C and air temperatures all over the map from about 25 as a high and minus 3 at the start of the day on a few occasions.

The O’Three PBB+ Thermals performed very well and I am impressed. They were actually warmer than a much bulkier 200 gram one-piece suit with light wicking undies underneath. After two-hours in the water, I was as warm as toast and multiple dives were not a problem.

The PBB+ is a two-piece system consisting of a farmer john-style pants and bib with a pullover top to protect the arms and to give a little more insulation to the core.

You can read a much more detailed account of the technology, features and benefits on O’Three’s website:

http://www.othree.co.uk/products/thermal-15/pbb-2.aspx

But the Cole’s Notes version is simply this: I like the design, the materials, the insulation factor*, and PBB+’s ability to wick away moisture and dry quickly when it does get wet. Frankly, if you’re anything like me and always on the look out for something to keep you warm on those long dives, this may be the answer.

A little plug: O’Three products including PBB undies are priced competitively here in North America and available from Silent Diving LLC… or me. </commercial break>

*As an aside, I do not know how relevant readings for garment insulation based on Clo or Tog units are to describe the performance of drysuit underwear… and in any event, I have no idea if anyone at O’Three has bothered to rate their PBB+ thermals, but I also own a one-piece thermal suit from a rival manufacturer that is rated to 1.45 Clo, and the PBB+ system was warmer, and way more comfortable, and less bulky. Viva new materials… Viva new technology!

Questions to ask – and answers to expect – when you research which CCR is right for you…

Let’s take as given that your research so far has turned up that the type of diver you are, and the type of diving you like to do – now or in the near future – makes you a good candidate to invest in a closed-circuit rebreather.


So far, so good, but now you need to pick which type of rebreather is going to be the best investment. You can find plenty of help on that score… almost every CCR diver thinks his or her unit is the best around, and in a way, that can hardly be surprising since they’ve invested a lot of money and time into it. And admitting you made a mistake of that magnitude is tough for anyone to admit to.


The decision-making process WILL be easier for you if you can log a few hours on various units BEFORE making any final commitment. And the rather worn out advice that it is not the agency that counts but the instructor is actually very true with CCR training, so picking the instructor can be as important as picking a unit.


But all that said and done, there are some fundamental questions that you should be armed with before you hand over the admission fees to diving without bubbles. The list below contains a few that I think are important. Look them over. I hope they help. Let me know what you think.


Is the CCR you are considering CE approved? It should be because CE approval connotes rigorous third-party testing for important performance issues such as work of breathing and overall functionality.


What is the tested depth rating? Some manufacturers put a depth limit on their gear and diving deeper than the depth recommended in the user manual is simply a poor judgment call.


Does the CCR you’re looking at have Over the Shoulder (Front) or Rear Mounted Counterlung design? There really isn’t a great deal of difference between the two, but there are advantages to each. As far as I know, only one manufacturer offers divers the choice with BOTH options with both carrying CE Certification.


What type of Oxygen Injection System, is used in the CCR you are looking at? Options include a Constant Flow Orifice, diver adjustable Variable Flow Orifice, a Static Solenoid or a Dynamic Solenoid. If you are looking for a CCR with the option of automatic set-point control, look for one with a Dynamic Solenoid capable of delivering continuous and instant reaction to changes in oxygen partial pressure in the diving loop.


If the unit uses oxygen controllers (has an automatic option) does it have independent dual controllers? It should do otherwise there is no backup in a system that is vital to life support.


How well will it maintain constant PO2 during ascent? This really comes back to controllers. During ascent the partial pressure of oxygen in the diver’s breathing loop can drop dramatically and even to hypoxic levels as the ambient pressure drops. Unless the CCR’s oxygen controller has the ability to react correctly and rapidly to these changes, the diver is at serious risk and the unit is poorly designed.


Does it have a CO2 Scrubber performance monitor? The scrubber bed is where carbon dioxide is removed from exhaled breath. There are several factors that can have a negative effect on its performance and how effectively it does its job. Since the chemical reaction that takes place in the scrubber material generates heat, a smart way to monitor performance is to measure which portion of the bed is “hot” and display that to the diver.


Does it have a CO2 Sensor? By following a few basic “rules” and sticking to certain guidelines, CO2 breakthrough can be avoided, but many divers feel more comfortable and secure with this type of sensor in place. If you’d like one, is it available on the CCR you’re considering?


Does it have Heads Up Display (HUD) and what information does it show to the diver? An HUD is a useful tool, but some are confusing and seem less than intuitive. An HUD should convey exactly the information necessary for the diver to fly the unit safely, and this includes warning when PO2 is outside set parameters, when battery power drops, and when the scrubber bed is reaching the end of its effective life.


Does it have real-time Nitrox / Trimix Computer designed and manufactured by the same people who built the CCR? It should. Some CCRs use controllers and computers from third-party suppliers. This may suit some risk models and business plans, but this approach is outside my personal comfort level. Of course yours may vary, but I like these two “bits” of my CCR to be integrated. I also think it helps when the Quality Assurance that keeps me safe on the rebreather extends to the computer feeding me information about CCR function and my decompression status.


Does the CCR you’re looking at have Automatic Depth Setpoint switching, and can that auto function be overridden simply without lots of button pushing? This is a good feature that can help to manage the risks of decompression stress, among other issues.


Does it have audible and visual alarms for crucial issues such as low or high PO2, high CO2, and scrubber life? These items are critically important. I try to dive my unit so that no alarms are triggered, but it’s nice to know there’s a back-up.


Are parts and service availability worldwide? If you travel, it would be nice to know that in the event of something breaking, a replacement part is not sitting in a warehouse someplace on the other side of the world and a several days away from access to world-wide shipping.


How much service is required? Good industrial design and well made parts put together in an ISO 9001 factory rather than outsourced to the cheapest off-shore knock-off house cannot come close to a 100 percent guarantee that things will work as expected, but they help us to come close.


Is there a backup power source? If a machine uses battery power to function, then there should be an independent backup battery pack and a mechanism to switch seamlessly from one to the other should it be required.


Can it be upgraded for Technical Trimix Diving? Not all CCR divers are interested in technical diving, but if you one day decide to take up technical diving, ask yourself if will you have to sell your unit and start again with a new model.


Does it have PC Interface and Dive log download? This is a nice feature to have at any time, but it becomes amazing when you can send that log to the manufacturer for system diagnostics.

“What could possibly go wrong?”

For a quick and dirty definition, you might say that planning for a technical dive is mostly about working out how to deal with contingencies when something hits the fan.

Of course that definition does beg a few questions: for example, exactly which contingencies does one have to deal with during a technical dive, and how fast is the fan likely to be spinning? But as a starting point, and in particular when trying to explain what the sport is all about to someone who is neither trained in nor familiar with technical diving, it works as well as anything else.

One of the first instructor-trainers I worked with was extremely fond of charts and graphs. His students left his workshops and classes with the impression that he had pie charts, bar graphs and spread-sheets of stats for almost everything related to diving. He could tell you what percentage of aluminum 80 cylinders made in a particular year by one or two manufacturers were painted red; or the total number of snorkel keepers that sat unused in the bottom of save-a-dive kits world-wide; or how many open-water divers out of a graduating class of, say, 100 would go on to become dive masters. Totally worthless information in most instances, but what it lacked in usefulness was compensated for in a perverse way by him having lots and lots of it.

Naturally and in accordance with the laws of nature, hidden away among the chaff were a few kernels of useful data too. For example, he had a chart showing the average number of catastrophic gas emergencies year by year per 1,000 dives by certified cave divers.

Much to my disappointment, I am unable to remember any of those figures – useful or otherwise – and in any event I was reasonably sure at the time of first hearing that a good percentage of his data were suspect and most probably thrown together the evening before he was due to share them with us – his eager new instructor candidates. I believe a good number of them were creative artifacts crafted in-situ, so to speak, to add an atmosphere of scientific sincerity to his otherwise wildly entertaining, right-brain presentations.

However, what I can remember was a favorite phrase he used when outlining for us what was involved in his version of contingency planning – “covering your arse” – whether diving on our own, with buddies or with students.

“You can, without much real effort,” he would say. “Contingency yourself right out of the water, and quickly arrive at a point where any and every dive looks too risky to undertake…”

During one presentation, he said: “Let’s take as a given that poor safety engineering in life-critical systems such as low-cost scuba regulators is reasonably commonplace.” He explained that based on the average diver’s yen to save a buck on kit, you could easily create a hugely pessimistic risk assessment for that average diver: especially if you wanted to factor in bad habits like not doing proper pre-dive checks.

Following that logic, and considering the magnitude of loss associated with diving accidents (the threats of death by drowning, embolism, oxygen toxicity, severe decompression sickness, et al) any argument that the probability of said failure is unlikely was smothered.

“Quantitative arguments about kit being unlikely to give up the ghost and go pear-shaped,” he told us; “Are moot if we were to agree that the common human reaction to component failure is panic: and since we cannot reduce instances of component gear failure to zero, and panic usually results in death or injury, diving is unsafe and should never be attempted.

“Clearly this is, to a great extent, bullshit,” he said, “Otherwise we would have to wade through a slurry of dead people at every dive site we visit. But it’s worth noting that people die sometimes for no better reason than they were surprised and unprepared.” He wrapped up the lecture by explaining that the secret is to know what has the shortest odds of actually going wrong on a dive and focusing one’s primary efforts on that, but also being prepared for the unexpected.

A rational and reasonably careful look at the situation makes it obvious that all the threats presented by diving can never be eliminated. So if we want to dive, we have to learn to be happy with an action-plan that deals primarily with threats that are real and that might actually happen. And when we have that sorted out, and before venturing deeper and longer than a sport dive, we should include cover your arse strategies for the unusual… because Murphy is a devious bastard.

I should admit that I am lazy. If there is an easier way to be effective, I’ll find it; and if it’s possible to reuse something again and again until it’s frayed and worn thin, I do so without much hesitation. There are some provisos but those are my guidelines… especially for contingency dive plans.

I am a huge fan of using and reusing the Apex Dive concept. The definition of apex dive that I use and teach is that we can separate various dives into categories by considering the equipment and training required to do the dive. To some extent, the depth and gear limits outlined in most of the technical dive programs I teach, help to draw hard lines around the otherwise ill-defined concept of a “Technical Dive.”

For example, one category of apex dive is for an open-circuit staged decompression dive in open water from a “starting” depth of 30 metres (100 feet) to a maximum depth of about 45 metres (that’s around 150 feet to my non-metric American and Canadian friends). If we add to this the limits we accept is we will use one decompression gas and work within the gas volume rules for only two cylinders of bottom-mix, we have defined the apex dive for graduate from a TDI Helitrox Decompression Program.

I have written down and available in my kit a “simple” action plan for this level of dive, and it includes set waypoints, maximum duration (given a specific minimum starting gas volume), ascent schedules, bailout schedule, lost gas plans, bailout scenarios, what to do if various pieces of kit fail, how to and how long to conduct a search for a lost buddy, how to bring an injured or unconscious buddy to the surface, and so on and so forth.

This apex dive plan is designed to be used with ANY O/C dive at this level or shallower and shorter. I use a similar approach to other categories of dives to greater depths (60, 75, 85 metres for example), and shallower (to depths of only 30 metres specifically), and for dives in different environments such as caves. I also have a similar array of plans for similar dives on a closed-circuit rebreather.

Much of a plan laid out at one level, is almost exactly the same as the plans for dives at the level below or above. The gas management plans, ascent and bailout schedules change of course, but a lot of the scaffold keeping the plan upright, is common across the board. Also for each of these dive plans there is a segment you could call the “it’s been a really bad day” scenario. The situations covered in this are the ones that are unlikely to occur, but which carry with them, a really serious magnitude of loss.

Some of these situations are the “contingency yourself out of the water” scenarios that my old IT told his classes about. Notwithstanding his advice to “ignore the unlikely,” it seems prudent to me to have something in place to deal with several of the unlikely possibilities when diving deep and long.

For example, I have nothing that will help me deal with a lightning strike while hanging on a decompression line, but I do have a plan to help get me back to the surface with a broken buoyancy device. As unlikely as it is that a wing would spring a catastrophic leak underwater, most wings used in technical diving do have a ludicrously venerable weak point: the 15-cent plastic elbow that connects its inflation hose to the body of the wing itself.

While judicious handling during transportation, a good assembly and pre-dive inspection, and a bubble-check before descending can all help prevent this particular failure, losing a wing at depth would be serious, and in most cases could really ruin your day.

At some point in the past, you have probably heard the advice to dive a balanced rig. A balanced rig is, according to a definition just read on Wikipedia and a couple of diving websites, a rig that a diver can swim to the surface from depth without the help of a wing/buoyancy device when the cylinders are empty because it will then be “neutrally buoyant.” Someone with a rudimentary understanding of dive kit and basic physics might read the previous sentence and tell themselves: “yea, sounds legit.” The rest of us may be left with some nagging doubts.

For example, what’s with that “neutral with empty cylinders” nonsense? I am a fan of divers NOT getting into the water with too much ballast but cylinders are never empty and since whatever gas is in them has mass, surely in a balanced rig/broken wing scenario, gravity is going to win.

In my opinion, we need some alternative to swimming our kit and ourselves up from depth without ANY assistance. As luck would have it, we do not have to look far for some solutions.

Unlike most sport divers, few open-circuit technical divers have truly ditchable weights. Their ballast is supplied by integral items of kit such as steel primary cylinders and a stainless-steel backplate. Sidemount divers may have the option of dropping one primary cylinder if needed, but divers wearing back-mounted doubles do not. Therefore, in the event of a wing failure – however unlikely – a good plan is to have some back-up buoyancy or a structure plan that includes some potentially helpful suggestions.

Here are a couple of tactics that may help you if the inflation hose and your wing become separate entities while you are faced with a long ascent between you and a cup of hot chocolate back on the surface.

My council would be to forget trying the “swim up balanced kit” technique. By all means work on the principal of wearing a “balanced kit,” but understand that a long staged-decompression ascent is not something you want to undertake as a continuous swim.

If there is structure nearby – a wall, shelf, wreck whatever — use it to stabilize yourself. Grab it, get yourself sorted out, “talk” the situation through with your buddy and try to relax. Unless your wing failure was accompanied by a huge loss of gas from your cylinder, you have something to breathe while you think. Relax and work out your options. If there is no structure, grab your buddy and use them as a stabilizer. It’s surprisingly simple to hang onto a buddy’s harness and let them add a little additional gas to their wing to support the two of you. But it does require a little practice!

Let’s assume you are wearing a drysuit. Add a little gas to it to offset gravity a little. You may be lucky and your suit may be all the help you need. Keep your buddy or buddies close, and start your ascent. Good luck and let’s meet up for a coffee sometime… but chances are that your suit may not overcome gravity’s pull completely.

If there is an upline, make for it and use it. At this point it may be worth noting that a prussic loop can be useful place to hang from while you work on options. A prussic is simple to tie to an upline and can be used just as effectively as an ascender is used in rock climbing (their original application). I carry a length of 3mm equipment line tied in a long loop in my wetnotes for this reason.

Things should be golden with the combination of a solid upline, a drysuit and a prussic loop, plus the administrations of your buddy to help with stage deployment etc. as needed. But what if there is no upline.

This would be a good time to send a DSMB aloft. Actually, it may be prudent to deploy a DSMB even if there is an upline, depending on how your surface support has been briefed. With the exception of the very smallest, silliest “safety sausage,” a DSMB (a Delayed Surface Marker Buoy) should provide sufficient lift to support a diver in place of a wing. If you have the choice, you may prefer to hang from a line attached to a small cave or wreck reel rather than a spool in this situation, but either works just fine… and spools rarely jam or bird’s nest.

In several thousand dives, I have had one wing failure and one buddy have a complete failure. I have conducted a couple of test dives with the dump valve removed from my wing – just for the fun of it – but only one real-world failure. Therefore, the weight of logic and statistical evidence is on their side of the argument that states that this type of gear failure is highly unlikely. It really is, and chances are it will never happen to you at any time. However, next time you have a dive planned with your usual buddies at a site with a hard bottom within sensible distance of the surface, and you have nothing better to do, try this. Empty your wing completely and get yourself back to the surface using an alternative method. You will certainly learn something about yourself and possibly your buddy, and most likely you’ll have fun too.

Remember as well, it does not take much to contingency yourself out of the water, but with a little forward thinking, planning and practice, there is no need to.

Inspection of a CCR after an accident…

One of the findings at Rebreather Forum 3.0 was for CCR manufacturers and other community members to publish a worksheet to help accident investigators collect meaningful data from rebreathers involved in diver deaths. A sombre topic for sure but the need to have some “standards” and some sort of unit-specific checklists is apparent given the wide gaps in information gathering to date.

Martin Parker — the managing director of Ambient Pressure Diving, the manufacturer of Vision Rebreathers (the Inspiration, Evolution and Evolution+) — recently posted a worksheet. It is available in PDF form from the link below.

Click Here

The description of some procedures are graphic and not suitable reading perhaps for the squeamish; however, I believe this is a good start… Kudos to Martin.

AN OPEN LETTER TO NEW DIVERS ABOUT STAYING ALIVE

Hi: and congratulations on your new open-water certification. Diving is extremely cool and I hope you get as much out of the experience as you can: talk about opportunities… wow!

You probably do not recall everything you read while doing the academic work to earn your certification, so I would like to take this chance to remind you of something important: An overhead is no place for an open-water diver: period. There should be no exceptions to this.

I’m writing to tell you this because there is a chance that sometime soon, someone – perhaps a buddy or a more experienced diver, maybe even an instructor – will try to tell you differently. Please tell them they are wrong. You can quote me if you like, and you can use stronger language too, but much more importantly, you can find the same advice in training manuals from EVERY agency and any reputable dive professional. Please take the time to check this out.

Caves, caverns, and the inside of wrecks, are NOT places to find yourself without specialized training. And I do not mean advanced open-water, or rescue diver or even a divemaster or instructor training but specialized training in those specific environments. If the person, even an instructor, trying to get you into a cavern or cave, calls you a wimp or says that everything will be OK as long as you “stay close and follow me,” please walk away. It could save your life and in any event, will send the right message.

If they are an instructor, suggest they reread their standards and procedures manual – it really does not matter which agency they teach for because they ALL forbid this sort of behavior and this type of dive. Fact is, suggesting that you let them “guide” you into an overhead environment could get them reprimanded and their teaching status suspended.

A few days ago, a buddy of mine pulled an open water diver out of a cave in North Florida. Against all odds in this sort of scenario, she was alive… shaken, but alive.

Her explanation was that she went into the cave just to take a quick peek at what was in there because someone (her Dad) had convinced her that as long as she did not go in too far, she’d be fine.

In a perfect and just world, she will be able to sit down sometime soon with her idiot father to have a chat. She almost died. She would have died if my friend had not been there to find and save her. (He is, by the way, a very experienced cave instructor and explorer.)

OK, so here are some things to think about. Untrained divers kill themselves in caves with sad regularity. This has been happening for years and unfortunately continues to happen even though it is preventable. People who should know better and who have read the “rules” choose to ignore common sense and believe they are immune from the laws of physics… and Murphy.

The poor sap who ends up dead may have been told that caverns and caves are safe, and believed it. They may also have been a super master specialty open-water instructor and have a collection of badges as long as their arm, but all that means bugger-all inside a cave when they realize they are lost, are sucking seeds and stems from their almost depleted single cylinder, and start to claw at the limestone ceiling and walls wailing for salvation.

Caves can be beautiful but that beauty can become extremely ugly in a couple of heartbeats. Here are some things that have happened to untrained divers who almost died in a cavern or cave but somehow managed to find their way out.

“We only intended to swim in a little way, but there were lots of passages and we got turned around…”
“The water was really clear but my buddy crashed into the bottom and I lost sight of him and the exit. I think he is still in there…”
“We had a light between us but it went out. It was really dark and I kept swimming into the walls…
“I swum in a little way and then my octo started to freeflow…”
“We followed a line and it just stopped and then I got tangled in it…”
“I panicked when I turned and could not see the exit.”

There are no grey areas when it comes to this overhead stuff. Going in there without the right kit and training is seriously tempting fate, and there are so many other ways to enjoy yourself with scuba. Please, please, do not go into an overhead until you get training in overhead diving and get yourself some serious kit and gain the experience to use it properly.

Thanks. Now go dive… in open water.

Steve Lewis
TDI instructor trainer #6

Air Breaks… what are they, and do people take them for the wrong reason?

I find the concept of taking air breaks to manage oxygen toxicity while decompressing comparable to using a paper towel to mop up an incoming tide at the beach. Or put another way, air breaks in this context are about as useful as ashtrays on a motorcycle.

Allow me to explain. I believe oxygen toxicity is one of the biggest risks to recreational divers, especially technical divers, but air-breaks as commonly described and executed, are no substitute for proper CNS planning… and are useless as a CNS management tool in any event.

The first time I remember hearing the term air-breaks was in a conversation with a hyperbaric doctor over a bottle of wine and a grilled fish supper some years back. The context was a discussion about the practice of getting hyperbaric chamber patients on air after 20-minute spells breathing pure oxygen at a “dry depth” of 18 metres (60 feet). Of course, this therapy – part of the procedures called for in the US Navy Diving Manual – delivers an oxygen partial pressure of 2.8 bar, well in excess of the 1.6 bar recommended as a maximum for recreational divers… technical or otherwise. I have no clue how or who decided that this term was the right one to use to describe the practice of switching to a low-oxygen content gas after breathing oxygen during staged decompression stops in the water. Nor can I fathom what it can possibly have to do with managing central nervous system (or pulmonary toxicity, gods forbid) while recreational diving.

Oxygen toxicity is a condition resulting from the harmful effects of breathing oxygen at elevated partial pressures. The most serious form of oxygen toxicity has the potential to affect a diver’s central nervous system and is a result of breathing very high-partial pressures (more than one bar or atmosphere) for a relatively short period of time (less than a few minutes at extreme levels). This type of toxicity may result in a clonic-tonic seizure; which in the water usually means death by embolism or drowning. Historically, this central nervous system condition was called the Paul Bert effect. The less problematic whole-body or pulmonary condition – a function of breathing lower partial pressures (less than one bar) over much longer periods – goes under the name the Lorrain Smith Effect, after the researchers who pioneered its discovery and description in the late 19th century.

I have heard and read that divers manage both Paul Bert and even Lorrain Smith effects by taking a short “air-break” during moderately long decompressions. The typical scenario is this: A diver conducts a deep or deepish dive which earns her a lengthy series of staged decompression stops on her way back to the surface. She finishes her dive by breathing pure oxygen at 6 metres on up. In this scenario, the decompression schedule requires the diver to breathe oxygen for around 20 minutes. There are a pile of variations on this theme, but the common thread is a fair amount of time breathing a gas that is delivering around 1.6 bar of oxygen… by the way, the NOAA limit for exposure to 1.6 bar of oxygen for a diver is 45 minutes, so this type of exposure does load a diver with the potential for a CNS incident… there is no argument there.

The “air-break” myth goes something like this. At some point during her spell breathing pure oxygen – sometimes at the end and sometime mid-stream – the diver will “RESET” her CNS “clock” by switching from breathing oxygen to breathing bottom mix, air, a less oxygen-rich nitrox (typically the mix she was breathing during her ascent to her final stops). Let’s illustrate the air-break protocol with a dive profile calling for a final decompression stop for 21 minutes at six metres or 20 feet. In this example, the diver might use oxygen for ten minutes, and then switch to say an EAN50 for five minutes, and finally switch back to oxygen for eleven minutes to finish up their deco. Typically, as in this example, the time spent on an “air-break” is not credited against the decompression obligation.

What I have yet to hear fully explained is how a five-minute break from breathing pure O2 resets a diver’s CNS loading during this procedure. Actually, you may also read postings from divers who rely on the same technique to manage Lorrain Smith effect, which shows an even greater misinterpretation of the mechanism behind the syndrome*.

OK, let’s take a step back and turn on the logic filter. According to NOAA – the folks who literally set the standards for nitrox use in the recreational dive community – a period of 20 minutes breathing oxygen at 6 metres – a practice that delivers a partial pressure or oxygen depth of around 1.6 bar/ata – has a corresponding time limit of 45 minutes. When we calculate the CNS loading for a dive, we are taught to account for the CNS loading for ALL phases of the dive. That’s to say, every minute spent breathing elevated levels of oxygen. Let’s ignore whatever came before during our example dive, and let us just focus on what happens at six metres or 20 feet. In a nutshell: The diver has to account for 20 minutes on pure oxygen. The NOAA tables don’t give a rat’s behind whether those 20 minutes are accumulated in one lump or two… or three or four. Twenty minutes is 20 minutes and uses up about 44-45 percent of the total allowable time regardless! The five minutes breathing another gas – in our example we can say she used EAN50 delivering an oxygen partial pressure of about 0.8 bar – simply adds a little to the total CNS loading, albeit a very tiny about (less than one percent). There is nothing in the NOAA dive manual or any of Hamilton’s published work that tells us anything different.

Now, to set the record straight, faced with the situation outlined above and breathing pure oxygen for that long, the chances are that I would take an air-break and recommend taking one to my team-mates; however, it has NOTHING to do with CNS but rather to help optimize off-gassing.

Oxygen is a vasoconstrictor – it causes some blood vessels to shut or partially shut – which may have some effect on general perfusion levels. This does not seem like a great plan for those of us trying to eliminate dissolved inert gas.
The bottom line is this: Let’s agree to take a break from pure O2 during our deco, but let’s not confuse the issue by suggesting that doing so magically helps manage CNS toxicity. Better yet, let’s opt to employ a better option and a slightly more helpful gas. But more about that later.

* Prolonged breathing of gas with an Fio2 (Fractional Inspired Oxygen) greater than 60 kPa (0.6 bar/ata)can lead to pulmonary toxicity and eventually irreversible pulmonary fibrosis, but this takes many hours or days and does not constitute an issue for the rank and file technical diver. Most likely, the “burning” sensation and pulmonary toxicity like symptoms mentioned by technical divers breathing oxygen and oxygen-rich gas during recreational decompression is a function of breathing cold, dry air (the dew-point of oxygen in the cylinders in my fill station is marked as -40! That’s dry.) This air has the ability to dry the mucus membranes lining our lungs and bringing on something called dry-air asthma. A less far-fetched probable outcome than pulmonary toxicity.

CCR Incident (Feb 2013) – Double Cell Failure, Human Factors – Inquest Report

Totally excellent article on the dramatic influences human factors can have on our behavior… both in and out of the water.

Cognitas Incident Research & Management

CCR FatalityAn instructor was teaching two students an advanced trimix CCR class. Unfortunately due to two of the cells being current limited and the voting logic voting out the ‘good cell’, and the instructor being a victim to a number of powerful human factor biases, they had an oxygen toxicity seizure at depth. One of this buddies took the diver to the surface but never recovered.

This incident happened in February 2013 and was widely reported in the (social) media at the time, especially as it quickly became known that the diver was using cells which were 40 months old (cells 1 & 3) and 17 months old (cell 2) and a significant amount of negative criticism raised, primarily how could someone so experienced undertake such a ‘stupid’ activity, using cells well past their use-by date. Immediately afterwards, AP issued a warning about using out-of-date cells.

Unfortunately a number of technical and…

View original post 1,148 more words